Flutter is already found in headlines of mobile app development industry. The popularity waves are no surprise as top known companies like Alibaba, Google Ads, App Tree, Birch Finance and many more has already adopted Flutter. May be chances are you already have used the app of Alibaba, Google Ads which is developed by Flutter.
The product was in beta stage for long time and recently on Dec 4th 2018, Google released its first version 1.0. We have already acknowledged the excitement to know about this new transformative technology, so here’s a brief overview.
Introduction to Flutter
What is Flutter?
Flutter is an open source mobile application technology originally developed by google.
It is a complete SDK – Software Development Kit that has each and every thing you require to develop native Android and iOS apps or cross platform applications. The kit includes ready-made widgets, testing and integration APIs, rendering engine, command-line tools.
Okay, let’s answer this question, “Can you write once and deploy to both Android and iOS? Yes, with Flutter you can write once and deploy to both platforms Android and iOS. Actually more than that like desktop embedded for Linux, Mac, Android, iOS, and Fuchsia mobile device. Flutter inherits all the UI’s from the Fuchsia.
Flutter works on the reactive development architecture, but with few changes. Updating UI contents automatically at the time of updating variables in the code is one of the essential parameter about reactive programming. React Native platform works on the same rule, but it takes help of JavaScript Bridge in order to access OEM widgets. However the app faces obstacles when the app has to pass the bridge access widgets every time the app loads. Due to this functionality, it causes performance issue.
Let’s understand the basic framework of OEM widget access process:
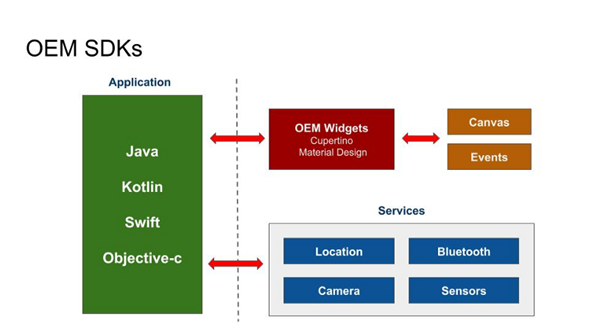
If the app needs to access OEM widgets, it has to be passed to the UI section, and it draws to the canvas while handling other events.
Reactive Method Of Working
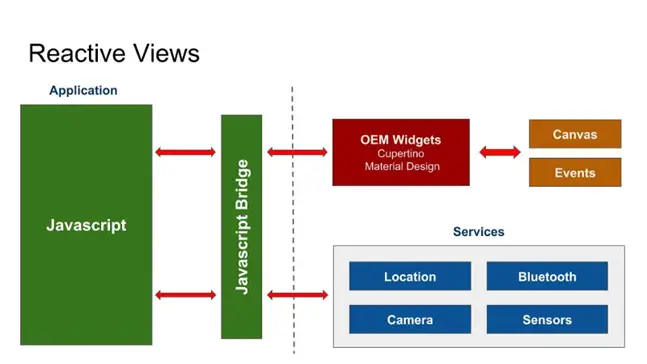
In endeavor of creating cross-app platform app, the application uses JavaScript. So, when app wants to access UI i.e. OEM Widgets, it needs to get translated into an underlying framework – JavaScript Bridge, which then has to talk to OEM UI. This one added step of bridge needs resources and time and therefore reducing performance.
The Cross-Platform Approach Of Working
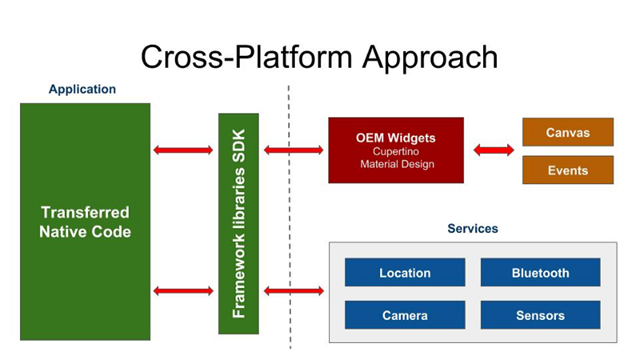
The real cross platform approach need to send their code to SDK libraries and that access OEM widgets.
The Flutter Approach
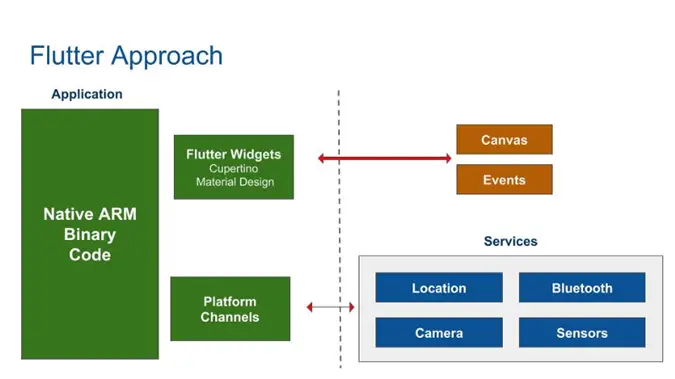
Now with Flutter, the bridge is removed and it communicates with platform by using Dart.
Checking out details about Dart? Flutter uses object-oriented language known as Dart that uses ahead-o-time compilation methods in order to compile into native code without the bridge access widgets. Due to this, app startup line is easily loaded and this boosting the speed of app load.
As shown in above picture, Flutters uses its OS as a canvas directly in order to develop the interface. Therefore, the different services like gestures, animations, rendering are directly accessed into the framework and this provides ease of control to developers.
Since we have already understand what flutter is and how it makes the development process easy, let’s check out some of its best features.
Features in Flutter
- High quality usability
- Write once and deploy to multiple platform
- Automated testing
- App’s work in a faster and smooth without hindrance
- Has rich set of widget and animation. Widget catalog in flutter. Ex: Material design, Cupertino (iOS – style) widgets.
- Generates platform specific SDK’s
- Hot reload feature for faster app development means after minor changes no need to restart the app.
- Build beautiful and high performance app with less time and money.
Pros of Flutter Development
- You can use ready-made and custom widgets for faster UI coding.
- Easy to learn and is a growing community.
- Uses language dart, which is simple and effective language to learn. Specially developed for Java programmers.
- Hot reload function for instantaneous updates.
- Internationalization and accessibility.
- Easy Portability, as it is a SDK rather than a framework.
- Widgets are directly accessible and thus guaranteed high performance.
Difference between Flutter & React Native
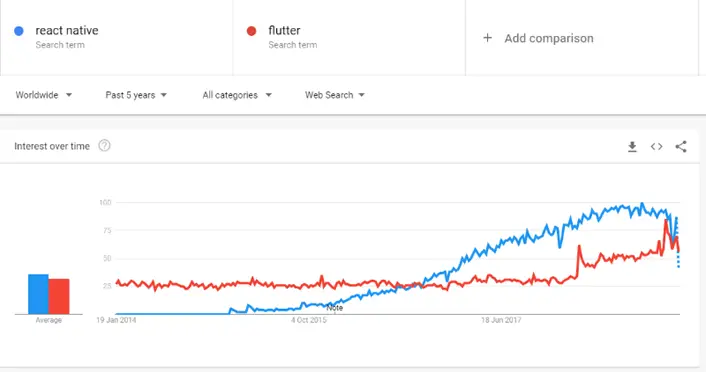
Today, mobile app developers are searching for an app development platform that allows them to code less and work fast without glitches. Two such technologies that make Native app development easy are React Native and Flutter. React Native developed in JavaScript has already gained major popularity for developing Android and iOS application. While, the recently released Flutter that is majorly promoted by Google surprises us with its outstanding features.
What happens when we compare these champions? Let’s see.
- Language
-
- Flutter uses Dart and is introduced by Google.
- React Native uses Javascript and is introduced by Facebook.
- Code Reusability
- Flutter best fits for code reusability.
- React native allows to reuse the code but restricted for a few components.
- Performance
- Flutter is faster. This is most probably true because for displaying something on the screen flutter doesn’t need any bridge (Android / iOS native Code). Except Bluetooth, Camera or other hardware related task.
- While, React native uses native android and iOS UI view for displaying UI components on the screen.
- Validate changes Instantly
- Both the framework support hot reload feature to make developer life easier
Google Trend Comparison between React Native and Flutter
How To Get Started With Flutter?
Installation Steps
We can use any text editor to write and build apps but recommended approach is android studio, VS code or Intelli J.
Here we will explain about how to install in android studio based on Linux OS: –
Step 1:
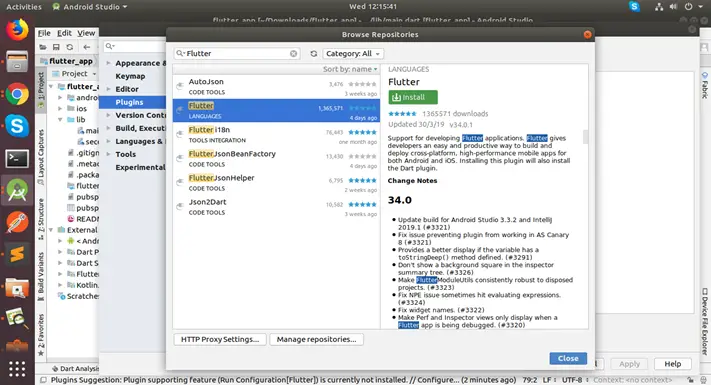
Open the android studio. Go to File -> Settings -> Plugin -> type “flutter” in search bar and click on install.
Step 2:
Install flutter SDK.
There are basically 2 ways to install SDK. They are.
File -> New -> New Flutter project -> Select Flutter Application -> Click on Install SDK
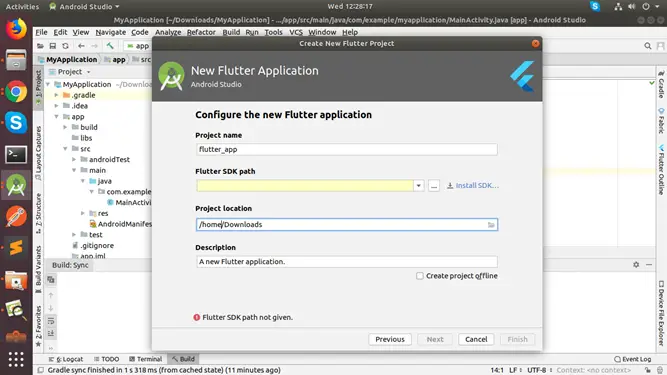
Now, give a path where you extracted the SDK. Click on next button and its done.
Can install directly from the https://flutter.dev/docs/get-started/install/linux and follow the steps as given in the document.
Now we can start writing with flutter app.
How to Code With Flutter?
We have explained how you can develop a login page.
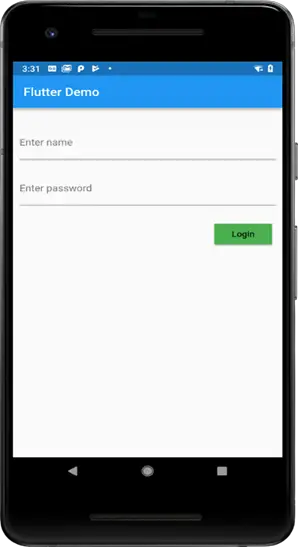
Just note that, app works only in portrait mode, and below are the code snippets.
void main()
{
 SystemChrome.setPreferredOrientations(
     [DeviceOrientation.portraitUp,DeviceOrientation.portraitDown])
     .then((_) {
   runApp(LoginScreen());
 });
}
Validation check
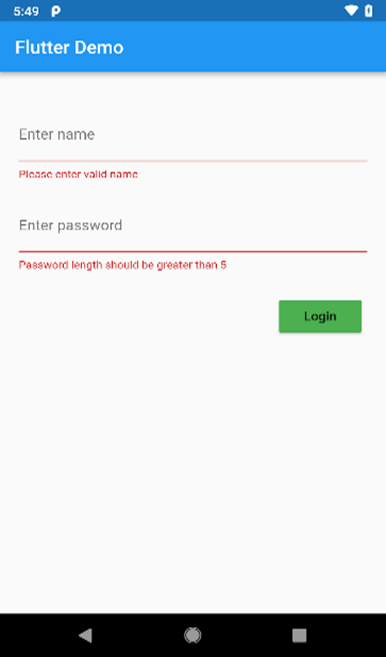
Enter name TextFormField need to check as below:
child: TextFormField(
decoration: InputDecoration(
labelText: 'Enter name',
),
validator: validateName,
onSaved: (String val) {
_name = val;
},
),

String validateName(String value) {
 if (value.length < 1) {
   return 'Please enter valid name';
 } else {
   return null;
 }
}
Enter password TextFormField need to check as below:
child: new TextFormField(
decoration: InputDecoration(
labelText: 'Enter password',
),
validator: validatePassword,
onSaved: (String val) {
_password = val;
},
obscureText: true,
),

String validatePassword(String value) {
 if(value.length<5)
   {
     return 'Password length should be greater than 5';
   }
}

OnLogin button click

RaisedButton(
padding: EdgeInsets.all(10.0),
color: Colors.green,
child: Text("Login"),
onPressed: _validatInputs,
 //start a new activity
),


void _validatInputs() {
 if (_validateKey.currentState.validate()) {
   _validateKey.currentState.save();
   //start a new activity
   Navigator.push(_mContext,
     MaterialPageRoute(builder: (context) => AnimationScreen()),);

 }
}

}
Comment down below if you have any queries related to above article.
The post Introduction to Flutter – New Mobile Application Development Technology appeared first on The Crazy Programmer.
No comments:
Post a Comment