Universal (or Isomorphic) JavaScript is a term that has become very common in the JavaScript community. It’s used to describe JavaScript code that can execute both on the client and the server.
Many modern JavaScript frameworks, like Vue.js, are aimed at building single-page applications (SPAs). This is done to improve the user experience and make the app seem faster, since users can see updates to pages instantaneously. While this has a lot of advantages, it also has a couple of disadvantages, such as long “time to content” when initially loading the app as the browser retrieves the JavaScript bundle, and some search engine web crawlers or social network robots won’t see the entire loaded app when they crawl your web pages.
Server-side rendering of JavaScript is about preloading JavaScript applications on a web server and sending rendered HTML as the response to a browser request for a page.
Building server-side rendered JavaScript apps can be a bit tedious, as a lot of configuration needs to be done before you even start coding. This is the problem Nuxt.js aims to solve for Vue.js applications.
What Nuxt.js Is
Simply put, Nuxt.js is a framework that helps you build server-rendered Vue.js applications easily. It abstracts most of the complex configuration involved in managing things like asynchronous data, middleware, and routing. It’s similar to Angular Universal for Angular, and Next.js for React.
According to the Nuxt.js docs, “its main scope is UI rendering while abstracting away the client/server distribution.”
Static Generation
Another great feature of Nuxt.js is its ability to generate static websites with the generate command. It’s pretty cool, and provides features similar to popular static generation tools like Jekyll.
Under the Hood of Nuxt.js
In addition to Vue.js 2.0, Nuxt.js includes the following: Vue-Router, Vuex (only included when using the store option), Vue Server Renderer and vue-meta. This is great, as it takes away the burden of manually including and configuring different libraries needed for developing a server-rendered Vue.js application. Nuxt.js does all this out of the box, while still maintaining a total size of 57kB min+gzip (60KB with vuex).
Nuxt.js also uses webpack with vue-loader and babel-loader to bundle, code-split and minify code.
How it works
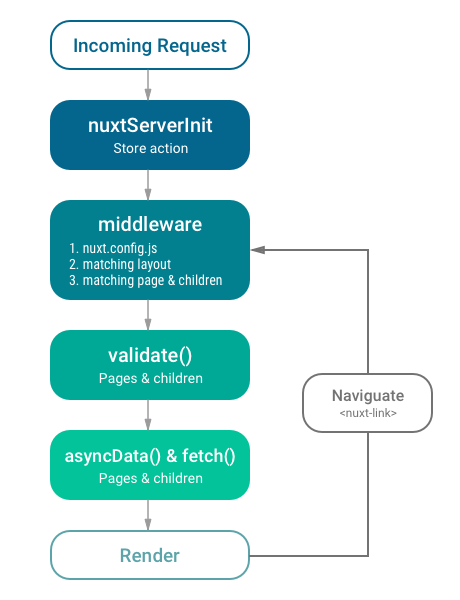
This is what happens when a user visits a Nuxt.js app or navigates to one of its pages via <nuxt-link>:
- When the user initially visits the app, if the
nuxtServerInitaction is defined in the store, Nuxt.js will call it and update the store. - Next, it executes any existing middleware for the page being visited. Nuxt checks the
nuxt.config.jsfile first for global middleware, then checks the matching layout file (for the requested page), and finally checks the page and its children for middleware. Middleware are prioritized in that order. - If the route being visited is a dynamic route, and a
validate()method exists for it, the route is validated. - Then, Nuxt.js calls the
asyncData()andfetch()methods to load data before rendering the page. TheasyncData()method is used for fetching data and rendering it on the server-side, while thefetch()method is used to fill the store before rendering the page. - At the final step, the page (containing all the proper data) is rendered.
These actions are portrayed properly in this schema, gotten from the Nuxt docs:

Creating A Serverless Static Site With Nuxt.js
Let’s get our hands dirty with some code and create a simple static generated blog with Nuxt.js. We’ll assume our posts are fetched from an API and will mock the response with a static JSON file.
To follow along properly, a working knowledge of Vue.js is needed. You can check out Jack Franklin’s great getting started guide for Vue.js 2.0 if you’re new to the framework. I’ll also be using ES6 Syntax, and you can get a refresher on that here: sitepoint.com/tag/es6/.
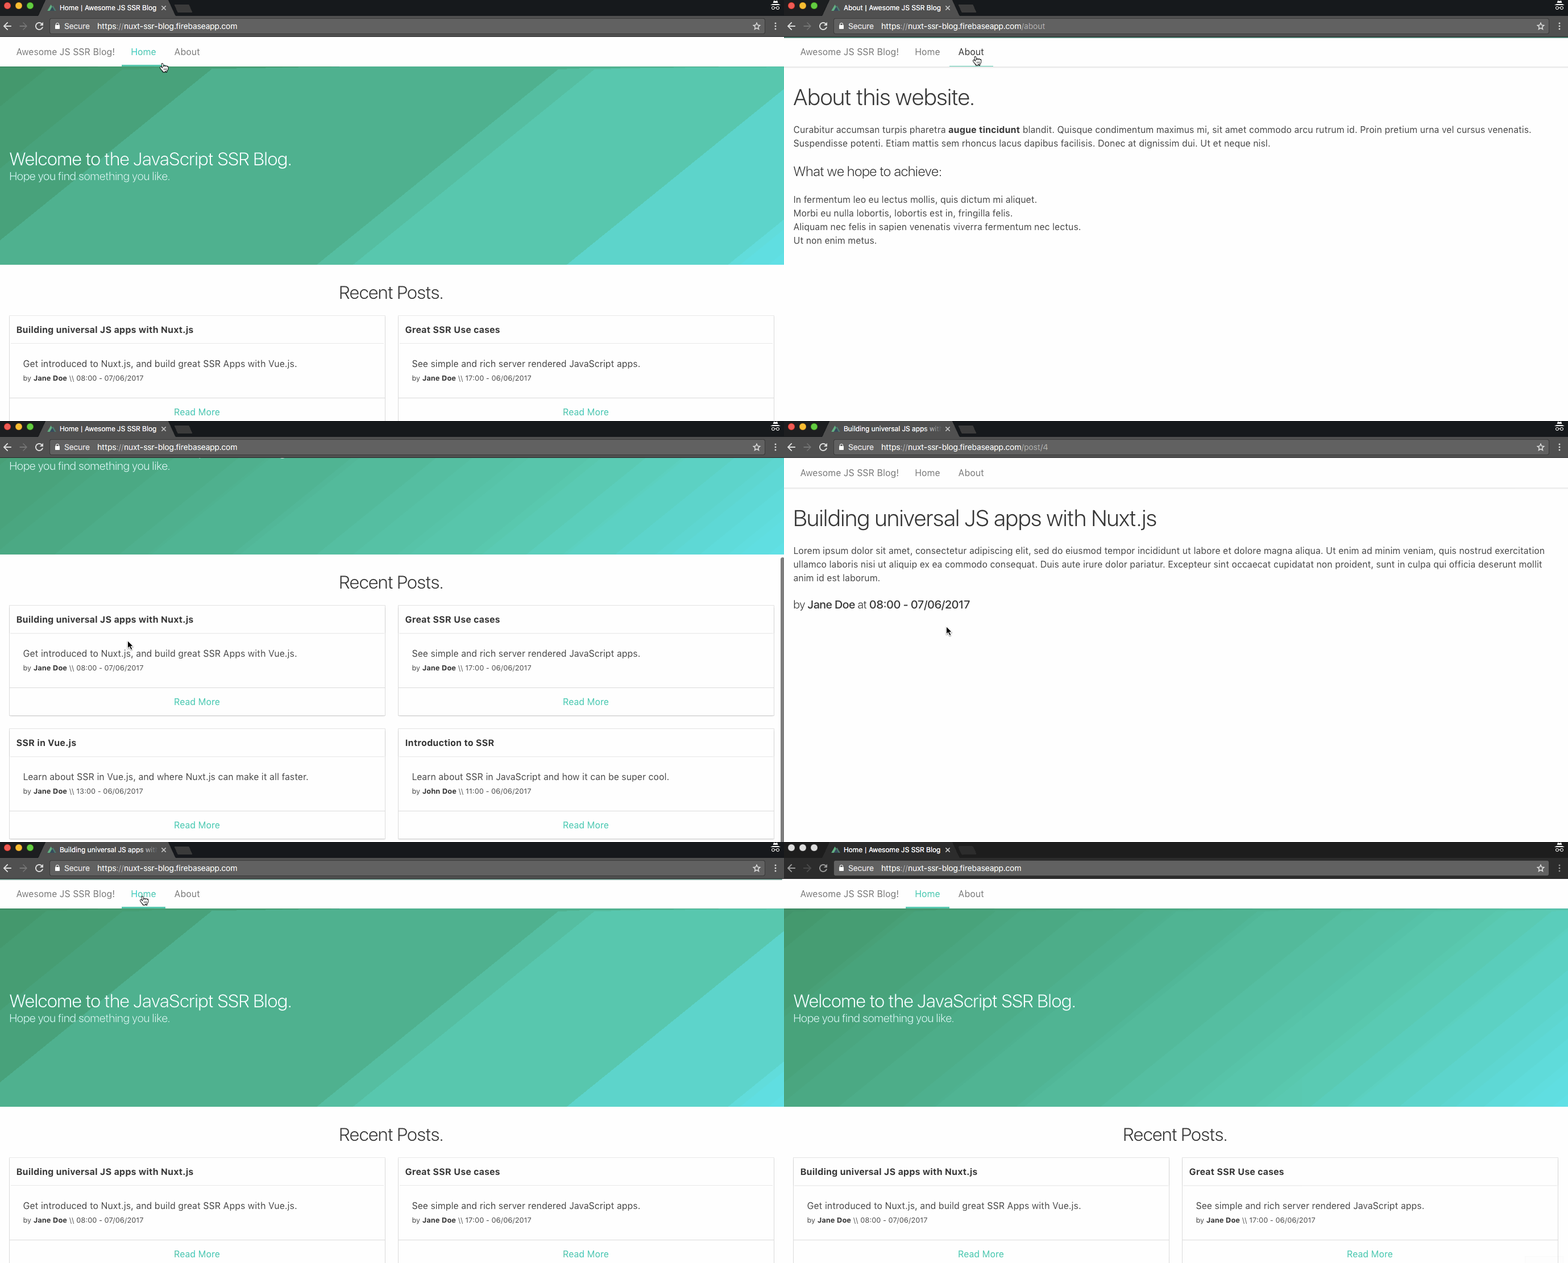
Our final app will look like this:

The entire code for this article can be seen here on GitHub, and you can check out the demo here.
Application Setup and Configuration
The easiest way to get started with Nuxt.js is to use the template created by the Nuxt team. We can install it to our project (ssr-blog) quickly using the vue-cli:
vue init nuxt/starter ssr-blog
Once you’ve run this command, a prompt will open and ask you a couple of questions. You can press Return to accept the default answers, or enter values of your own.
Note: If you don’t have vue-cli installed, you have to run npm install -g @vue/cli first, to install it.
Next, we install the project’s dependencies:
cd ssr-blog
npm install
Now we can launch the app:
npm run dev
If all goes well, you should be able to visit http://localhost:3000 to see the Nuxt.js template starter page. You can even view the page’s source, to see that all content generated on the page was rendered on the server and sent as HTML to the browser.
Next, we can make some simple configurations in the nuxt.config.js file. We’ll add a few options:
// ./nuxt.config.js

module.exports = {
  /*
   * Headers of the page
   */
  head: {
    titleTemplate: '%s | Awesome JS SSR Blog',
    // ...
    link: [
      // ...
      {
        rel: 'stylesheet',
        href: 'https://cdnjs.cloudflare.com/ajax/libs/bulma/0.7.2/css/bulma.min.css'
      }
    ]
  },
  // ...
}
In the above config file, we simply specify the title template to be used for the application via the titleTemplate option. Setting the title option in the individual pages or layouts will inject the title value into the %s placeholder in titleTemplate before being rendered.
We also pulled in my current CSS framework of choice, Bulma, to take advantage of some preset styling. This was done via the link option.
Note: Nuxt.js uses vue-meta to update the headers and HTML attributes of our apps. So you can take a look at it for a better understanding of how the headers are being set.
Now we can take the next couple of steps by adding our blog’s pages and functionalities.
The post Nuxt.js: a Minimalist Framework for Creating Universal Vue.js Apps appeared first on SitePoint.
No comments:
Post a Comment