Translate

Wednesday, 30 September 2020

Getting Started with Gatsby: Build Your First Static Site

Thinking about getting on the Jamstack bandwagon? If your answer is Yes, then Gatsby, one of the hottest platforms around, could be just what you’re looking for.

JAM stands for JavaScript, APIs, and Markup. In other words, while the dynamic parts of a site or app during the request/response cycle are taken care of by JavaScript in the client, all server-side processes take place using APIs accessed over HTTPS by JavaScript, and templated markup is prebuilt at deploy time, often using a static site generator. That’s the Jamstack. It’s performant, inexpensive to scale and offers better security and a smooth developer experience.

Why Use a Static Site

The static site model doesn’t fit all kinds of projects, but when it does it has a number of advantages. Here are a few of them.

Speed

The time it takes a website to load in the browser as the request is made for the first time is an important factor for user experience. Users get impatient very quickly, and things can only get worse on slow connections. A lack of database calls and the content being pre-generated make static sites really fast-loading.

A static site is made of static files which can be easily served all over the world using content delivery networks (CDNs). This makes it possible to leverage the data center that’s closer to where the request is being made.

Simplified Hosting

Hosting for static sites can be set up in a snap. Because there’s no database or server-side code, special languages or frameworks to support, all the hosting has to do is to serve static files.

Better Security

Without server-side code or a database, there isn’t anything for hackers to hack. There’s no hassle keeping the server up to date with security fixes and patches. All this means a lot more peace of mind when it comes to the security of your website.

Better Developer Experience

Setting up your static website with a hosting company like Netlify or Vercel is straightforward and, with continuous deployment, you just push your changes to your code repo of choice and they’re immediately reflected in the live version.

What Is Gatsby?

Gatsby is one of the most popular tools for building websites today. It’s more than a static site generator. In fact, it is a “React-based, open-source framework for creating websites and apps.” As Gatsby is built on top of React, all the React goodness is at your fingertips, which enables you to take advantage of this powerful library to build interactive components right into your static website. Gatsby is also built with GraphQL, so you can query data and display it on your website any way you want.

Installing Gatsby and Creating Your Project

Gatsby is put together using webpack, but you don’t need to worry about complicated set-up maneuvers; Gatsby CLI will take care of everything for you.

For this tutorial, I’ll assume you have Node.js installed locally. If this isn’t the case, then head over to the Node home page and download the correct binaries for your system. Alternatively, you might consider using a version manager to install Node. We have a tutorial on using a version anager here.

Node comes bundled with npm, the Node package manager, which we’re going to use to install some of the libraries we’ll be using. You can learn more about using npm here.

You can check that both are installed correctly by issuing the following commands from the command line:

node -v
> 12.18.4

npm -v
> 6.14.8

The first thing you need to do is install the Gatsby CLI. This is an npm package that lets you create a Gatsby site in a few seconds. In your terminal, write:

npm install -g gatsby-cli

With the Gasby CLI installed on your machine, you can go ahead and create your website. I’ll call it sitepoint-demo, but you’re free to call it whatever you like. In your terminal, type:

gatsby new sitepoint-demo

Once Gatsby CLI has installed all the necessary files and configured them appropriately, you’ll have a fully functioning Gatsby website ready for you to customize and build upon. To access it, move into the sitepoint-demo folder:

cd sitepoint-demo

and start the local server:

gatsby develop

Finally, open a window on http://localhost:8000 where you’ll find your shiny Gatsby site looking something like this:
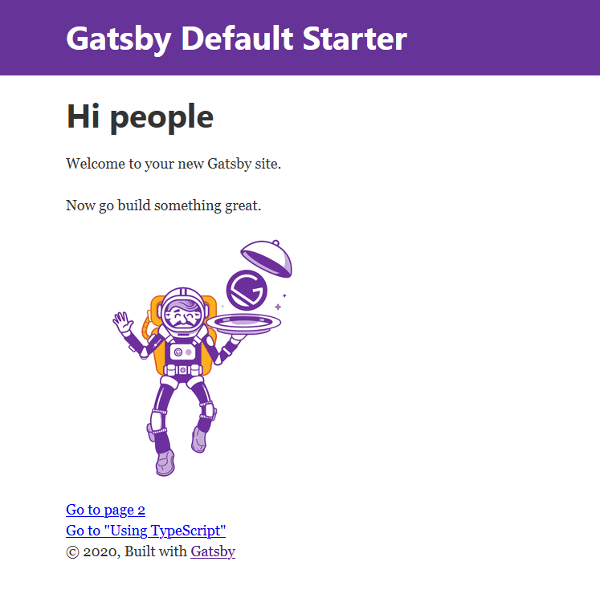
Gatsby default template

To quickly get a website up and running, Gatsby takes advantage of several official starter boilerplates as well as starters offered by the strong community around it. The site you’ve just created uses Gatsby default starter, but you can find plenty more on the Gatsby website.

If you’d like to use a different starter from the default one, you need to specify its URL in the command line, following this pattern:

gatsby new [SITE_DIRECTORY_NAME] [URL_OF_STARTER_GITHUB_REPO]

For instance, let’s say you’d like a Material Design look and feel for your site. The quickest way to create it is to use Gatsby Material Starter by typing the following command in your terminal:

gatsby new sitepoint-demo https://github.com/Vagr9K/gatsby-material-starter

Great! Now let’s take a look at the files inside your brand new Gatsby project.

A Tour Inside Your Gatsby Site

A good place to start is the /src/ directory. Here’s what you’ll find.

pages Directory

The /src/pages/ directory contains your site’s pages. Each page is a React component. For instance, your site’s home-page code is located in /pages/index.js and looks like this:

import React from "react"
import { Link } from "gatsby"
import Layout from "../components/layout"
import Image from "../components/image"
import SEO from "../components/seo"

const IndexPage = () => (
<Layout>
  <SEO title="Home" />
  <h1>Hi people</h1>
  <p>Welcome to your new Gatsby site.</p>
  <p>Now go build something great.</p>
  <div style=>
    <Image />
  </div>
  <Link to="/page-2/">Go to page 2</Link>
  <Link to="/using-typescript/">Go to "Using TypeScript"</Link>
</Layout>
)

export default IndexPage

That’s the typical code for a React component.

Components let you split the UI into independent, reusable pieces, and think about each piece in isolation. … Conceptually, components are like JavaScript functions. They accept arbitrary inputs (called “props”) and return React elements describing what should appear on the screen. — React docs.

components Directory

The /src/components/ directory is where you find general components for your website. The default starter comes with the following components: Header (header.js), Image (image.js), Layout (layout.js), and SEO (seo.js). You’re free to customize these components and add your own to the same directory.

Now you’re ready to start making changes to your new site and customize it to your taste.

How to Make Changes to Your Gatsby Site

Let’s have a go at modifying the message displayed on the home page. Open pages/index.js in your code editor and replace the two paragraphs below the <h1> tag with this paragraph:

<p>Welcome to my SitePoint Demo Site!</p>

Of course, you can add any text you want ibetween the <p> tags.

As soon as you hit Save, your changes are displayed in the browser thanks to Gatsby’s hot reloading development environment. This means that when you develop a Gatsby site, pages are being watched in the background so that when you save your work, changes will be immediately visible without needing a page refresh or a browser restart.

Gatsby makes it easy to add new pages. For instance, let’s add an About page by creating a new file, about.js, inside the /pages/ directory and enter this content:

import React from "react"

const AboutPage = () => <h1>About Me</h1>

export default AboutPage

The code above is a React functional component which displays some text.

Save your work and navigate to http://localhost:8000/about and you should see the About Me <h1> title on your screen.

You can quickly link to your new About page from the home page using the Gatsby Link component. To see how it works, open index.js in your code editor and locate this bit of code just before the </Layout> closing tag:

<Link to="/page-2/">Go to page 2</Link>

Next, replace the value of the to property with /about/ and the Go to page 2 text with About:

<Link to="/about/">About</Link>

Save your work and you should see your new link on the screen. Click on the About link and instantly you’re on the About page.

Gatsby uses the Link component for internal links. For external links, you should use the good old <a> tag, like you would on a regular vanilla HTML website.

Now, let’s experiment with your Gatsby site’s look and feel by changing a few styles.

Styling Your Gatsby Site

Gatsby offers a number of options for applying style rules to your website.

Global Stylesheet

A familiar choice is to use a global .css file which contains rules that apply to the entire website. To get started, add a /styles/ directory inside the /src/ directory and add a global.css file to it: /src/styles/global.css . You’re free to choose any name you like both for the directory and the style-sheet file. Inside global.css, add the following CSS declaration, which is going to be applied to the entire website:

body {
  background-color: yellow;
}

Now, save your work. Oops, nothing happened! Not yet, anyway. To make it work you need to take an extra step. Open gatsby-browser.js in your code editor and import the stylesheet you’ve just created:

import "./src/styles/global.css"

Head back to your browser and you should see that the background color of your website has turned into a bright yellow. Not ideal as a color choice, but it works!

Continue reading Getting Started with Gatsby: Build Your First Static Site on SitePoint.


Create a Toggle Switch in React as a Reusable Component

Implementing a Toggle Switch in React JS as a Reusable Component

In this article, we’re going to create an iOS-inspired toggle switch using React. This will be a small, self-contained component that you’ll be able to reuse in future projects. As we go, we’ll also build a simple demo React app that uses our custom toggle switch component.

We could use third-party libraries for this, but building from scratch allows us to better understand how our code is working and allows us to customize our component completely.

Forms provide a major means for enabling user interactions. The checkbox is traditionally used for collecting binary data — such as yes or no, true or false, enable or disable, on or off, etc. Although some modern interface designs steer away from form fields when creating toggle switches, I’ll stick with them here due to their greater accessibility.

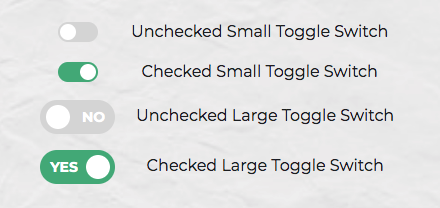
Here’s a screenshot of the component we’ll be building:

Two small and two large toggle switches in both a checked and unchecked state

Getting Started

Let’s use Create React App to get a React app up and running quickly. If you’re unfamiliar with Create React App, check out our getting started guide.

create-react-app toggleswitch

Once everything has installed, change into the newly created directory and start the server with yarn start (or npm start if you prefer). This will start the development server at http://localhost:3000.

Next, create a ToggleSwitch directory in the src directory. This is where we will make our component:

mkdir src/ToggleSwitch

In this directory, make two files: ToggleSwitch.js and ToggleSwitch.scss:

touch ToggleSwitch.js ToggleSwitch.scss

Finally, alter App.js as follows:

import React from 'react';
import ToggleSwitch from './ToggleSwitch/ToggleSwitch'

function App() {
  return (
    <ToggleSwitch />
  );
}

export default App;

The Markup

We can start with a basic HTML checkbox input form element with its necessary properties set:

<input type="checkbox" name="name" id="id" />

To build around it, we might need an enclosing <div> with a class, a <label> and the <input /> control itself. Adding everything, we might get something like this:

<div class="toggle-switch">
  <input type="checkbox" class="toggle-switch-checkbox" name="toggleSwitch" id="toggleSwitch" />
  <label class="toggle-switch-label" for="toggleSwitch">
    Toggle Me!
  </label>
</div>

In time, we can get rid of the label text and use the <label> tag to check or uncheck the checkbox input control. Inside the <label>, let’s add two <span> tags that help us construct the switch holder and the toggling switch itself:

<div class="toggle-switch">
  <input type="checkbox" class="toggle-switch-checkbox" name="toggleSwitch" id="toggleSwitch" />
  <label class="toggle-switch-label" for="toggleSwitch">
    <span class="toggle-switch-inner"></span>
    <span class="toggle-switch-switch"></span>
  </label>
</div>

Converting to a React Component

Now that we know what needs to go into the HTML, all we need to do is to convert the HTML into a React component. Let’s start with a basic component here. We’ll make this a class component, and then we’ll convert it into hooks, as it’s easier for new developers to follow state than useState.

Add the following to src/ToggleSwitch/ToggleSwitch.js:

import React, { Component } from "react";

class ToggleSwitch extends Component {
  render() {
    return (
      <div className="toggle-switch">
        <input
          type="checkbox"
          className="toggle-switch-checkbox"
          name="toggleSwitch"
          id="toggleSwitch"
        />
        <label className="toggle-switch-label" htmlFor="toggleSwitch">
          <span className="toggle-switch-inner" />
          <span className="toggle-switch-switch" />
        </label>
      </div>
    );
  }
}

export default ToggleSwitch;

At this point, it’s not possible to have multiple toggle switch sliders on the same view or same page due to the repetition of ids. We could leverage React’s way of componentization here, but in this instance, we’ll be using props to dynamically populate the values:

import React, { Component } from 'react';

class ToggleSwitch extends Component {
  render() {
    return (
      <div className="toggle-switch">
        <input
          type="checkbox"
          className="toggle-switch-checkbox"
          name={this.props.Name}
          id={this.props.Name}
        />
        <label className="toggle-switch-label" htmlFor={this.props.Name}>
          <span className="toggle-switch-inner" />
          <span className="toggle-switch-switch" />
        </label>
      </div>
    );
  }
}

export default ToggleSwitch;

The this.props.Name will populate the values of id, name and for (note that it is htmlFor in React JS) dynamically, so that you can pass different values to the component and have multiple instances on the same page. Also notice that the <span> tag doesn’t have an ending </span> tag. Instead, it’s closed in the starting tag like <span />, and in terms of JSX this is completely fine.

Test this out by changing the contents of App.js as follows:

function App() {
  return (
    <>
      <ToggleSwitch Name='newsletter' />
      <ToggleSwitch Name='daily' />
      <ToggleSwitch Name='weekly' />
      <ToggleSwitch Name='monthly' />
    </>
  );
}

Inspect the resultant output at http://localhost:3000/ (possibly using your browser’s dev tools) and ensure everything is working correctly.

Styling and SCSS

I recently wrote about styling React Components, where I compared the various ways this was possible. In that article, I concluded that SCSS is the best method, and that’s what we’ll use here.

For SCSS to work with Create React App, you’ll need to install the node-sass package:

yarn add node-sass

We’ll also need to import the correct file into our component:

// ToggleSwitch.js

import React, { Component } from 'react';
import './ToggleSwitch.scss';
...

Now for the styling. This is a rough outline of what we’re after:

  • By default, the switch is going to be only 75px wide and vertically aligned inline-block so that it’s inline with the text and doesn’t cause layout problems.
  • We’ll make sure that the control is not selectable so that users can’t drag and drop it.
  • We’ll be hiding the original checkbox input.
  • Both the ::after and ::before pseudo-elements needs to be styled and made into elements to get them into the DOM and style them.
  • We’ll also add some CSS transitions for a cool animated effect.

And this is what that looks like in SCSS. Add the following to src/ToggleSwitch/ToggleSwitch.scss:

.toggle-switch {
  position: relative;
  width: 75px;
  display: inline-block;
  vertical-align: middle;
  -webkit-user-select: none;
  -moz-user-select: none;
  -ms-user-select: none;
  text-align: left;
  &-checkbox {
    display: none;
  }
  &-label {
    display: block;
    overflow: hidden;
    cursor: pointer;
    border: 0 solid #bbb;
    border-radius: 20px;
    margin: 0;
  }
  &-inner {
    display: block;
    width: 200%;
    margin-left: -100%;
    transition: margin 0.3s ease-in 0s;
    &:before,
    &:after {
      display: block;
      float: left;
      width: 50%;
      height: 34px;
      padding: 0;
      line-height: 34px;
      font-size: 14px;
      color: white;
      font-weight: bold;
      box-sizing: border-box;
    }
    &:before {
      content: "Yes";
      text-transform: uppercase;
      padding-left: 10px;
      background-color: #f90;
      color: #fff;
    }
  }
  &-disabled {
    background-color: #ddd;
    cursor: not-allowed;
    &:before {
      background-color: #ddd;
      cursor: not-allowed;
    }
  }
  &-inner:after {
    content: "No";
    text-transform: uppercase;
    padding-right: 10px;
    background-color: #bbb;
    color: #fff;
    text-align: right;
  }
  &-switch {
    display: block;
    width: 24px;
    margin: 5px;
    background: #fff;
    position: absolute;
    top: 0;
    bottom: 0;
    right: 40px;
    border: 0 solid #bbb;
    border-radius: 20px;
    transition: all 0.3s ease-in 0s;
  }
  &-checkbox:checked + &-label {
    .toggle-switch-inner {
      margin-left: 0;
    }
    .toggle-switch-switch {
      right: 0px;
    }
  }
}

Assuming you’re following along, if you head to the dev server at http://localhost:3000/ you’ll now see four nicely styled toggle switches. Try toggling them; they should all work.

Also take a while to go through the code above. If there’s anything you’re unsure about, you can consult the Sass documentation, or head over to the SitePoint Forums and ask a question.

Dynamic Labels

Currently, the toggle options are hard coded:

.toggle-switch {
  ...
  &-inner {
    ...
    &:before {
      content: "Yes";
      ...
    }
  }
  ...
  &-inner:after {
    content: "No";
    ...
  }
  ...
}

To make the component more flexible, we can grab these dynamically from the control using HTML5 data-attributes:

&:before {
  content: attr(data-yes);
  ...
}
&-inner:after {
  content: attr(data-no);
  ...
}

We’ll hardcode the data attributes for testing, but will make this more flexible in the final version:

// ToggleSwitch.js

class ToggleSwitch extends Component {
  render() {
    return (
      <div className="toggle-switch">
        ...
        <label className="toggle-switch-label" htmlFor={this.props.Name}>
          <span className="toggle-switch-inner" data-yes="Ja" data-no="Nein"/>
          <span className="toggle-switch-switch" />
        </label>
      </div>
    );
  }
}

A Smaller Component Version

Also, for smaller screens, it would be a great idea to use a smaller version of switch, without the text. So let’s add the styling for it with some minimal sizes and removing the text:

.toggle-switch {
  ...
  &.small-switch {
    width: 40px;
    .toggle-switch-inner {
      &:after,
      &:before {
        content: "";
        height: 20px;
        line-height: 20px;
      }
    }
    .toggle-switch-switch {
      width: 16px;
      right: 20px;
      margin: 2px;
    }
  }
}

With respect to responsiveness, we should be changing the complete size, so let’s use the CSS scale function. Here we’ve covered all the Bootstrap-based responsive widths of devices:

.toggle-switch {
  ...
  @media screen and (max-width: 991px) {
    transform: scale(0.9);
  }
  @media screen and (max-width: 767px) {
    transform: scale(0.825);
  }
  @media screen and (max-width: 575px) {
    transform: scale(0.75);
  }
}

You can test this out by adding the small-switch class to the parent <div> element in ToggleSwitch.js:

class ToggleSwitch extends Component {
  render() {
    return (
      <div className="toggle-switch small-switch">
        ...
      </div>
    );
  }
}

Head back to the dev server and test your changes. If you’d like to check what you have against the finished SCSS file, you can find that here.

Theming in SCSS

Since we can use variables in SCSS, adding support for multiple color themes in our app is made easier. You can read more about this in “Sass Theming: The Never Ending Story”. We’ll be using some color themes here and change all the raw colors to variables. The first three lines are a configurable set of colors, which helps us theme our little control:

// Colors
$label-colour: #bbb;
$disabled-colour: #ddd;
$toggle-colour: #2F855A;
$white: #fff;

// Styles
.toggle-switch {
  ...
  &-label {
    ...
    border: 0 solid $label-colour;
  }
  &-inner {
    ...
    &:before {
      ...
      background-color: $toggle-colour;
      color: $white;
    }
  }
  &-disabled {
    background-color: $disabled-colour;
    cursor: not-allowed;
    &:before {
      background-color: $disabled-colour;
      cursor: not-allowed;
    }
  }
  &-inner:after {
    ...
    background-color: $label-colour;
    color: $white;
  }
  &-switch {
    ...
    background: $white;
    border: 0 solid $label-colour;
  }
  ...
}

And that’s it with the styling. Now let’s add some interactivity.

Continue reading Create a Toggle Switch in React as a Reusable Component on SitePoint.


Cisco Issues Patches For 2 High-Severity IOS XR Flaws Under Active Attacks

Cisco yesterday released security patches for two high-severity vulnerabilities affecting its IOS XR software that were found exploited in the wild a month ago.Tracked as CVE-2020-3566 and CVE-2020-3569, details for both zero-day unauthenticated DoS vulnerabilities were made public by Cisco late last month when the company found hackers actively exploiting Cisco IOS XR Software that is installed

Vulnerability In Medium Partner Program Could Allow Siphoning Writers’ Earnings

The popular content writing and sharing platform Medium had a serious security flaw. The vulnerability basically existed in the Medium

Vulnerability In Medium Partner Program Could Allow Siphoning Writers’ Earnings on Latest Hacking News.


French Logistics Giant CMA CGM Group Went Offline Following Malware Attack

The French logistics and maritime transport giant has recently fallen prey to a cyber attack. The CMA CGM Group faced

French Logistics Giant CMA CGM Group Went Offline Following Malware Attack on Latest Hacking News.


UHS Hospital Network Suffered Ransomware Attack

Another ransomware attack surfaces online. The victim belongs to the health sector, thus affecting the patients. Reportedly, several hospitals in

UHS Hospital Network Suffered Ransomware Attack on Latest Hacking News.


Fortinet VPN Flaw Exposes 200K Businesses To MiTM Attacks

While VPNs are supposed to protect users, the same tools can pose a threat to user security if found vulnerable.

Fortinet VPN Flaw Exposes 200K Businesses To MiTM Attacks on Latest Hacking News.


Google Removed 17 Android Apps With Joker Malware From Play Store

Google Play Store is a platform where threat actors keep reappearing due to its popularity and widespread use. No matter

Google Removed 17 Android Apps With Joker Malware From Play Store on Latest Hacking News.


KuCoin Cryptocurrency Exchange Hacked Losing $150M Worth Of Crypto

Another crypto exchange has suffered a loss of millions of dollars following a cyber attack. As reported, the latest victim

KuCoin Cryptocurrency Exchange Hacked Losing $150M Worth Of Crypto on Latest Hacking News.


Pastebin Introduce New Security Features: “Burn After Read” And Password Protected Pastes

The popular content pasting platform (specifically used for pasting codes) Pastebin has recently announced two new security features. These are

Pastebin Introduce New Security Features: “Burn After Read” And Password Protected Pastes on Latest Hacking News.


Airbnb Exposed Private Inboxes To Unrelated Accounts Due To Technical Glitch

Airbnb users faced a peculiar issue recently when they started seeing unrelated inboxes. It turns out that Airbnb inadvertently exposed

Airbnb Exposed Private Inboxes To Unrelated Accounts Due To Technical Glitch on Latest Hacking News.


Cisco Addressed Numerous Bugs In IOS and IOS XE With September Update Bundle

Cisco has rolled-out its biannual update bundle for its networking operating systems IOS (Internetwork Operating System) and IOS XE. The

Cisco Addressed Numerous Bugs In IOS and IOS XE With September Update Bundle on Latest Hacking News.


CISA Disclosed Malware Attack On A Federal Agency Network

The Cybersecurity and Infrastructure Security Agency (CISA) have disclosed a cyber attack on a federal agency. According to CISA, a

CISA Disclosed Malware Attack On A Federal Agency Network on Latest Hacking News.


More Apps Running HiddenAds Campaign Found On App Store And Play Store

Criminal hackers infiltrated the Google Play Store and Apple App Store with malicious apps. However, this time, the apps running

More Apps Running HiddenAds Campaign Found On App Store And Play Store on Latest Hacking News.


Chinese APT Group Targets Media, Finance, and Electronics Sectors

Cybersecurity researchers on Tuesday uncovered a new espionage campaign targeting media, construction, engineering, electronics, and finance sectors in Japan, Taiwan, the U.S., and China. Linking the attacks to Palmerworm (aka BlackTech) — likely a China-based advanced persistent threat (APT) — Symantec's Threat Hunter Team said the first wave of activity associated with this campaign began last

FBI, CISA warn of disinformation campaigns about hacked voting systems

Threat actors may spread false claims about compromised voting systems in order to undermine confidence in the electoral process

The post FBI, CISA warn of disinformation campaigns about hacked voting systems appeared first on WeLiveSecurity


Tuesday, 29 September 2020

Webflow vs WordPress: A Head-to-head Comparison

When an entrepreneur thinks about creating a new website, one option pops up right away: WordPress, the number one CMS in the world. With 38.4% of websites using WordPress, there’s no room to doubt its prominence. WordPress is to content management what Microsoft is to operating systems, Amazon to ecommerce, or Google to search.

However, in the last few years, a new contender has started to challenge WordPress’s throne: Webflow. While WordPress continues to lead in the blogosphere, Webflow has become the young prince of a new small but fast-growing kingdom known as the “the no-code movement”.

Inspired by millions of code-averse internet users, Webflow has grown rapidly to the point where some industry insiders started to question WordPress’s future as the primary option for non-technical website owners.

Is Webflow truly a contender to WordPress’s throne? Or is it a temporary threat that will never hurt WordPress’ dominance? In this article, we’ll look at what makes each company popular and the main threats to their respective positions.

WordPress: The Standard of Websites

WordPress started as nothing more than a pet project for Matt Mullenweg and Mike Little, two young developers who wanted to create an open-source blogging platform after b2/cafelog, the platform they used, stopped updating its code.

From this innocent beginning, WordPress grew to the point where today, companies as diverse as Zoom, The Walt Disney Company, and Zillow use it daily to power their blogging efforts. Media giants like Vogue, Techcrunch, and Rolling Stone see WordPress as much more than a CMS, but as the core of their entire online operations. Thanks to WordPress’ popularity, it’s safe to say that without it, much of the Web as we know it today wouldn’t work as it does.

But if you look beyond the big brand names and overwhelming statistics, WordPress continues to be nothing more than a glorified blogging platform. Up to this day, WordPress’ CMS capabilities are the reason that justifies its high adoption. Creating a website with WordPress has become the industry standard. Read any guide on starting a website, and you’ll see the same steps repeated over and over:

As a non-technical person, I remember when I created my first website around 2010. It was daunting, even a bit scary. Not having a one-click WordPress installation didn’t help. But after I followed each of the steps my hosting provider shared, I got my first WordPress-powered website up and running. To me, that was the beginning of a long-lasting relationship with WordPress — one that I continue to keep up until today.

That’s not to say that installing and using WordPress for non-technical people like myself is easy. Working so closely with PHP feels like cleaning the engines of a submarine while immersed deep underwater; you think that if you touch the wrong screw, the whole ship can sink.

Automattic, the company behind WordPress, understands these fears very well, which is why it has developed a massive community of experts and hobbyists that steer non-technical people like myself in the right direction whenever they run into any issues. This tight-knit community is one reason why, despite its technical nature, WordPress continues to stay popular among non-technical people.

If we look beyond the brand names and overwhelming statistics, WordPress’s functionality is quite limited. It was created as a blogging platform, and it continues to be so. But this hasn’t stopped it from allowing others to develop unique ad-hoc functions whenever they need them.

With over 57,000 plugins, developers have transformed WordPress from a mere blogging platform into a versatile one capable of fulfilling almost every website owner’s needs. For example, if you need a contact form, you can install a free plugin like WPForms in a few clicks. There’s no need to open the engine and code a form with HTML and PHP.

I asked Jeremy Moser, the CEO of uSERP and the owner of a SaaS tool built for WordPress, why he thinks WordPress has become so successful, and he said:

WordPress is to websites as Apple is to phones. They succeed because of a few basic reasons. 1) Market share. They dominate the current market, and word of mouth sustains it. 2) They are plug and play! You can fire up a simple WordPress site in an hour, download 10 free plugins, and have your site optimized for conversions and more. The learning curve is almost non-existent for most functionality, providing an incredibly low barrier to entry.

WordPress’s limitations become apparent when you need in-depth custom changes, either on the front or the back end. Changing a theme’s aesthetics or adding unique functionality that no existing plugin offers requires hiring developers — people whose high-value services come at a high price.

Matt Medeiros, a WordPress entrepreneur and industry expert, has observed that WordPress has stopped being the best option for entrepreneurs due to the technical hurdles setting up a WordPress-based website.

There’s a fast and furious debate going on about WordPress’ up-and-coming REST API, and whether or not it’s making it to core anytime soon.

These discussions are for the 1% of the 1%, but they send ripple effects through the future timeline of our beloved software. In fact, I’d argue this is the most defining discussion to come along in a while, which will shape what WordPress is for the next decade. If you’re someone that doesn’t live and breathe WordPress like I do, why do you care? You probably don’t and quite frankly, why take on this cognitive load?

As you’ll see, the disconnection between WordPress and its non-technical community is one of the reasons that explain Webflow’s rise.

Besides the mental stress of managing a WordPress site, serious vulnerability issues have also changed WordPress’s public perception. One study found that at least 30,823 out of 42,106 WordPress websites analyzed had security vulnerabilities that put them at hackers’ mercy. Considering the costs of a data breach, the effort of keeping up with WordPress security challenges may not be worth it.

For almost 15 years, WordPress has seen cut-throat competition from Drupal and Joomla in the CMS field to Squarespace and Wix in the page builder industry to the traditional HTML template websites found in ThemeForest. Yet none of these competitors have been able to stop WordPress from becoming the primary option for website owners and developers — until Webflow showed up.

Continue reading Webflow vs WordPress: A Head-to-head Comparison on SitePoint.


LIVE Webinar on Zerologon Vulnerability: Technical Analysis and Detection

I am sure that many of you have by now heard of a recently disclosed critical Windows server vulnerability—called Zerologon—that could let hackers completely take over enterprise networks. For those unaware, in brief, all supported versions of the Windows Server operating systems are vulnerable to a critical privilege escalation bug that resides in the Netlogon Remote Control Protocol for Domain

Government Software Provider Tyler Technologies Suffered Ransomware Attack

Continuing the trail of ransomware attack victims, now joins Tyler Technologies – a government software provider. While the service has

Government Software Provider Tyler Technologies Suffered Ransomware Attack on Latest Hacking News.


Critical Instagram App RCE Flaw Could Threaten Android And iOS Devices

Instagram has again made it to the news due to a serious security flaw. Reportedly, a critical RCE flaw existed

Critical Instagram App RCE Flaw Could Threaten Android And iOS Devices on Latest Hacking News.


Teenager Awarded $25K Bounty For Finding Stored XSS In Instagram Spark AR

A teenage researcher was awarded $25,000 as bounty for discovering a flaw affecting Instagram. Specifically, he found a stored XSS

Teenager Awarded $25K Bounty For Finding Stored XSS In Instagram Spark AR on Latest Hacking News.


Monday, 28 September 2020

How to Create a WooCommerce Store on the Cloud in 10 Minutes

While online shopping via eCommerce has been growing steadily for years, there’s been an unprecedented explosion since the start of the pandemic.

Even if you own a brick-and-mortar store, having an online presence has never been so important.

An eCommerce store doesn’t just boost your income. It provides an alternate stream of revenue, limiting your exposure to events like the one we’re currently in. And of course, an eCommerce store enables businesses to reach a much larger market than a storefront alone.

In this tutorial, we explain how you can create your eCommerce store with WooCommerce on the cloud in just ten minutes.

WordPress is one of the most popular content management systems in the world. It now powers 37.5% of all sites on the Internet, and that number isn’t inflated by all of those forgotten blogs with an audience of one. 38% of websites in the Quantcast Top 10k are WordPress-powered, too.

If you look past the Gatsby front-end, the site you’re reading this article on is powered by WordPress, too.

WooCommerce is a popular WordPress plugin that converts your WordPress site into an eCommerce store. WordPress and WooCommerce are both open source, and actively developed. The community and support for both the platform and the plugin are tremendous. It’s an easy choice for beginners and experts in web development.

But that’s enough talk. Let’s fire up a server on the cloud and create an eCommerce store.

Continue reading How to Create a WooCommerce Store on the Cloud in 10 Minutes on SitePoint.


How Businesses Can Maximize The Value Of Data Analytics

Data is perhaps the most significant resource a business can possess today, and data analytics is one of the most

How Businesses Can Maximize The Value Of Data Analytics on Latest Hacking News.


Data Security Trends for 2020

Keeping your data safe online is more important than ever. New threats arise every day, and no matter where you

Data Security Trends for 2020 on Latest Hacking News.


How To Get More Sales Leads on LinkedIn for Your Business

Summary: LinkedIn is an effective social media site for generating sales and growing your business. The website platform offers many

How To Get More Sales Leads on LinkedIn for Your Business on Latest Hacking News.


How Can Parents Monitor Snapchat Conversations?

Snapchat is one of the most popular social media platforms in the world right now. The app started as a

How Can Parents Monitor Snapchat Conversations? on Latest Hacking News.


Why Accuracy and Facial Recognition go Hand in Hand?

Introduction The Internet is awash with articles detailing the pros and cons of facial recognition technology. These arguments are taken form ethical, political,

Why Accuracy and Facial Recognition go Hand in Hand? on Latest Hacking News.


Cerberus Out, Alien Malware In! New Android Banking Trojan Has Arrived

In the previous year, Cerberus malware emerged as a powerful Android trojan. It even revamped its functionalities to become more

Cerberus Out, Alien Malware In! New Android Banking Trojan Has Arrived on Latest Hacking News.


Researchers Uncover Cyber Espionage Operation Aimed At Indian Army

Cybersecurity researchers uncovered fresh evidence of an ongoing cyberespionage campaign against Indian defense units and armed forces personnel at least since 2019 with an aim to steal sensitive information. Dubbed "Operation SideCopy" by Indian cybersecurity firm Quick Heal, the attacks have been attributed to an advanced persistent threat (APT) group that has successfully managed to stay

Red Team — Automation or Simulation?

What is the difference between a penetration test and a red team exercise? The common understanding is that a red team exercise is a pen-test on steroids, but what does that mean? While both programs are performed by ethical hackers, whether they are in-house residents or contracted externally, the difference runs deeper. In a nutshell, a pen-test is performed to discover exploitable

Twitter Warns Developers Of A Potential API Key Leak Due To Glitch

Twitter has recently confessed another security glitch in its systems. Specifically, Twitter now warns of a potential API key leak

Twitter Warns Developers Of A Potential API Key Leak Due To Glitch on Latest Hacking News.


TikTok Glitch Allows Multi-Factor Authentication Bypass – No Patch Available Yet

The popular Chinese social media app TikTok has once again made it to the news. But this time, it’s not

TikTok Glitch Allows Multi-Factor Authentication Bypass – No Patch Available Yet on Latest Hacking News.


Sunday, 27 September 2020

Saturday, 26 September 2020

Google Sunsets Chrome Web Store Payments System Affecting Paid Chrome Extensions

Google Chrome has just announced a serious change that may not be good news for many developers. In a surprise

Google Sunsets Chrome Web Store Payments System Affecting Paid Chrome Extensions on Latest Hacking News.


National Australia Bank (NAB) Launches Bug Bounty Program

In the wake of ever-increasing cybersecurity threats to the financial sector, an Australian bank has announced a much-needed step. Specifically,

National Australia Bank (NAB) Launches Bug Bounty Program on Latest Hacking News.


Week in security with Tony Anscombe

Bug let hijack Firefox browsers on other phones over Wi-Fi – NIST's new tool to help firms understand why staff fall for phishing – Almost 200 arrested in dark web crackdown

The post Week in security with Tony Anscombe appeared first on WeLiveSecurity


5 tips for better Google Drive security

As cloud storage solutions are becoming more and more popular, we look at several simple steps you can take to secure your files on Google Drive

The post 5 tips for better Google Drive security appeared first on WeLiveSecurity


Friday, 25 September 2020

FinSpy Spyware for Mac and Linux OS Targets Egyptian Organisations

Amnesty International today exposed details of a new surveillance campaign that targeted Egyptian civil society organizations with previously undisclosed versions of FinSpy spyware designed to target Linux and macOS systems. Developed by a German company, FinSpy is extremely powerful spying software that is being sold as a legal law enforcement tool to governments around the world but has also

Microsoft Windows XP Source Code Reportedly Leaked Online

Microsoft's long-lived operating system Windows XP—that still powers over 1% of all laptops and desktop computers worldwide—has had its source code leaked online, allegedly, along with Windows Server 2003. Yes, you heard that right. The source code for Microsoft's 19-year-old operating system was published as a torrent file on notorious bulletin board website 4chan, and it's for the very first

Software Engineer Salary in India 2020

Wondering how much is a Software Engineer salary in India?

You’re at the right stop, and we’ll help you get your mind clear on the scope of the Software Engineers demand in India. Besides, you’ll also understand how much average a Software Engineer makes based on different locations and work experience. 

Who is a Software Engineer or Developer?

Software Engineer

Image Source

A software engineer plays an essential role in the field of software design and development. The developer is usually the one who helps create the ways that a software design team works.

The software developer may collaborate with the creator to integrate the program’s various roles into a single structure. In addition, the engineer interacts with programmers and codecs to map different programming activities and smaller functions, merged in more significant, running programs and new applications for current applications.

Who can be a Software Engineer?

An individual must typically have a Bachelor’s in information technology, computer science, or a similar field to work as a software engineer. Many organizations choose applicants for this position that can demonstrate practical programming and coding expertise.

Generally, to become a Software Engineer, one needs the following:

  • A bachelor’s degree in Computer Engineering/Computer Science/Information Technology
  • Understanding of programming languages such as JAVA or Python
  • An acquaintance of high school mathematics 

Skills required to become an expert in Software Engineer are:

  • Python 
  • Java
  • C ++
  • Databases such as Oracle and MySQL
  • Basic networking concepts

These skills will help an individual grow their career in the field of Software Engineers or Developers.

However, one should also be familiar with the following given skills to excel and stay updated in the field of Software Engineering:

  • Object-oriented Design or OOD
  • Debugging a program
  • Testing Software 
  • Coding in modern languages such as Ruby, R and Go
  • Android Development
  • HTML, CSS, and JavaScript
  • Artificial Intelligence (AI)

Software Engineer Salary in India

According to the latest statistics from Indeed, a Software Engineer gets an average annual pay of INR 4,38,090 in India. For the past 36 months, salary figures are based on 5,031 payrolls privately submitted to India to staff and customers of software engineers through past and current job ads. A software engineer’s average period is shorter than one year. 

Software Engineer Salary in India

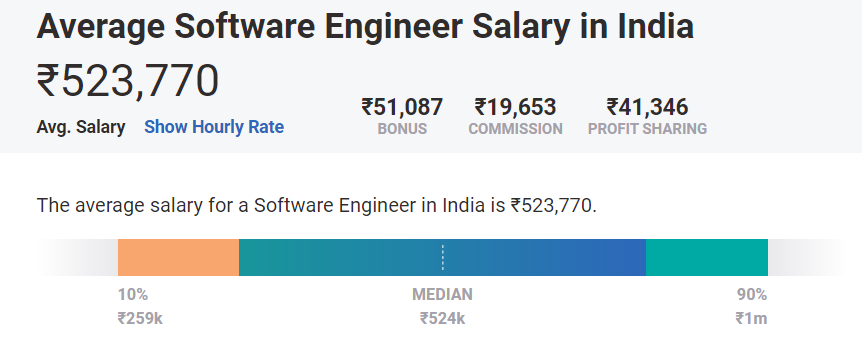
Besides, as per the Payscale Report, the average Software Engineer salary in India is around INR 5,23,770.

Average Software Engineer Salary in India

So, we can conclude on this basis that the average salary of a Software Engineer lies somewhere between INR 4 to 6 lacs. 

Software Engineer Salary in India based on Experience

A software engineer at entry-level with less than one year of experience should expect an average net salary of INR 4 lacs based on a gross compensation of 2,377 wages (including tips, incentives, and overtime work). A candidate with 1-4 years of experience as a software developer receives an annual salary of INR 5-6 lacs based on approximately 15,0000 salaries in India in different locations.

A 5-9-year midcareer software engineer receives an overall amount of INR 88,492 payout based on 3,417 salaries. An advanced software engineer with 10 to 19 years ‘ experience will get an annual gross salary of INR 1,507,360. For the last 20 years of Software Engineers’ service, they can earn a cumulative average of INR 8813,892.

Check out the Payscale graph of Software Engineer based on the work experience in India:

Software Engineer Salary graph

Top Employer Companies Salary Offering to Software Engineers in India

Company Annual Salary
Capgemini INR 331k
Tech Mahindra Ltd INR 382k
HCL Technologies INR 388k
Infosys Ltd INR 412k
Tata Consultancy Services Ltd INR 431k
Accenture INR 447k
Accenture Technology Solutions INR 455k
Cisco Systems Inc. INR 1M

The Top company names offering jobs to Software Engineers in India are Tata Consultancy Services Limited, HCL Technologies Ltd., and Tech Mahindra Ltd. The average salary at Cisco Systems Inc is INR 1.246.679, and the recorded wages are highest. Accenture Technology Solutions and Accenture’s Software Engineers earn about INR 454,933 and 446,511, respectively, and are other companies that provide high salaries for their position. At about INR 330,717, Capgemini pays the lowest. Tech Mahindra Ltd and HCL Technologies Ltd. produce the lower ends of the scale pay around INR 3,82,426 and 3,87,826.

Software Engineer Salary in India based on Popular Skills

Skill Average Salary
Python INR 6,24,306
Java INR 5,69,020
JavaScript INR 5,31,758
C# INR 5,03,781
SQL INR 4,95,382

Python, Java, and JavaScript skills are aligned with a higher overall wage. On the other hand, C# Programming Language and SQL skills cost less than the average rate. 

Software Engineer Salary in India based on Location

Location Average Salary
Bangalore INR 5,74,834
Chennai INR 4,51,541
Hyderabad INR 5,14,290
Pune INR 4,84,030
Mumbai INR 4,66,004
Gurgaon INR 6,53,951

Haryana receives an average of 26.6% higher than the national average workers of Software Engineer in the Gurgaon job category. In Bangalore, Karnataka (16.6% more), and Hyderabad, Andhra Pradesh (3.6 percent more), these work types also indicate higher incomes than average. In Noida, Uttar Pradesh, Mumbai, Maharashtra, and Chennai, Tamil Nadu, the lowest salaries were found (6.6% lower). The lowest salaries are 4.7% lower.

Software Engineer Salary in India based on Roles

Role Average Salary
Senior Software Engineer
INR 486k – 2m
Software Developer INR 211k – 1m
Sr. Software Engineer / Developer / Programmer INR 426k – 2m
Team Leader, IT INR 585k – 2m
Information Technology (IT) Consultant INR 389k – 2m
Software Engineer / Developer / Programmer INR 219k – 1m
Web Developer INR 123k – 776k
Associate Software Engineer INR 238k – 1m
Lead Software Engineer INR 770k – 3m
Java Developer INR 198k – 1m

FAQs related to Software Engineering Jobs and Salaries in India

Q1. How much do Software Engineer employees make?

The average salary for jobs in software engineering ranges from 5 to 63 lacs based on 6619 profiles. 

Q2. What is the highest salary offered as Software Engineer?

Highest reported salary offered to the Software Engineer is ₹145.8lakhs. The top 10% of employees earn more than ₹26.9lakhs per year. The top 1% earn more than a whopping ₹63.0lakhs per year.

Q3. What is the median salary offered as Software Engineer?

The average salary estimated so far from wage profiles is approximately 16.4 lacs per year.

Q.4 What are the most common skills required as a Software Engineer?

The most common skills required for Software Engineering are Python, Java, JavaScript, C#, C, and SQL.

Q5. What are the highest paying jobs as a Software Engineer?

The top 5 highest paying jobs as Software Engineer with reported salaries are:

  • Senior Sde – ₹50.4lakhs per year
  • Sde 3 – ₹37.5lakhs per year
  • Sde Iii – ₹33.2lakhs per year
  • Chief Software Engineer – ₹32.6lakhs per year
  • Staff Software Test Engineer – ₹30.6lakhs per year

Conclusion

In India, the pay of Software Engineers is one of the country’s most giant packs. How much you value will depend on your abilities, your background, and the community you live in.

The Software Engineer salary in India depends on so many factors that we’ve listed in this post. Based on your expertise level and your work experience, you can extract as high CTC per annum in India as in other countries.

Cheers to Software Engineers!

The post Software Engineer Salary in India 2020 appeared first on The Crazy Programmer.


Fortinet VPN with Default Settings Leave 200,000 Businesses Open to Hackers

As the pandemic continues to accelerate the shift towards working from home, a slew of digital threats have capitalized on the health concern to exploit weaknesses in the remote work infrastructure and carry out malicious attacks. Now according to network security platform provider SAM Seamless Network, over 200,000 businesses that have deployed the Fortigate VPN solution to enable employees to

Shopify Disclose Security Breach By Two Of Its Employees

The e-commerce giant Shopify has now fallen prey to an insider issue. Specifically, Shopify has disclosed a security breach caused

Shopify Disclose Security Breach By Two Of Its Employees on Latest Hacking News.


Ray‑Ban parent company reportedly suffers major ransomware attack

There is no evidence that cybercriminals were also able to steal customer data

The post Ray‑Ban parent company reportedly suffers major ransomware attack appeared first on WeLiveSecurity


Thursday, 24 September 2020

Microsoft Leaked Bing Data Online Through An Unsecured Server

While data leak incidents via exposed servers aren’t uncommon, this time, the ignorant firm is a tech giant. Reportedly, Microsoft

Microsoft Leaked Bing Data Online Through An Unsecured Server on Latest Hacking News.


Firefox 81 Rolls Out With High-Severity Bug Fixes

Mozilla Firefox browser’s latest version is out. With Firefox 81, Mozilla has released numerous bug fixes including patches for code-execution

Firefox 81 Rolls Out With High-Severity Bug Fixes on Latest Hacking News.


Major Instagram App Bug Could've Given Hackers Remote Access to Your Phone

Ever wonder how hackers can hack your smartphone remotely? In a report shared with The Hacker News today, Check Point researchers disclosed details about a critical vulnerability in Instagram's Android app that could have allowed remote attackers to take control over a targeted device just by sending victims a specially crafted image. What's more worrisome is that the flaw not only lets attackers

179 arrested in massive dark web bust

The sting is said to be the US Government’s largest operation targeting crime in the internet’s seedy underbelly

The post 179 arrested in massive dark web bust appeared first on WeLiveSecurity


Wednesday, 23 September 2020

Detecting and Preventing Critical ZeroLogon Windows Server Vulnerability

If you're administrating Windows Server, make sure it's up to date with all recent patches issued by Microsoft, especially the one that fixes a recently patched critical vulnerability that could allow unauthenticated attackers to compromise the domain controller. Dubbed 'Zerologon' (CVE-2020-1472) and discovered by Tom Tervoort of Secura, the privilege escalation vulnerability exists due to the

Activision Data Breach Leaves 500,000 Call Of Duty Players’ Accounts At Risk

Another day, another breach. This time, it’s the gamers’ community that may suffer. According to reports, Activision has faced a

Activision Data Breach Leaves 500,000 Call Of Duty Players’ Accounts At Risk on Latest Hacking News.


New Phishing Campaign Evades Security Checks With Hexadecimal IP Addresses

A new phishing campaign has emerged. As observed, this phishing campaign makes use of hexadecimal IP addresses instead of the

New Phishing Campaign Evades Security Checks With Hexadecimal IP Addresses on Latest Hacking News.


How MMORPGs Work

There are several ways to create a data flow needed for MMORPG but usually, it requires a server and a

How MMORPGs Work on Latest Hacking News.


More Bugs Discovered In Discount Rules for WooCommerce Plugin

It hasn’t been long since we heard of multiple security bugs in the Discount Rules for WooCommerce Plugin. Yet, recently,

More Bugs Discovered In Discount Rules for WooCommerce Plugin on Latest Hacking News.


11 Essential Tips for Loan App Development in 2021

So you are planning to create a loan app? But not sure where to get started? If your answer is

11 Essential Tips for Loan App Development in 2021 on Latest Hacking News.


10 ways to make your smartphone an impregnable gadget

Currently, almost all of our life depends on smartphones. They control purchases, paying bills, communication, searching for something, have the

10 ways to make your smartphone an impregnable gadget on Latest Hacking News.


Most Popular Crowdfunding Platforms

Because of the clear benefits of crowdfunding, there are a ton of options in the market to choose from.  There

Most Popular Crowdfunding Platforms on Latest Hacking News.


Firefox for Android Bug Allows Hijacking Other Phones’ Browsers Over WiFi

A serious bug exists in Firefox for Android browsers that allows hijacking other phones’ browsers connected on the WiFi. Upgrade

Firefox for Android Bug Allows Hijacking Other Phones’ Browsers Over WiFi on Latest Hacking News.


US Department of Commerce Bans TikTok and WeChat Transactions

TikTok and WeChat users in the United States might suffer in the coming days due to the authorities’ latest decision.

US Department of Commerce Bans TikTok and WeChat Transactions on Latest Hacking News.


Mozilla Sunsets Firefox Send; Firefox Notes To Follow

Earlier this year, Mozilla’s file-sharing product Firefox Send made it to the news due to its exploitation for malware distribution.

Mozilla Sunsets Firefox Send; Firefox Notes To Follow on Latest Hacking News.


A New Hacking Group Hitting Russian Companies With Ransomware

As ransomware attacks against critical infrastructure continue to spike in recent months, cybersecurity researchers have uncovered a new entrant that has been actively trying to conduct multistage attacks on large corporate networks of medical labs, banks, manufacturers, and software developers in Russia. The ransomware gang, codenamed "OldGremlin" and believed to be a Russian-speaking threat

New tool helps companies assess why employees click on phishing emails

NIST’s tool can help organizations improve the testing of their employees’ phish-spotting prowess

The post New tool helps companies assess why employees click on phishing emails appeared first on WeLiveSecurity


6 Reasons to Consider to Switch Your Hosting Provider

Did you know that your business website acts as your door to the greater world? But whatever that makes this possible is your web host. No matter the professionalism that you might employ in crafting your website, if you don’t walk with the right web hosting provider, no customer will be able to land on your site.

Nothing is more frustrating than when customers are looking forward to purchasing your products but when they try to navigate through your website, they find a 404 page. This is very detrimental to your business. That’s why you need to choose the best web hosting provider.

Not all hosting providers are made equal. You need to research both the reputation and make sure they meet your needs and have a clean track record. There are some reliable web hosting providers like Hostinger Global who offer world-class web hosting services. However, not all plans and offers are made equal, so understanding your project and its platform is a must.

web hosting

Let’s dive into the six key reasons that may indicate that it’s time to change your web hosting provider.

1. Check if Your Bandwidth Usage is Always Maximum

If at all you need your business to grow optimally, you need a web hosting provider that understands all your needs. Besides, you cannot walk with a partner who doesn’t offer what your potential customers expect. And if your current provider can’t guarantee these, you have the best reason to quit.

Sometimes, when you do not hit the maximum bandwidth usage, some web hosts try tricking you with other features or even lowering your rates. But do not fall into the trap—there’s always no substitute for having the top resources to run your site and hit the best possible traffic.

Be sure to track your resource usage on the regular, and keep a pin in the tendencies and traffic you get to your website.

2. You’re Receiving Calls from Your Web Host About Your Site’s Traffic

As you know, there are many web host providers who have hosted a large number of small businesses on shared hosting. As your business grows at an amazing rate and you start receiving more and more traffic, these web hosts may start complaining instead of congratulating you.

But do not get them wrong – they do this because of the business model they adopted. Do not try to argue with them – they might not be in a position of accommodating your growing business or they are just happy dealing only with the small businesses.

When you feel that your current web host does not want you around for any reason, do not waste your time trying to make it happen – just switch!

3. Your Current Web Hosting Isn’t Meeting Your E-Commerce or Streaming Needs

Understand that business websites are a bit different from other types of sites. If you have a web host that doesn’t recognize this, then you are not walking with the right partners. For instance, features that should be available for a business website can be completely different from sites that are wholly meant for blogging.

Try to determine if you are receiving services that are meant for your business. In case you find that you aren’t getting professional web hosting services, just move to the next hosting provider.

4. Online Customer Support Unavailable Mostly

No matter how smart your web hosting provider might be, you can always encounter technical issues that you may call for help. There’s nothing amazing about it – everyone, even professionals fall under this problem.

The only thing that you should understand is that your web hosting providers are the ones who can easily sort you out even if you are an IT guru.

Ever called your host and feel that they are hiding something from you or postpone fixing the issues? These problems are most common to the web hosting providers who try to act as if they were a bigger company whereas they are just a startup.

A reputable web hosting provider is like your business partner – they will disclose to you all the problems even if they emanated from their end. Why are these companies that frank to you?

Because they will always try to inform you how they plan to handle your issue if it’s out of their hands or when they will be at a position to and even the ETA (expected time of arrival) of a solution.

Additionally, if you’re running into issues and their customer support team seems to rarely ever respond to live chats, calls, or leave your emails on “read,” it’s high time for you to switch.

5. Your Current Web Host Not Growing with the Technology

Technology is always growing at a very fast pace. Newer apps are popping into the market with each hour that passes. Your web hosting provider needs to seamlessly integrate with these applications. And if you feel they aren’t able—you have a perfect reason to switch.

You may try to add these apps on your end but mostly you will encounter problems with the third-party apps. A perfect web host will always be at par with the current technology and ensure that your functionality is at maximum levels while ensuring top-notch security.

6. UX Doesn’t Allow You to Make Changes to Your Website

In the current day, you have all the ability to make any changes that you deem best for your site on your user interface. You don’t have all the time to always call your web host’s customer support for every little problem that you encounter.

And if this is what you are undergoing, your competitors will outpace you in the long run – you will become frustrated with the time spent on your phone instead of your business operations.

All you require is a web host provider that gives you a perfect user interface that you can easily handle at your site. When this is done, you will realize that you will be way ahead of your competitors who always rely on their web host customer support to resolve even the minor issues—a very inefficient practice.

Before You Leave

As far as you feel that you are not getting the best value for your bucks in the current web hosting provider, it’s time to leave. The good news is that moving from one web host to the other is not a daunting task.

In fact, when you realize that you are moving to a service that will help you creep to the top of your business earning as well as a customer response, you will understand how easy the task is.

Don’t forget that switching web host providers is switching your distribution. Switching to the best web host provider should be a well-thought undertaking. This is because you are choosing a long-term partner who you trust will scale your business into great heights.

Author Bio:

Mary is a founder and chief editor at her digital content and SEO agency PRable.org. She is passionate about digital marketing innovations. The technologies and online businesses are her engines she loves to write about.

The post 6 Reasons to Consider to Switch Your Hosting Provider appeared first on The Crazy Programmer.


Tuesday, 22 September 2020

Unsecured Microsoft Bing Server Exposed Users' Search Queries and Location

A back-end server associated with Microsoft Bing exposed sensitive data of the search engine's mobile application users, including search queries, device details, and GPS coordinates, among others. The logging database, however, doesn't include any personal details such as names or addresses. The data leak, discovered by Ata Hakcil of WizCase on September 12, is a massive 6.5TB cache of log

British Hacker Sentenced to 5 Years for Blackmailing U.S. Companies

A UK man who threatened to publicly release stolen confidential information unless the victims agreed to fulfill his digital extortion demands has finally pleaded guilty on Monday at U.S. federal district court in St. Louis, Missouri. Nathan Francis Wyatt , 39, who is a key member of the infamous international hacking group 'The Dark Overlord,' has been sentenced to five years in prison and

Mozilla fixes flaw that let attackers hijack Firefox for Android via Wi‑Fi

Attackers could have exploited the flaw to steal victims’ login credentials or install malware on their devices

The post Mozilla fixes flaw that let attackers hijack Firefox for Android via Wi‑Fi appeared first on WeLiveSecurity


Monday, 21 September 2020

How to Replace Redux with React Hooks and the Context API

The most popular way to handle shared application state in React is using a framework such as Redux. Quite recently, the React team introduced several new features which include React Hooks and the Context API. These two features effectively eliminated a lot of challenges that developers of large React projects have been facing. One of the biggest problems was “prop drilling”, which was common with nested components. The solution was to use a state management library like Redux. This, unfortunately, came with the expense of writing boilerplate code. But now it’s possible to replace Redux with React Hooks and the Context API.

In this tutorial, you’re going to learn a new way of handling state in your React projects, without writing excessive code or installing a bunch of libraries — as is the case with Redux. React hooks allow you to use local state inside function components, while the Context API allows you to share state with other components.

Prerequisites

In order to follow along with this tutorial, you’ll need to be familiar with the following topics:

The technique you’ll learn here is based on patterns that were introduced in Redux. This means you need to have a firm understanding of reducers and actions before proceeding. I’m currently using Visual Studio Code, which seems to be the most popular code editor right now (especially for JavaScript developers). If you’re on Windows, I would recommend you install Git Bash. Use the Git Bash terminal to perform all commands provided in this tutorial. Cmder is also a good terminal capable of executing most Linux commands on Windows.

You can access the complete project used in this tutorial at this GitHub Repository.

About the New State Management Technique

There are two types of state we need to deal with in React projects:

  • local state
  • global state

Local states can only be used within the components where they were defined. Global states can be shared across multiple components. Previously, defining a global state required the installation of a state management framework such as Redux or MobX. With React v16.3.0, the Context API was released, which allows developers to implement global state without installing additional libraries.

As of React v16.8, Hooks have allowed implementation of a number of React features in a component without writing a class. Hooks brought vast benefits to the way React developers write code. This includes code reuse and easier ways of sharing state between components. For this tutorial, we’ll be concerned with the following React hooks:

useState is recommended for handling simple values like numbers or strings. However, when it comes to handling complex data structures, you’ll need the useReducer hook. For useState, you only need to have a single setValue() function for overwriting existing state values.

For useReducer, you’ll be handling a state object that contains multiple values with different data types in a tree-like structure. You’ll need to declare functions that can change one or more of these state values. For data types such as arrays, you’ll need to declare multiple immutable functions for handling add, update and delete actions. You’ll see an example of this in a later section of this tutorial.

Once you declare your state using either useState or useReducer, you’ll need to lift it up to become global state using React Context. This is done by creating a Context Object using the createContext function provided by the React library. A context object allows state to be shared among components without using props.

You’ll also need to declare a Context Provider for your context object. This allows a page or a container component to subscribe to your context object for changes. Any child component of the container will be able to access the context object using the useContext function.

Now let’s see the code in action.

Setting Up the Project

We’ll use create-react-app to jump-start our project quickly:

$ npx create-react-app react-hooks-context-app

Next, let’s install Semantic UI React, a React-based CSS framework. This isn’t a requirement; I just like creating nice user interfaces without writing custom CSS:

yarn add semantic-ui-react fomantic-ui-css

Open src/index.js and insert the following import:

import 'fomantic-ui-css/semantic.min.css';

That’s all we need to do for our project to start using Semantic UI. In the next section, we’ll look at how we can declare a state using the useState hook and uplifting it to global state.

Counter Example: useState

For this example, we’ll build a simple counter demo consisting of a two-button component and a display component. We’ll introduce a count state that will be shared globally among the two components. The components will be a child of CounterView, which will act as the container. The button component will have buttons that will either increment or decrement the value of the count state.

Let’s start by defining our count state in a context file called context/counter-context.js. Create this inside the src folder and insert the following code:

import React, { useState, createContext } from "react";

// Create Context Object
export const CounterContext = createContext();

// Create a provider for components to consume and subscribe to changes
export const CounterContextProvider = props => {
  const [count, setCount] = useState(0);

  return (
    <CounterContext.Provider value={[count, setCount]}>
      {props.children}
    </CounterContext.Provider>
  );
};

We’ve defined a state called count and set the default value to 0. All components that consume the CounterContext.Provider will have access to the count state and the setCount function. Let’s define the component for displaying the count state in src/components/counter-display.js:

import React, { useContext } from "react";
import { Statistic } from "semantic-ui-react";
import { CounterContext } from "../context/counter-context";

export default function CounterDisplay() {
  const [count] = useContext(CounterContext);

  return (
    <Statistic>
      <Statistic.Value>{count}</Statistic.Value>
      <Statistic.Label>Counter</Statistic.Label>
    </Statistic>
  );
}

Next, let’s define the component that will contain buttons for increasing and decreasing the state component. Create the file src/components/counter-buttons.js and insert the following code:

import React, { useContext } from "react";
import { Button } from "semantic-ui-react";
import { CounterContext } from "../context/counter-context";

export default function CounterButtons() {
  const [count, setCount] = useContext(CounterContext);

  const increment = () => {
    setCount(count + 1);
  };

  const decrement = () => {
    setCount(count - 1);
  };

  return (
    <div>
      <Button.Group>
        <Button color="green" onClick={increment}>
          Add
        </Button>
        <Button color="red" onClick={decrement}>
          Minus
        </Button>
      </Button.Group>
    </div>
  );
}

As it is, the useContext function won’t work since we haven’t specified the Provider. Let’s do that now by creating a container in src/views/counter-view.js. Insert the following code:

import React from "react";
import { Segment } from "semantic-ui-react";

import { CounterContextProvider } from "../context/counter-context";
import CounterDisplay from "../components/counter-display";
import CounterButtons from "../components/counter-buttons";

export default function CounterView() {
  return (
    <CounterContextProvider>
      <h3>Counter</h3>
      <Segment textAlign="center">
        <CounterDisplay />
        <CounterButtons />
      </Segment>
    </CounterContextProvider>
  );
}

Finally, let’s replace the existing code in App.js with the following:

import React from "react";
import { Container } from "semantic-ui-react";

import CounterView from "./views/counter-view";

export default function App() {
  return (
    <Container>
      <h1>React Hooks Context Demo</h1>
      <CounterView />
    </Container>
  );
}

You can now fire up the create-react-app server using the yarn start command. The browser should start and render your counter. Click the buttons to ensure that increment and decrement functions are working.

You can also test this code on CodePen.

See the Pen
qBZYyqw
by SitePoint (@SitePoint)
on CodePen.

Let’s go the next section, where we’ll set up an example that’s a bit more advanced using the useReducer hook.

Continue reading How to Replace Redux with React Hooks and the Context API on SitePoint.