Translate
Friday, 31 July 2020
17-Year-Old 'Mastermind', 2 Others Behind the Biggest Twitter Hack Arrested
EU sanctions hackers from China, Russia, North Korea who're wanted by the FBI
New Attack Leverages HTTP/2 for Effective Remote Timing Side-Channel Leaks
Thursday, 30 July 2020
What Hacking Is And How Should Your Business Protect Itself Against It
In today’s digital world, data is a valuable resource and its security has become a paramount business for digital service
What Hacking Is And How Should Your Business Protect Itself Against It on Latest Hacking News.
Worth Watching: 4 Technologies Set to Disrupt Industries
Technology is present in almost everything we do. The digital age has ushered in innovative tech that has reshaped life
Worth Watching: 4 Technologies Set to Disrupt Industries on Latest Hacking News.
5 Great Study Tools for Your Amazon AWS Certified Solutions Architect Associate Exam Preparation. When Refer to Practice Tests?
Introduction During exam preparation, choosing appropriate study resources is one of the most important factors. This is because when you
5 Great Study Tools for Your Amazon AWS Certified Solutions Architect Associate Exam Preparation. When Refer to Practice Tests? on Latest Hacking News.
Protecting Networks in Today’s At-Home Workspaces
The rise of remote working is not purely the result of COVID-19’s impact. After all, remote teams and companies
Protecting Networks in Today’s At-Home Workspaces on Latest Hacking News.
Zoom Bug Allowed Snoopers Crack Private Meeting Passwords in Minutes
How to Make a Body or Object in VR (Virtual Reality)?
If you’ve enjoyed gaming using an Oculus Rift S or Sony PlayStation headset, then you’ve had a hands-on experience of VR. Nowadays, the concept of virtual reality or VR is finding across-the-board applications, including healthcare, defense, aerospace, and many other industries. However, no other sector makes use of VR as much as the gaming industry.
In this article, we will walk you through the basics of ‘how to make a body or object in VR?”. We’ll take you through the integrated steps of creating 3D objects and bodies abounding in the VR point-and-click adventure gaming. This tutorial will guide you on how to create a basic version of a simple point-and-click adventure game, albeit in VR. What you’ll need is a computer or laptop. It doesn’t have to be a powerful PC or VR ready laptop as only the basic stuff will be covered.
This guide mainly introduces you to 3D programming and serves as a standalone starter tutorial for setting up a web-based VR model. In the first part, we will instruct you on how to create by exploiting webVR, which is the perfect platform for playing VR games with or without using a VR headset. In the latter section, you’ll learn to create a mirrored framework for playing the game on your desktop or smartphone.
In other words, every move a gamer makes on his smartphone will be reflected on the desktop sample. Consequently, you and the player are connected in real-time, enabling you to watch all his moves, document the game, and offer guidance if necessary.
How to Make a Body or Object in VR (Virtual Reality)?
What you’ll need to get started?
At the outset, you’ll need a VR headset (use Google Cardboard available at $15.00 apiece) and net access, particularly to glitch.com. You’ll need to access Mac OSX when you come to the 2nd part of the tutorial.
1st Step: Putting Together a VR Model
At the first stage, you’ll be building a website with the help of a single static HTML page for coding directly from a desktop. Coding from the desktop computer also allows you to deliver to the website mechanically. Once you create the site, you’ll be able to upload it on your smartphone and, after that, place it inside the Google Cardboard VR headset.
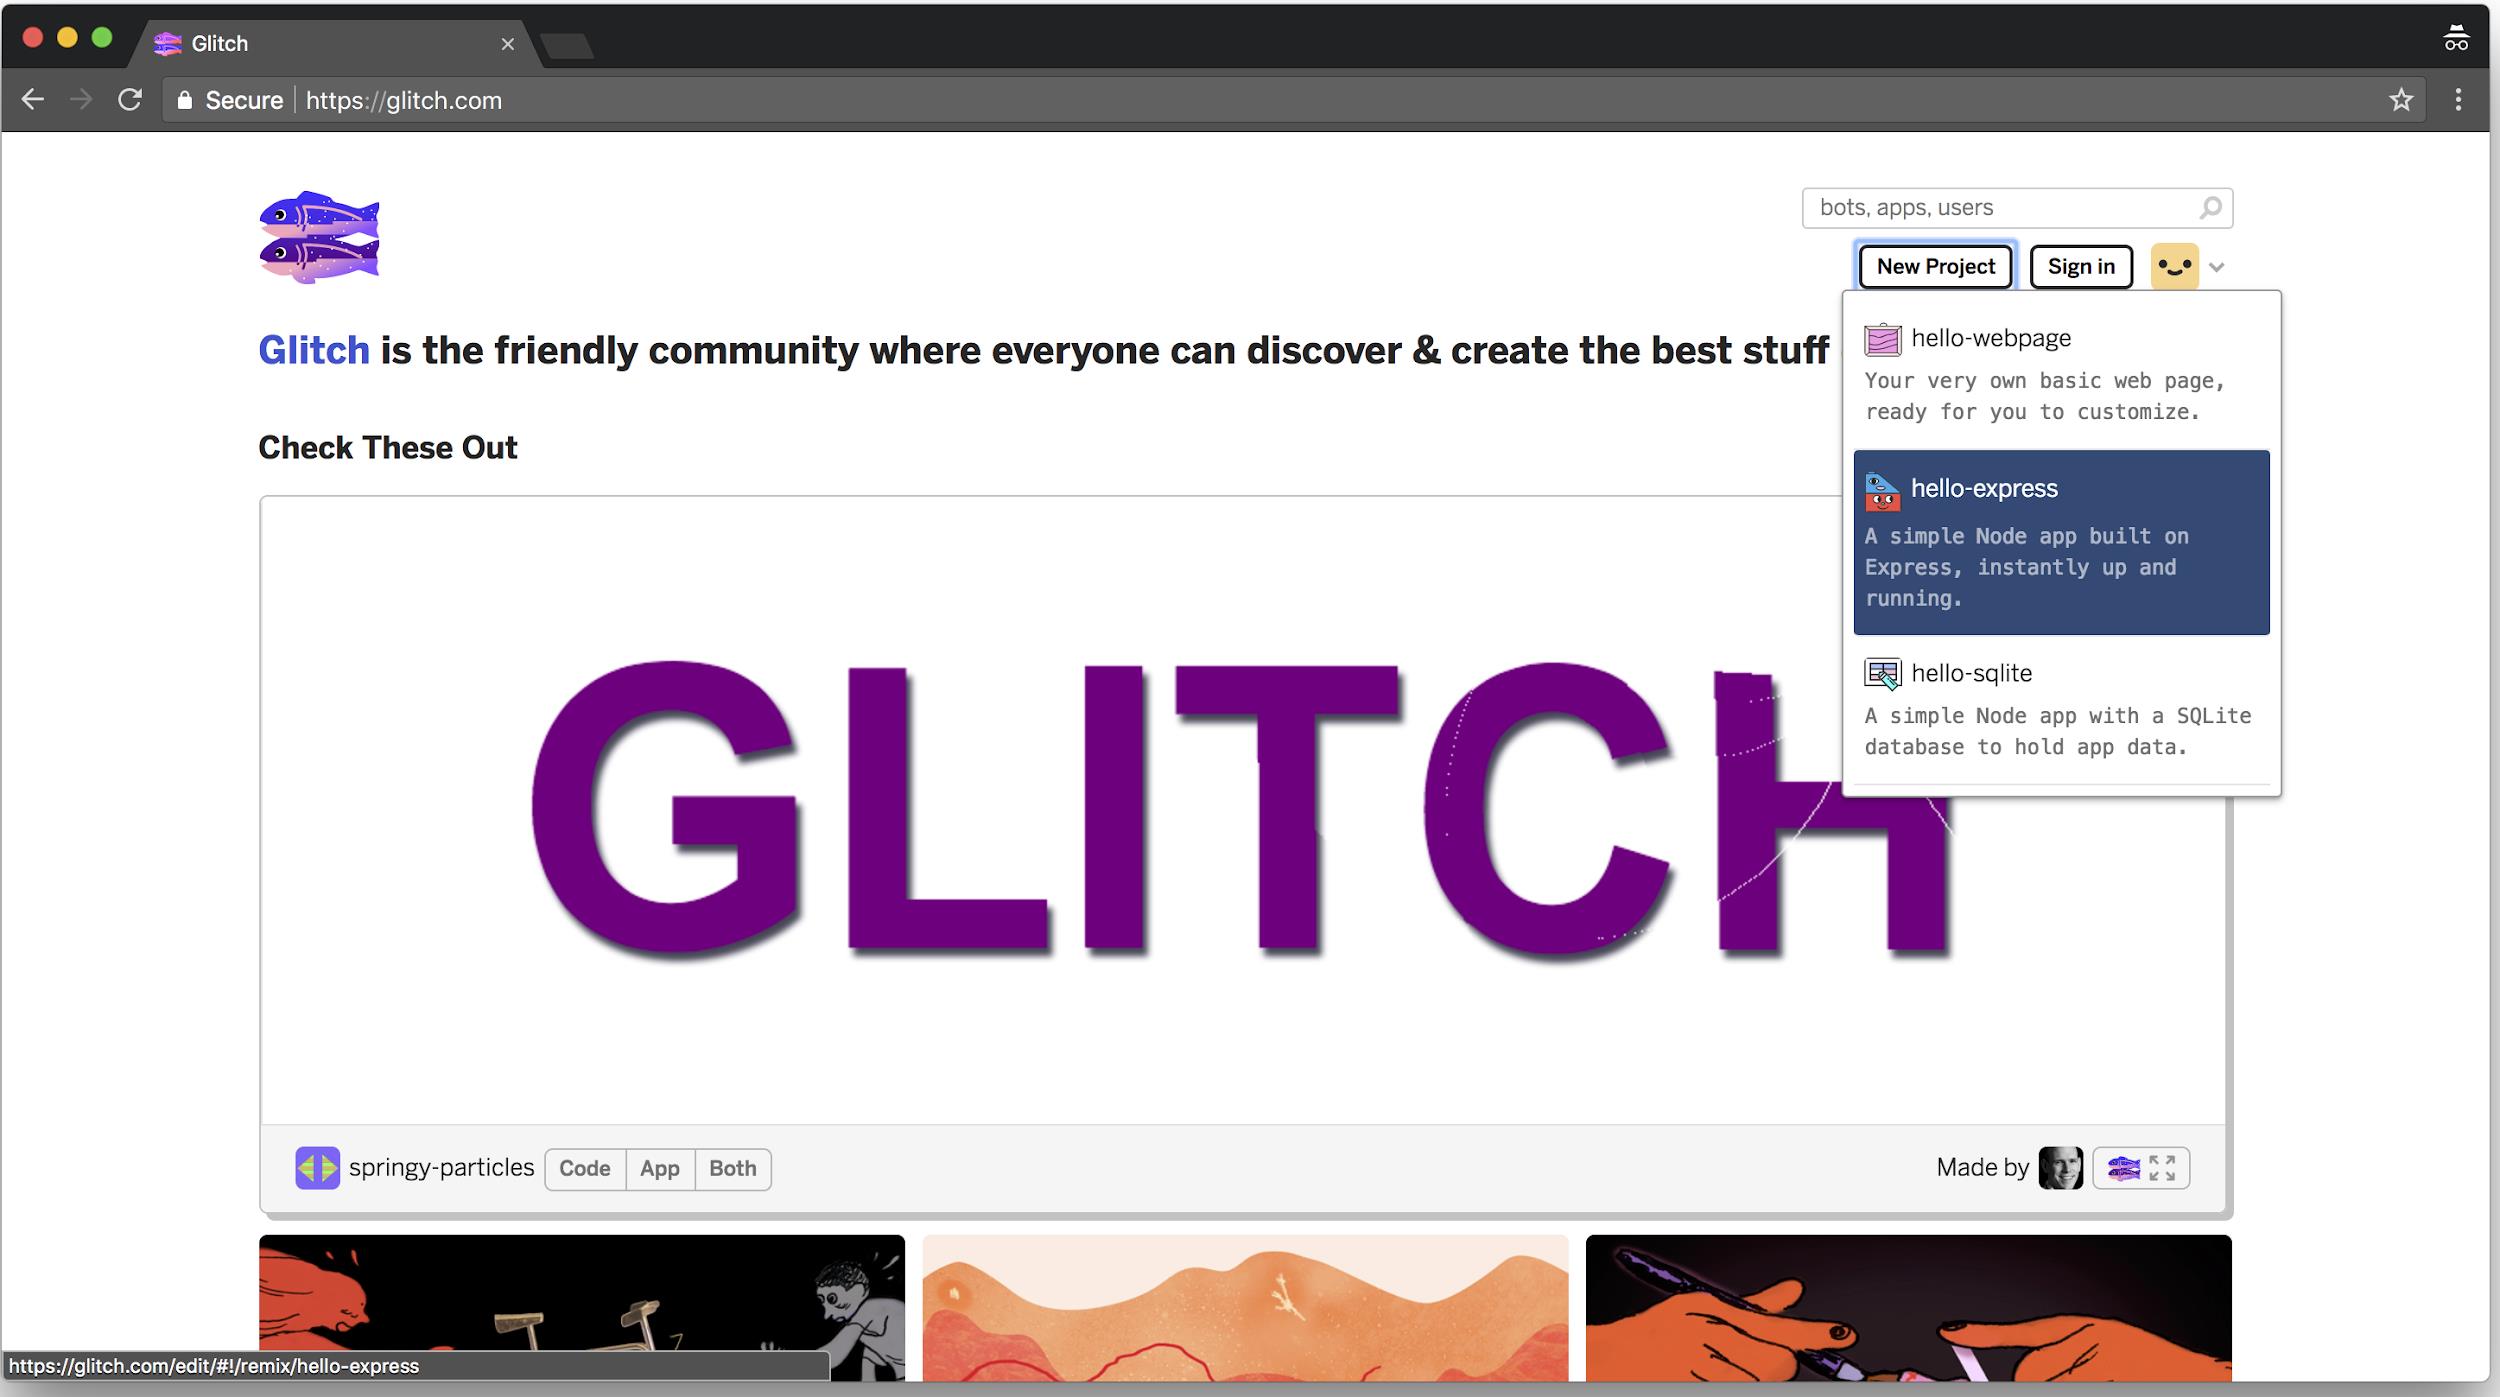
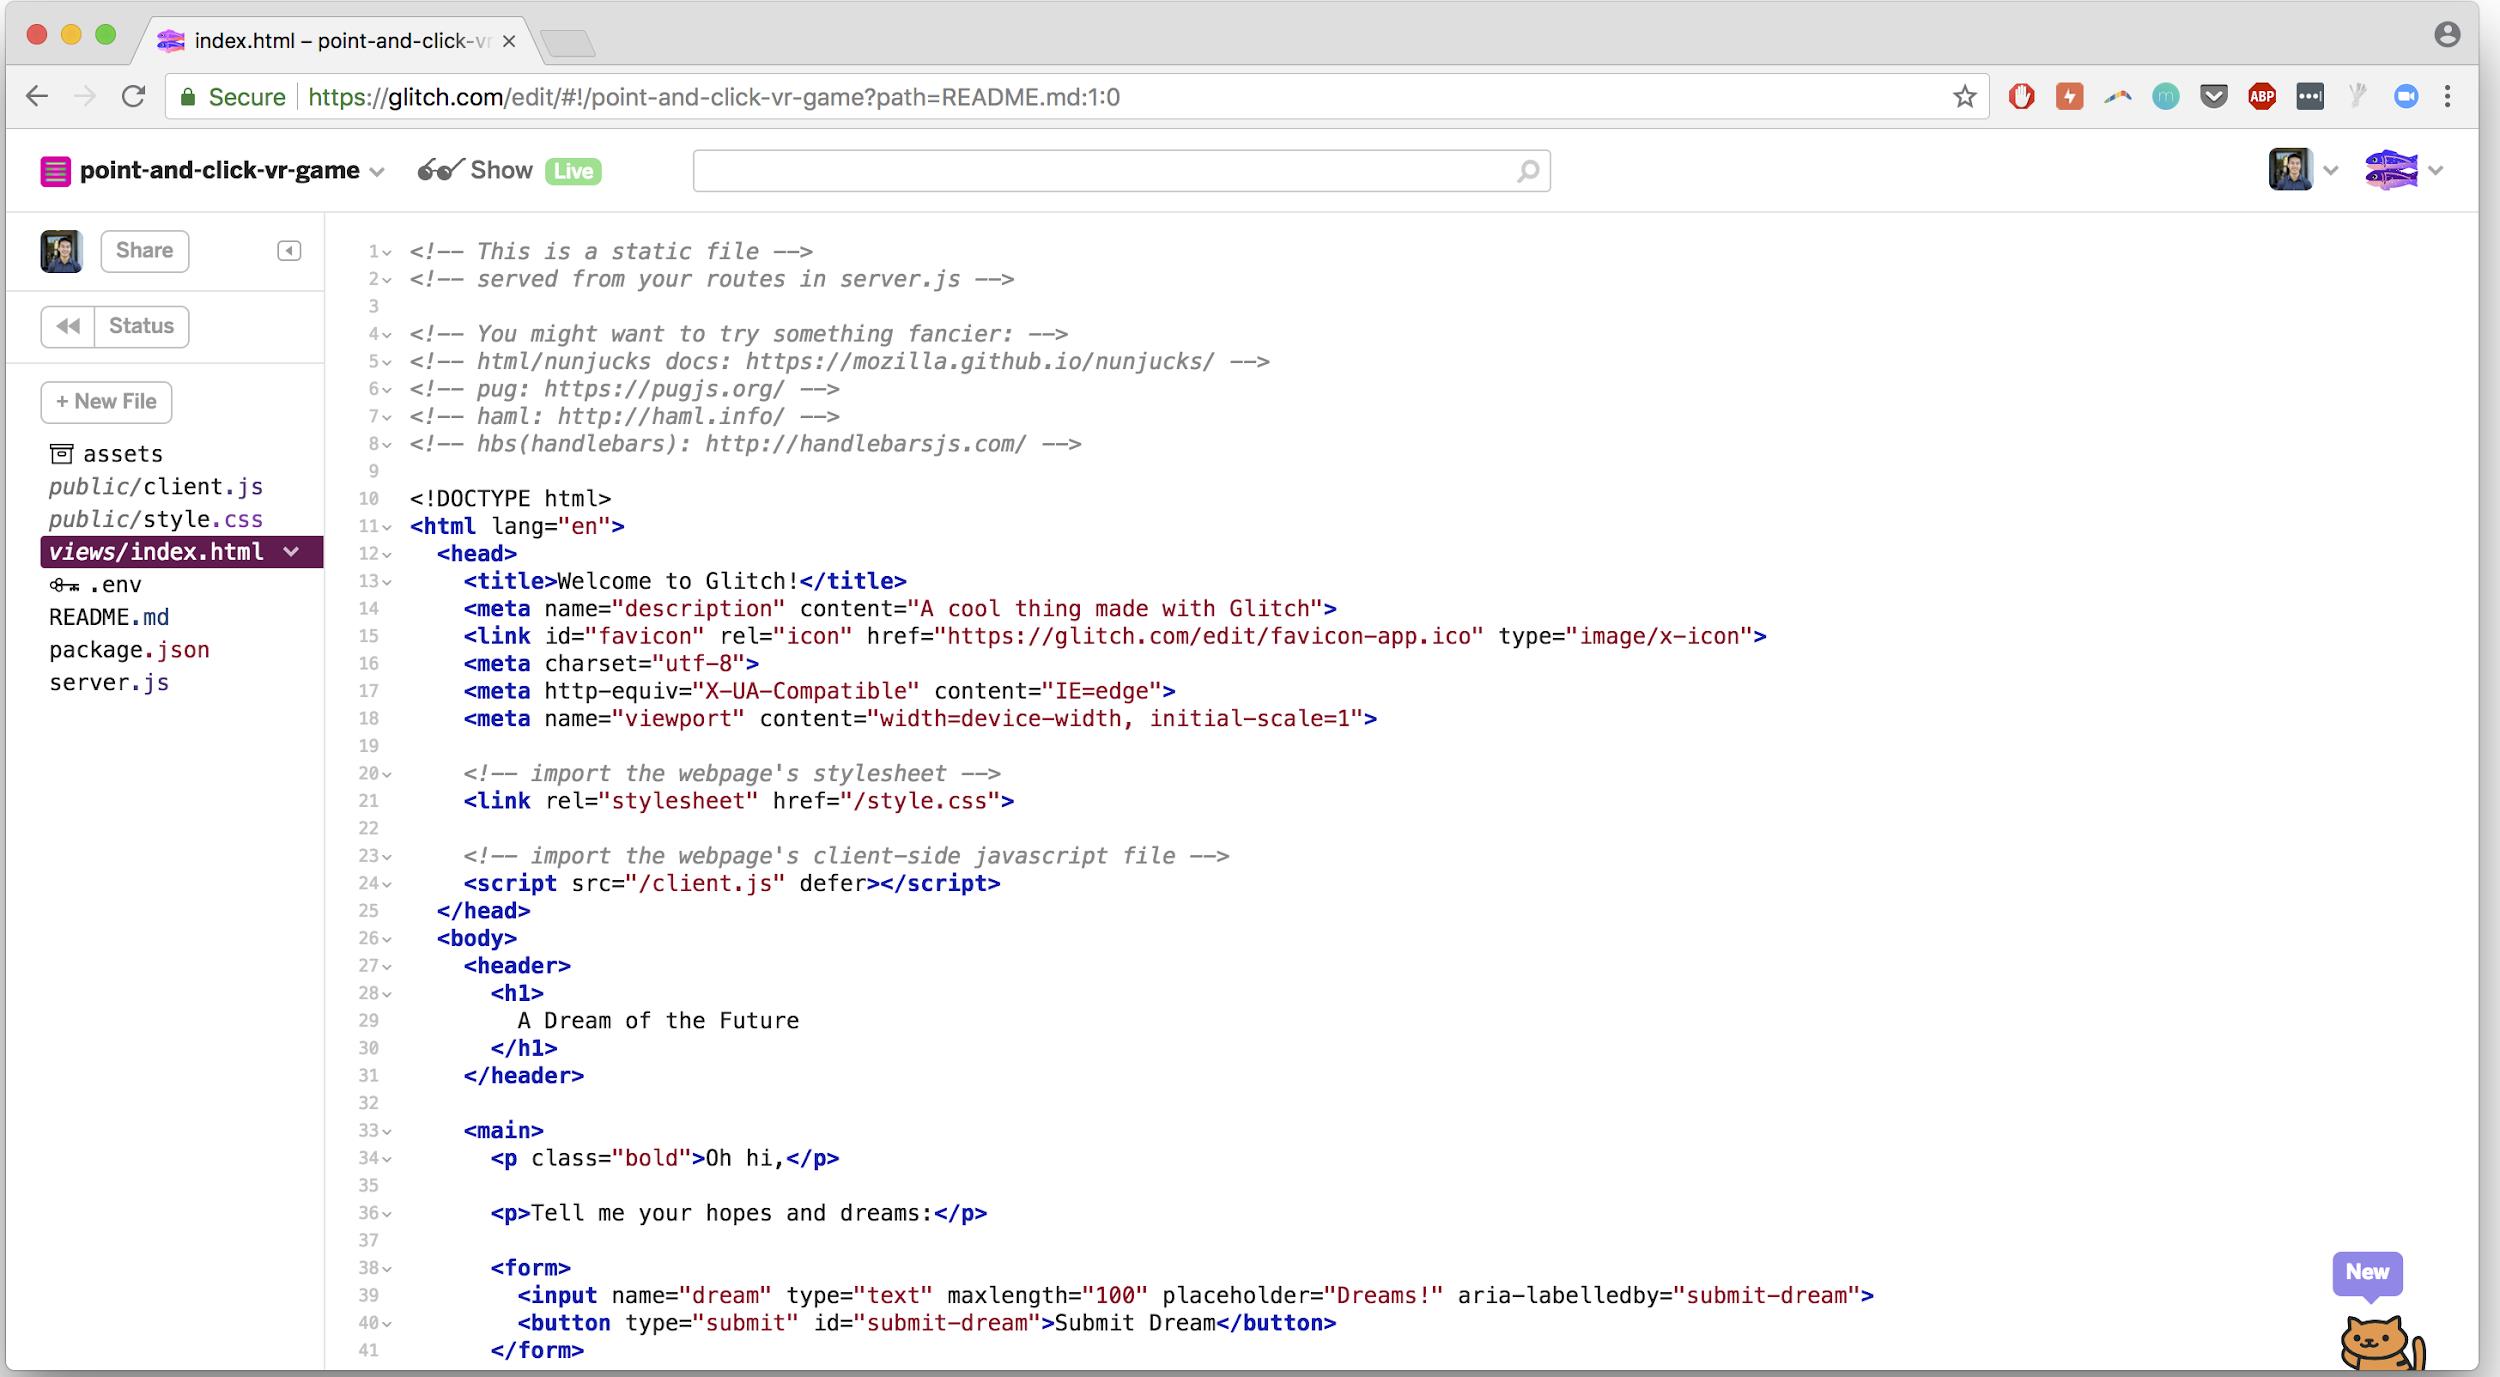
On the other hand, you can use the VR headset for uploading the deployed website. You can start by logging in at glitch.com. Once you’re on the landing page of glitch.com, you’ll have to click over “New Project” and “Hello-Express” on the top right and drop-down, respectively. Next, you’ll need to take your mouse to the left sidebar and click on “views/index.html, which is usually known as the “editor.”
Click on “preview” on the top left to see a sample of the webpage which you can call your preview. Whatever changes you make in the editor will be automatically mirrored on this webpage except for unsupported browsers and bugs. Revert to the editor to restore the existing HTML with the ensuing boilerplate for uploading a VR model.
To view this display on the VR headset, you’ll need to log in at the URL in the omnibar. After completing this action, you’ll have created your website URL.
2nd Step: Creating a Tree Model
This step entails setting up your basic VR model for which you’ll have to create a tree specimen with the help of primitives from aframe.io. Primitives are regulated entities that Aframe has programmed in advance for the convenience of use. There are three entities associated with bodies for carrying on the communication around ‘transformation axes,’ ‘relative transformations,’ and ‘geometry and material.’
For coding every 3D object, you’ll invariably need material and geometry, which are the two essential building blocks. While geometry specifies the shape or form of the object (like a pyramid, cuboid, sphere, and so on), the material typifies the physical properties like reflectiveness, color, and so on.
Secondly, you have three transformational axes to create or build your object. The x and y axes run horizontally and vertically as you shift right and upwards. The third axis-z-moves out of the display screen, and as we approach you, its value goes up. You can scale up or down, turn, and translate primitives or entities along these transformational axes.
For instance, you increase an object’s x value for translating it, and for rotating it, you spin it all along the y-axis. Keep in mind that all changes or transformations are indicated as <x>, <y>, <z>, implying that you’ll have to raise the corresponding second value to increase the cost. All objects are preprogrammed to be situated at o, o, o.
Finally, all conversions or translations are considered by their parents. Attach a tube or roll within the above sphere to attach a trunk to the tree model. This is to make sure that the trunk’s position or location is about the sphere’s situation. Add two green orbs to the tree model to impart a semblance of shrubbery to it.
You’ll be able to view the below tree when you go back to the preview. Upload the show of the website again on the VR headset and look at the tree model you have created. The next step will instruct you on how to make the tree useful for a two-way flow of information.
3rd Step: Inserting Click interface to the VR model
You’ll have to append an animation and activate it on clicking to make an entity communicative. As the end-user is involved with a VR headset, you’ll simply need to look intently to click. Simply put, gawking at an object or body will initiate click action. For introducing these transformations, you’ll have to begin with the cursor.
After that, you’ll have to select an animation and click on it for activating it. To end this step, you’ll need to revert to your website preview and draw the cursor to the tree. When a black circle comes to position itself on the tree, the latter will shift to the right and go back to its original position. So, now you’re done with creating a simple point-and-click adventure game in VR.
In the subsequent step, you’ll be building a primary nodeJS server, which will function as your stationary demo.
4th Step: Setting up NodeJS Server
Now you’ll be building a straightforward and practical but straightforward nodeJS server, which will be indispensable for your current VR model. Select package.json on the left sidebar of your editor. Begin by obliterating lines 2 through 4 and ascribe a new name-mirrors.
Select dependencies to insert socket.io. Now upgrade the archived URL to make it compatible with your existing glitch.com. The specimen glitch project is known as point-and-click-VR-game. Substitute that name with the name of your glitch project. Now alter the “glitch” icon to “VR” and repeatedly check to ensure that your package.json corresponds with the following:-
Also, doubly ensure that your code from the earlier components matches up with the following in views/index.html. Next, alter the current server.js. And get going by importing numerous NodeJS functions like Express, socket.io, and HTTP.
You also activate the ExpressJS application when you import the above utilities. After the services are uploaded, the available server now guides the server to restore index.html as the homepage. At last, the current source code informs the application to connect and listen to a port.
After you are through with editing, Glitch reloads the server on its own. To take a sneak peek at your application, simply click on “show” in the top-left. Now your website preview is ready to deliver.

5th Step: Enabling Interaction of the Client with the Server
In the 5th step, you’ll have to employ the client to establish a link with the server. The client will let the server know whether it is a desktop or a smartphone. To begin, import the would-be Javascript file to your views/index.html. Once you’re done with line 4, bring in an altogether new script and append camera listener to the properties list on line 14.
After that, go to the public/client. Js on the left sidebar and remove all Javascript code in this file. Next, specify a utility function for checking out whether the client device is a mobile one. Yet again, you’ll need to upload the preview onto the desktop and after that on your smartphone.
As soon as the mobile device is connected, the server instantly starts logging in the position and rotational information of the camera via the server to the client.
6th Step: Making the Server Interact with the Client
In the ultimate step, you’ll transmit the host camera’s data to all the reflectors for which you’ll have to open up the server file, server.js. Alter the onMove event handler to the following:-
The broadcast modifier guarantees that the server conveys this info to all clients linked with the socket barring the original client. Once a client receives this information, you’ll have to set up a reflector’s camera correspondingly. Now open the client script- public/client.js. Next, check whether it is a desktop that is the client and, if so, then obtain the shift data and log inappropriately.
Upload the website preview both on your smartphone and your desktop. Unlock and open the developer platform on the browser of your desktop. The moment your smartphone uploads the app, the developer console on the desktop will light up to indicate the camera’s rotational position.
You’ll need to open up the client script once again at public/client.js. Based on the data transmitted, you regulate the client’s camera. Change the event handler for the sake of the move event.
For the last time, upload the app on the phone as well as the desktop. Whatever movement is there on the mobile device is mirrored on the desktop. Now you can have a view or instead preview of everything that the smartphone user sees.
The post How to Make a Body or Object in VR (Virtual Reality)? appeared first on The Crazy Programmer.
ESET Threat Report Q2 2020
A view of the Q2 2020 threat landscape as seen by ESET telemetry and from the perspective of ESET threat detection and research experts
The post ESET Threat Report Q2 2020 appeared first on WeLiveSecurity
Wednesday, 29 July 2020
Deno Module System: A Beginner’s Guide

Learn about the Deno module system – the biggest workflow change you’ll encounter if you’re coming from Node.js. Find out how it works and how to use it, how to make use of Node.js packages in Deno, and more.
Node.js is a JavaScript runtime based on Chrome’s V8 engine, developed by Ryan Dahl, and released in 2009.
Deno is a JavaScript runtime based on Chrome’s V8 engine, developed by Ryan Dahl, and released in 2020. It was created with the benefit of a decade’s worth of hindsight. That doesn’t necessarily make it a sequel or superior to Node.js, but it deviates from that path.
See also:
- Introduction to Deno: A Secure JavaScript & TypeScript Runtime
- Node.js vs Deno: What You Need to Know
The headline differences: Deno natively supports TypeScript, security, testing, and browser APIs. Module handling receives less attention, but it’s possibly the largest change to how you create JavaScript applications. Before discussing Deno, let me take you back to a simpler time…
Node.js Modules
JavaScript didn’t have a standard module system in 2009. This was partly because of its browser heritage and ES6 / ES2015 was several years away.
It would have been inconceivable for Node.js not to provide modules, so it adopted CommonJS from a choice of community workarounds. This led to the development of the Node Package Manager, or npm, which allowed developers to easily search, use, and publish their own JavaScript modules.
npm usage grew exponentially. It’s become the most popular package manager ever devised and, by mid-2020, hosts almost 1.5 million modules with more than 800 new ones published every day (source: modulecounts.com).
Deno Modules
Deno opts for ES2015 Modules which you import from an absolute or relative URL:
import { something } from 'https://somewhere.com/somehow.js';
The script at that URL must export functions or other values accordingly, e.g.
export function something() {
  console.log('something was executed');
}
Deno uses an identical module system to that implemented in modern web browsers.
Node.js also supports ES2015 modules … but it’s complicated and remains experimental. CommonJS and ES2015 modules look similar, but work in different ways:
Continue reading Deno Module System: A Beginner’s Guide on SitePoint.
Critical GRUB2 Bootloader Bug Affects Billions of Linux and Windows Systems
Is Your Security Vendor Forcing You To Move to the Cloud? You Don't Have To!
Industrial VPN Flaws Could Let Attackers Target Critical Infrastructures
US CISA Alerts of Active Exploitation of F5 BIG-IP Vulnerability
Earlier this month, a serious security flaw surfaced online targeting F5 Networks. Now, the US CISA has issued an alert
US CISA Alerts of Active Exploitation of F5 BIG-IP Vulnerability on Latest Hacking News.
OkCupid Dating App Flaws Could've Let Hackers Read Your Private Messages
FBI warns of disruptive DDoS amplification attacks
The Bureau expects cybercriminals to increasingly abuse new threat vectors for large-scale DDoS attacks
The post FBI warns of disruptive DDoS amplification attacks appeared first on WeLiveSecurity
Tuesday, 28 July 2020
Critical Vulnerabilities Found in Chinese DJI Drones Android App
A serious vulnerability has been discovered in the Android app of DJI drones. As observed by the researchers, the vulnerability
Critical Vulnerabilities Found in Chinese DJI Drones Android App on Latest Hacking News.
Undetectable Linux Malware Targeting Docker Servers With Exposed APIs
How to Host Static Sites for Free with an Automated Pipeline

Did you know that you can host static sites for free on a number of high-grade services? This doesn’t just save money, but also means you’re deploying to globally distributed CDNs and automating processes.

Provided: Netlify
In a previous article, we reviewed 100 Jamstack tools, APIs and services to power your sites, which included a lot of hosting services.
In this article, we’ll get hands-on and show you how to host static sites with an automated pipeline for deployment.
Does this sound complicated? It’s easier than you’d think.
Free Cloud Hosting, but with Strings Attached
You can actually host websites for free — even dynamic ones — with the AWS Free Tier (Amazon Web Services), the GCP Free Tier (Google Cloud Platform) and Windows Azure (with some workarounds).
But when you go to give that a try, you’ll come across a number of conditions, fine print considerations, and implementation constraints:
- how much computing power do you need?
- your credit card number, please?
- where do you want to deploy to?
- is your account brand new?
- and not older than 1 year?
- actually, what services?
Often this is more a tryout than an actual freebie (hence the reason why AWS Amplify Storage is not included in this list). And while some power users might take advantage of the goodies, if you aren’t well acquainted with these platforms beforehand, you’ll find out that the learning curve to start using these services is very steep, and that for every cloud service you intend to use you’ll need to find out first in which way each provider reinvented the wheel before you can actually spin it into any free deployment.
Let’s see now how a handful of smaller players rose to prominence with free hosting services that aren’t a hassle to implement and have fewer strings attached.
Continue reading How to Host Static Sites for Free with an Automated Pipeline on SitePoint.
QSnatch Data-Stealing Malware Infected Over 62,000 QNAP NAS Devices
Monday, 27 July 2020
Almost 4,000 databases now wiped in ‘Meow’ attacks
The attackers and their motivations remain unknown; however, the incidents yet again highlight the risks of careless data security
The post Almost 4,000 databases now wiped in ‘Meow’ attacks appeared first on WeLiveSecurity
Why Not Having An IT Insurance Can Get You In Trouble
As an entrepreneur or a professional, liability insurance is vital in protecting your company or employees of uncertain events such
Why Not Having An IT Insurance Can Get You In Trouble on Latest Hacking News.
7 Cyber Security Challenges in 2020!
At one point, the internet has connected us to countless opportunities, on the other, it has also made us prone
7 Cyber Security Challenges in 2020! on Latest Hacking News.
How to look for holidays of any country using Public Holidays API
Holidays information can be difficult to maintain and can sometimes get in the way of building your products. Using Holidays
How to look for holidays of any country using Public Holidays API on Latest Hacking News.
Protect Your Online Privacy – Six Steps You Should Take
The internet is a vast system of an interconnected network that provides information and communication anytime, anywhere. This 19th-century invention
Protect Your Online Privacy – Six Steps You Should Take on Latest Hacking News.
How to Check Someone’s Call History Online for Free
Checking someone’s call history is something everyone dreams. From parents to people in a relationship, everyone wonders for getting their
How to Check Someone’s Call History Online for Free on Latest Hacking News.
What is ransomware and how do we fight it?
First things first, what exactly is ransomware? It is a type of malware from crypto virology that encrypts and blocks
What is ransomware and how do we fight it? on Latest Hacking News.
Learn Machine Learning and AI – Online Training Program @ 93% OFF
Sunday, 26 July 2020
Azure Virtual Machine Tutorial
So in this article, we’ll learn the following things:
- What is a Virtual Machine?
- Why we use Virtual Machines?
- How to create a Virtual Machine?
- How to use a Virtual Machine in your Computer System?
Prerequisites:
- Microsoft Azure Subscription
- Good Internet Connection
So let’s start with the first question.
What is a Virtual Machine?
In simple words, If we use a Computer machine over the internet which has its own infrastructure i.e. RAM, ROM, CPU, OS and it acts pretty much like your real computer environment where you can install and run your Softwares. All you need is an internet connection to use that machine. We can increase and decrease the size of the disk, RAM, the capacity of CPU according to our needs.
At a time we can run multiple virtual machines in a single computer.
Why We Use Virtual Machines?
To answer this question let’s assume a scenario:
Ram is a freelancer and develops Computer Games. So once a client wants a game to be developed which should run on All of the operating Systems (i.e. Windows, macOS, Ubuntu).
On the other hand, Ram has only one PC which runs on macOS. So he needs Windows and Ubuntu to run and test his game.
Now here, Virtual Machines come as an option. So Ram can deploy two Virtual Machines for each of the Operating System and test his game. When the game is tested and the client is happy with it, Ram can delete both of the virtual machines.
So this was an example in terms of operating systems.
Let’s take another scenario:
In this case, the Client wants a high-end Game which requires a lot of computing power to be developed and Ram doesn’t have a computer with that much capacity So Ram has two options, first, he can purchase a new PC or upgrade his PC which can be end-up with high cost. The second option is creating a virtual machine with that much computing power.
So in the second example, The cost will be too lower than building a new PC. He can increase or decrease the computing power or memory any time he wants, at a lower cost than getting a new One.
So now you understand what is Virtual Machine, let’s see how to create one using Microsoft Azure.
How to Create a Virtual Machine in Azure?
To create a virtual machine go to Azure Portal.
It will look something like this:
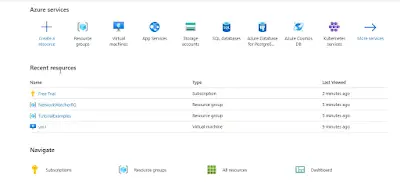
So you can just click on Create a Resource button that will be on the front page or click on the menu button and select Create a Resource button from there as shown in the picture below:
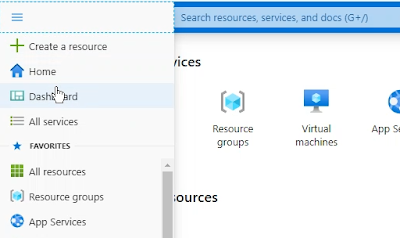
After clicking on this button you’ll be redirected to the resources page from where you can either search a resource by its name or scroll down the menu to find out.

In our case, we want to create a virtual machine So we can search for Windows or Ubuntu but we here we can also see Both of these are available in the popular section also. So we can choose it from here too. So I am going to select the Windows Server 2016 Data Center to create a Windows Virtual Machine.
After this, you’ll be redirected to Create a Virtual Machine page.
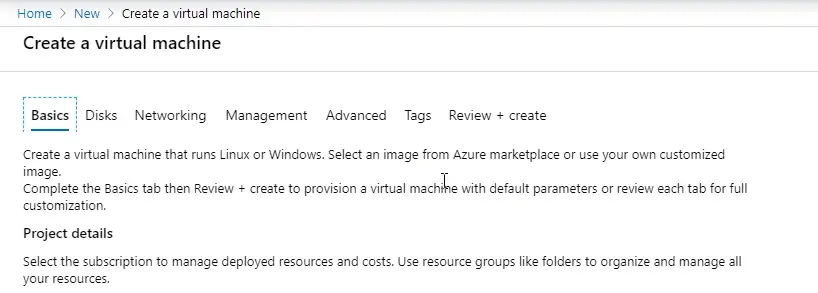
So there are 7 different tabs where we’ll fill the details about the virtual machine we want to create. let’s have a look at each of it one by one.
1. Basics
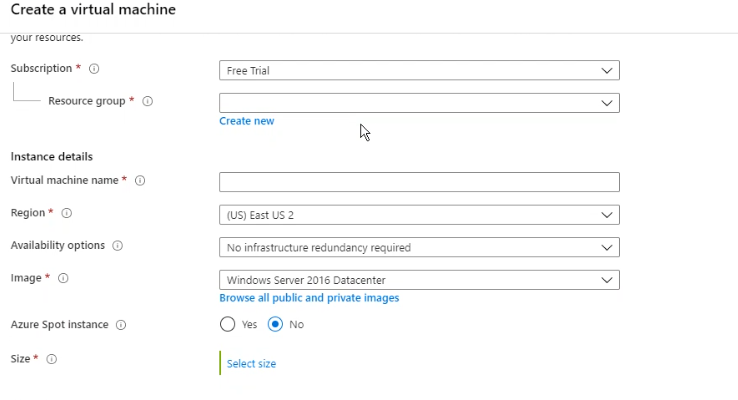
So here you’ll see the details like:
- Subscription – So here you have to choose the subscription-like if you have a free subscription related to your email account then it will be shown up in the list or on the other hand if you have upgraded your plan you can select it too.
- Resource group – Here you have to choose a resource group where you want to store the resources related to your virtual machine. Basically resource groups are used to group the resources related to a project. you can think it as a folder containing resources so you can monitor it easily.
- Virtual Machine Name – you can choose any name you want but the name should be unique in your resource group.
- Region – There are various regions available in the Azure Portal. If you’re confused about what a region is – It is a group of data centers situated in an area and that area called a region and Azure gives more regions than any other cloud provider. There are various parameters, on based you can choose your region (but we’ll discuss this in another article) for now you can choose the region near to you for low latency.
- Availability options – Azure offers various options to manage the availability of our application by protecting data and make it available in maintenance or data center outages. To learn more about it – https://docs.microsoft.com/en-us/azure/virtual-machines/windows/availability
- Image – Here you can choose the operating system that you want to use in your virtual machine (i.e. Windows 10 pro, Ubuntu Server )
- Azure Spot Instance – To access the unused azure compute capacity at large discounts, you can choose yes. It will provide scalability as well as reduced costs. For more – https://azure.microsoft.com/en-in/pricing/spot/
- Size – Here you can choose the memory size (RAM) as well as CPUs according to your need. The approx prices will be also given in front of the memory options.
- Username & Password – This username and password will be required to use the virtual machine just like we use in our system.
- Inbound ports – Here we’re setting public inbound ports to “allow” and selecting RDP port. There are other options like HTTP, HTTPS, SSH, RDP. If you’re making a VM for webserver you can choose HTTP and HTTPS. SSH and RDP are for accessing your virtual machine remotely. For windows, I am choosing RDP (Remote Desktop Protocol) to access this virtual machine to access it from a windows machine.
2. Disks
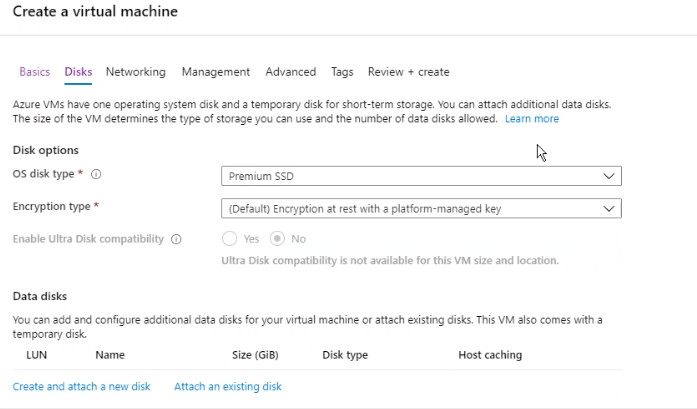
Here you’ll see the options like:
- OS disk type – Here you can choose the external disks according to your need, you will be seeing options Premium SSD, Standard HDD, Standard SSD.
- Encryption type – Here you can encrypt the disk if you want. You can do it in two ways – 1. With a platform managed key, 2. A customer-managed key.
- Enable Ultra Disk compatibility – It is the same as above but with higher throughput, high input/output per second, and low latency.
- Data Disks – Here you can add additional disks for your VM and configure it and one thing to point out here that virtual machine also have its own temporary disk.
3. Networking
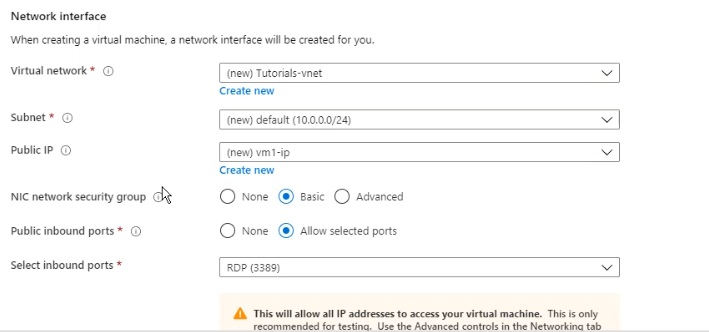
Here you’ll see options like:
- Virtual Network – your network will be logically isolated from other networks in Azure. Here you can configure IP address ranges, set rout tables, subnets. Overall you can imagine this like the network we have in our traditional data centers. So you can also access the other virtual machines in the same virtual network.
- Public IP – Here we can use a public IP address to communicate with the other virtual machines which aren’t in the same network.
- NIC network security group – It consists of the security rules that we want to apply on our network. For details – https://docs.microsoft.com/en-us/azure/virtual-network/security-overview
- Accelerated networking – You can turn this on for high throughput and low latency on our network.
- Load balancing – you can use this to distribute a load of incoming traffic on your virtual machine. Get more on https://docs.microsoft.com/en-us/azure/load-balancer/load-balancer-overview
4. Management
Here you’ll see the options like:
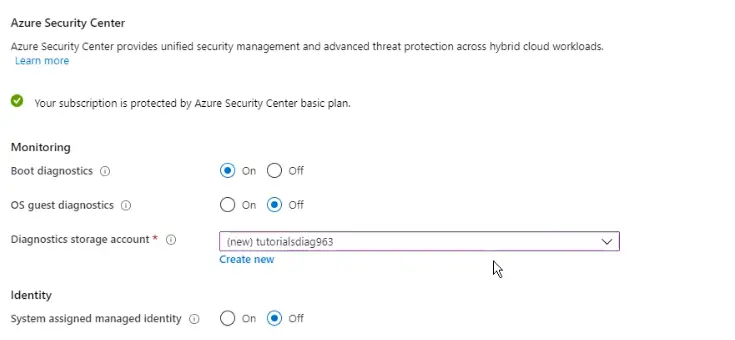
- Boot diagnostics – you can turn on this to get the logs of the virtual machine running. It helps to solve the startup issues.
- OS guest diagnostics – You can turn this on to get the metrics per minute. It can be used to identify the performance of your virtual machine. For more – https://docs.microsoft.com/en-us/azure/virtual-machines/windows/monitor
- Diagnostics storage account – It is a storage account where your metrics will be written so we can also analyze them with other tools if we want.
- The system-assigned managed identity – So this is to manage your keys or password on azure key vaults and integrate this with our Virtual machine for better security. For more – https://docs.microsoft.com/en-us/azure/key-vault/general/tutorial-net-windows-virtual-machine
- Login with AAD credentials – If we turn this on then we can also access our virtual machine with the credentials of Azure Active Directory and we can also enforce Multi-Factor Authentication. If you want to learn more about azure active directory then please have a look on – https://azure.microsoft.com/en-in/services/active-directory/
- Auto Shutdown – You can set at what time you want to shutdown your Virtual Machine so you don’t have to pay an extra penny for computational power when you’re not using the virtual machine. I recommended you to turn this on.
- Backup – To protect our virtual machine from accidental deletion or corruption of disks, you can turn this on.
5. Advanced
Here you’ll see options like:
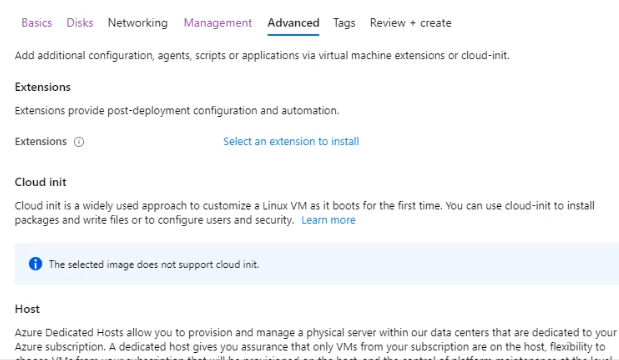
- Extensions – Using this you can add new features to your virtual machine like Antiviruses, Configuration Management, Rapid7, Azure Network watcher. For more – https://docs.microsoft.com/en-us/azure/virtual-machines/extensions/overvie
- Custom data – You can pass a script, file, or other data while our virtual machine is being deployed. For more details have a look – https://azure.microsoft.com/en-in/blog/custom-data-and-cloud-init-on-windows-azure/
- Host – You can have a dedicated host to your virtual machines or other resources related to one Azure subscription. To have a look in details – https://docs.microsoft.com/en-us/azure/virtual-machines/windows/dedicated-hosts
- Proximity Placement group – It is a logical grouping that is used to make sure that resources are located nearly to each other as much as possible. It is useful where we require low latency. For more – https://azure.microsoft.com/en-in/updates/proximity-placement-groups-are-now-available/
- VM generation – Here you will have two options Gen1 and Gen2. Where Gen1 supports most of the guest operating system but on the other hand, Gen2 supports mostly 64-bit version of Current versions of Linux and Windows as well as FreeBSD OS.
Note: Gen2 virtual machines do not support disk encryption yet.
6. Tags
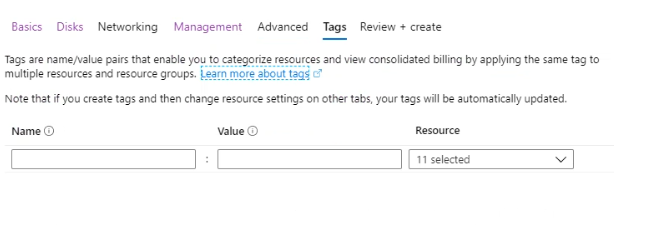
Here you can categorize your resources together so you can see the details like billing information of all the related resources that have the same tag.
For example – You have some resources related to the development of a project so you can apply name as “Environment” and “Development” as value and you will be able to see the information on a category level instead of resource level. For in-depth – https://docs.microsoft.com/en-us/azure/azure-resource-manager/management/tag-resources
7. Review and Create
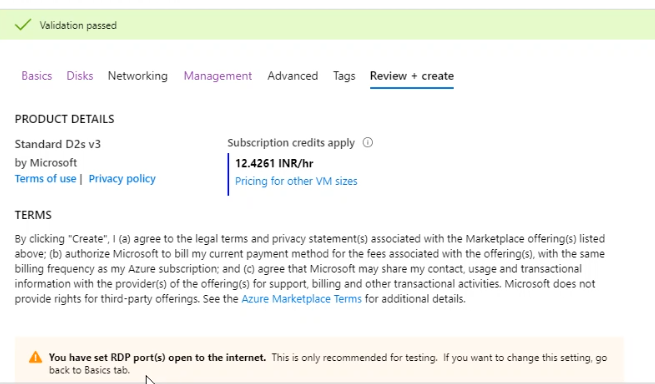
Here you’ll get the details like:
- Product details – In this section, you can see how much you’ll be charged for an hour and see the details that you have chosen in previous tabs to make sure it is right.
- Down a template for automation – Even you can download the template as a JSON file so if in future you need to make the same kind of virtual machine then you can create using this template instead of filling all of the information from starting.
Also, the validation of the information that you have filled earlier will happen in this tab only. So make sure everything is right and we are ready to deploy our virtual machine. Click on “Create” Button.
After clicking on create button you’ll be redirected to this page:
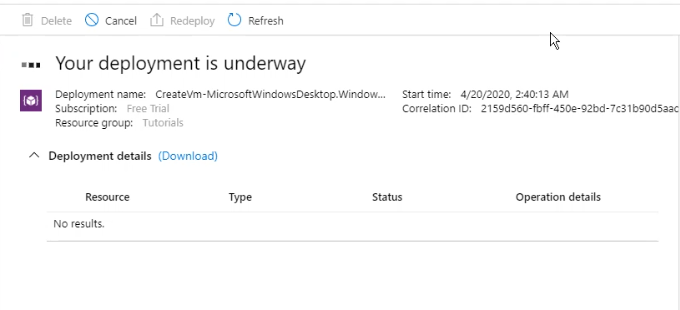
Which is showing “Your deployment is underway”. It will take 5 to 10 minutes to complete the deployment. After deployment, you’ll see something like this:
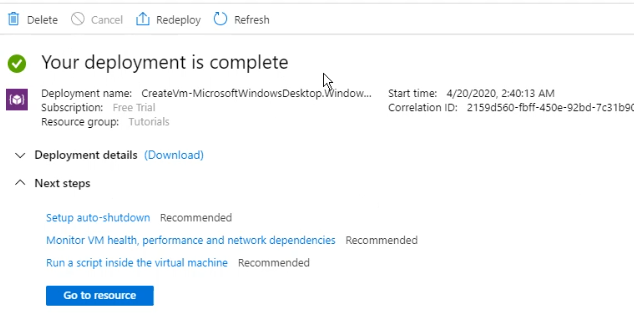
Congratulation you’ve created your first virtual machine.
Now click on “Go to resource “ to see more information.
How to Run Virtual Machine?
So after creating a virtual machine now the next point is how to access it from any remote machine. It is pretty simple. Let’s see how.
Remember, the inbound ports (RDP) we have selected while creating a virtual machine. Now we’ll use that RDP (Remote Desktop Protocol) to connect to our virtual machine.
As mentioned in the above screenshot, if we click on “Go to resource” you’ll be seeing this screen.
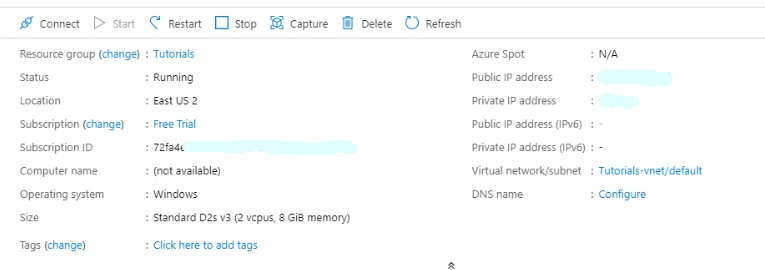
Click on the “Connect” button on the top left corner.
Select RDP.
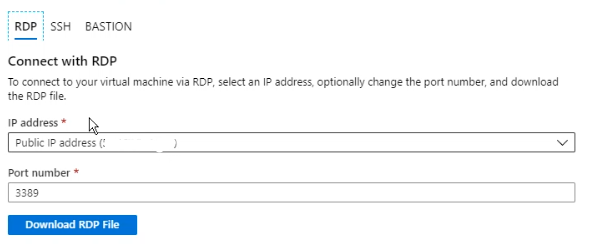
Click on “Download RDP File “ and open that downloaded file.

Click on Connect button.
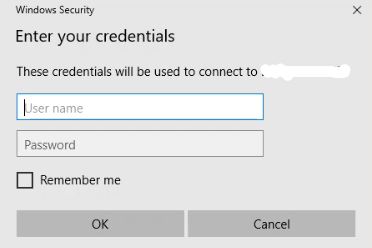
Enter the Username and Password that we have created while creating the virtual machine.

Finally, We’ve connected to our virtual machine. You can do almost anything that you do in your local machine and don’t forget to check the internet speed in your virtual machine, Its amazing. I tried to download PyCharm on my VM and it took 1 second to be downloaded.
That’s all.
If you’ve any suggestions or problems related to this article then please leave us a comment in the comment box below.
The post Azure Virtual Machine Tutorial appeared first on The Crazy Programmer.
Saturday, 25 July 2020
Emergency Update Addressed Multiple Adobe Photoshop Vulnerabilities
Adobe have issued an out-of-band update right after the Patch Tuesday update bundle. This update addressed multiple vulnerabilities across different
Emergency Update Addressed Multiple Adobe Photoshop Vulnerabilities on Latest Hacking News.
Week in security with Tony Anscombe
VPN services accused of leaking personal data – Better security in Gmail, Meet and Chat – Data breach reports in 1H2020
The post Week in security with Tony Anscombe appeared first on WeLiveSecurity
Premier League team narrowly avoids losing £1 million to scammers
In another incident, ransomware attackers almost forced the cancellation of a match, a report reveals
The post Premier League team narrowly avoids losing £1 million to scammers appeared first on WeLiveSecurity
Friday, 24 July 2020
BadPower Attack Can Burn A Device By Hacking Fast-Charging Devices
While fast-charging helps you use your device without charging breaks, it can potentially harm your device too. The feature isn’t
BadPower Attack Can Burn A Device By Hacking Fast-Charging Devices on Latest Hacking News.
DeepSource Reset Login Following Phishing Attack On Employee
Developer tools provider DeepSource has recently reset login credentials of employee accounts and users after a cyber attack. The incident
DeepSource Reset Login Following Phishing Attack On Employee on Latest Hacking News.
Researchers Reveal New Security Flaw Affecting China's DJI Drones
Most Popular Cybersecurity APIs for 2020
The latest technology has turned the world upside down, and of course, for good reasons. Speaking of Application Programming Interfaces,
Most Popular Cybersecurity APIs for 2020 on Latest Hacking News.
Smartwatch Maker Garmin Shuts Down Services After Ransomware Attack
Google adds security enhancements to Gmail, Meet and Chat
The tech giant introduces its own version of verified accounts in Gmail, rolls out increased moderation controls in Meet, and enhances phishing protection in Chat
The post Google adds security enhancements to Gmail, Meet and Chat appeared first on WeLiveSecurity
Thursday, 23 July 2020
How to Increase the Security of Internal Company Communications
Security has been a significant concern for companies around the world for a very long time. However, the threats have
How to Increase the Security of Internal Company Communications on Latest Hacking News.
100 Jamstack Tools, APIs & Services to Power Your Sites

We’ve explained the Jamstack, a popular new way to build secure, scalable, high-performance sites. Now we’ll introduce you to the tools, services, and APIs that power Jamstack sites.
The A in Jamstack stands for API. APIs can do anything for you, from sending a form to authenticating a user, or from storing and retrieving data in real time to shopping for products.
In this article, we’ll do an extensive review of existing APIs and how they compare to one another. This review couldn’t possibly encompass the whole spectrum of third-party APIs that you can integrate into your website, but hopefully you’ll still find the coverage enlightening enough.
We’ll use the words “headless”, “detached”, and “serverless” a lot in this article. If you haven’t already, check out our introduction to the Jamstack, which covers all the basics.
Hosting (Mostly for Free)
Provided: Netlify
Hosting a Jamstack site usually involves automated deployment pipelines. For example, you might have a repository in GitHub which, on every push, automatically triggers an online deployment (via webhooks), running the necessary build tools (such as Jekyll) and regression tests (via Travis CI).
Sound difficult? It can be a surprisingly simple process!
Most of the services here include these goodies out of the box:
- SSD drives
- CDN deployments
- free SSL (including for custom domains)
- command line deployments and rollbacks
Note: look out for another article in this series, coming soon, covering how to use these services.
Services
Google Firebase and AWS Amplify
Firebase Hosting is Google’s take on a hosting service that’s easy to understand and implement, and it’s free to use (limits apply). Firebase’s backbone actually lies on top of the Google Cloud Platform (GCP), and you can in fact access and tweak some Firebase deployments through the GCP console. But by implementing something of an “gateway” (Firebase) that transparently handles GCP resources for us, Google gave developers a brand new and highly improved user experience (UX) … and the Firebase’s YouTube channel is just brilliant! 👏
AWS Amplify is also an effort to reduce the complexities of Amazon Web Services (AWS) for web and mobile deployment that doesn’t quite offer free hosting but 12 months of free use for new accounts for its Storage with Amplify as part of the AWS Free Tier.
Google really made a brilliant move with the Firebase family of products by “detaching” them from the GCP, but Amazon went half-way with AWS Amplify. It sure is a dramatic improvement from the regular AWS workflow, especially for novice users, and its documentation hub is superb and way more down-to-earth than the way Amazon usually documents services. But Amplify is still accessed from the same old (horrifically bloated) console. You still need a credit card to just open an account, deployments are still region-specific (no built-in CDN, seriously?), and the workflow isn’t as straightforward when compared to that of Firebase or Netlify.
GitHub Pages and GitLab Pages
Both hosting services for Git repositories also have a built-in service to host static pages right out of your codebases, 100% free: GitHub Pages and GitLab Pages.
In a future article we’ll cover how to use these services, but in the meantime make sure to check out these easy-to-follow guides:
Netlify and Heroku
In a very short period of time, Netlify not only coined the Jamstack term but also positioned itself as the place to go for all things static. While you could certainly accomplish more with an elaborated AWS pipeline, the simplicity and unparalleled ease of use that Netlify offers is unbeatable. Want to host a static site? Just drop it here and it’s online. Want automatic updates? Link a repo and just push a commit. And batteries are included — instant builds, worldwide CDN, free SSL, CLI tool, on-click rollbacks, and more.
Heroku is the only service in this list that allows you to host dynamic pages: Node.js, Ruby, Python, Java, PHP, Go, Scala and Clojure (check their Language Support page). So if you aren’t yet quite ready to go static, this might be a good way to test your dynamic sites online for free.
Others Services
With 194 data centers as of 2020, Cloudflare is — by many metrics — the company that offers the lowest latency for their DNS and CDN services around the world. They serve big companies but also have a number of services oriented to developers, like Workers Sites. The service isn’t free ($5/mo minimum charge) but it’s as top performant as you can get, and fairly easy to use.
Other tools targeted at static pages include Aerobatic, which offers a free trial with no credit card required and support for internationalization (i18n) and full-text search built-in plugins; Surge.sh with npm run scripts and CI services; and Vercel (formerly ZEIT Now) with an Edge Network serving big names such as Twilio and The Washington Post.
Comparison
| Service | Free plan | Easy-of-use | Tooling |
|---|---|---|---|
| Aerobatic | 1 month | easy | good |
| Firebase Hosting | yes | easy | very good |
| GitHub Pages | completely free | easy | poor |
| GitLab Pages | completely free | easy | good |
| Heroku | yes | somewhat easy | very good |
| Netlify | yes | extremely easy | very good |
| Storage with Amplify | 1-year (new accounts) | somewhat easy | very good |
| Surge.sh | yes | easy | good |
| Vercel | yes | easy | good |
| Workers Sites | no | somewhat easy | good |
Storing and Retrieving Data: Real-time NoSQL Databases
NoSQL solutions like MongoDB have been coexisting with relational databases like MySQL for some time (see the differences and how to choose), but real-time processing takes NoSQL to the next level by enabling cloud storage for state management, such as a user entering their name or clicking a radio button.
If you’re familiar with Redux and Vuex — React and Vue.js libraries for state management, respectively — think of integrating that concept with a cloud storage provider.
Services
Amazon DynamoDB is a “fully managed, multiregion, multimaster, durable database with built-in security, backup and restore, and in-memory caching for internet-scale applications”. But as with many things AWS, it’s difficult to implement and very hard to debug (see Why Amazon DynamoDB isn’t for everyone, by Forrest Brazeal). In all fairness to Amazon, they also built DataStore into AWS Amplify (with GraphQL and REST API support) with a more straightforward approach, in line with the simplicity of the rest of Amplify’s products.
Google Firestore made real-time NoSQL databases — a fairly complex topic in and of itself — as simple as they can be, with pretty much all the capabilities DynamoDB has. It’s very well documented (with introductory clips that are fun to watch). And React and Vue.js have wrappers around Firestore with react-redux-firebase and Vuexfire, respectively.
Cloudflare sure knows how to take performance to the very extreme, and Workers KV, a serverless key-value storage for applications, is a fine example of what a well engineered product looks like. The premise of Workers KV is that you can access a key as if it were a local file within your app, and the content will be the value stored for that key. That’s it — no API to implement, no extra coding. And because of the unbeatable performance of the Cloudflare CDN, this approach can actually be faster than querying a NoSQL database. And as simple as it is, it scales seamlessly to millions of requests. 👏
And finally, there’s FaunaDB, a startup that crafted a solution with native GraphQL and a simple pricing (including a free plan) that can be implemented in minutes.
Managing Content: Headless CMS
In the “monolithic” way of doing things, whenever we used a given content management system — such as WordPress, Django, or Joomla! — it meant that we also needed to use the front-end engine that came attached to it, as back and front end were “coupled” components of a single piece of software (see our introduction to the Jamstack for more info about tightly vs loosely coupled sites).
Enter the headless CMS — a back end only without a front end. Since a headless CMS would normally expose an API or generate static content in the way of Markdown or HTML files, the front end can be anywhere really. In fact, multiple and simultaneous interfaces can be created for web sites, mobile apps, and Internet of Things (IoT) apps.
Products and Services
There are a number of headless CMSs, both as software you can download and configure where you do the deployments yourself, or offered in the software-as-a-service (SaaS) model where everything is taken care of for you.
Some features you can expect to find:
- localization (l10n) and internationalization (i18n)
- microservices architecture with a RESTful API
- editor interface
- customization
- versioning*
* Since some headless CMS will integrate smoothly with your git repo, the versioning capability can actually be a remarkable improvement over a regular CMS.
Self-hosted Headless CMS
Ghost, “the #1 open source headless Node.js CMS”, is certainly the one with the most stars on GitHub. Not only can Ghost handle content, but it also offers a number of integrations to manage payments (Stripe), email lists (MailChimp), shopping (Shopify), and many more. And then there’s Ghost(Pro), which is the official managed hosting for Ghost with commercial support.
Fairly close to Ghost in popularity comes Strapi, with REST and GraphQL APIs, and 1-click deployments on Heroku, AWS, and DigitalOcean. It has “starters” (template projects) to work seamlessly with Gatsby, Vue.js with Nuxt.js, React with Next.js, and Angular. It also runs on Node.js and has support for a number of database engines.
Netlify CMS is also a popular option built as a single–page React app. There’s Directus, which wraps custom SQL databases with an API and provides an intuitive admin app to manage its content, and the commercial companion Directus Cloud. There’s also TinaCMS, which is also React-based, and Ponzu, Copckpit, and many more, which you can explore oin the comprehensive list provided by headlesscms.org.
SaaS Headless CMS
CloudCannon is the cloud CMS for Jekyll (we’ll review Jekyll later in the “static site generators” section), with smooth integration with GitHub, Bitbucket and Dropbox. They have a free plan as well but with no global CDN hosting.
Contentful is something different: a content hub where business owners, marketers, developers and project managers can all go to set and manage all of the data sources of an organization. And their headless CMS is just a part of that strategy. The Contentful platform is fully featured, very well documented, with plenty of open-source tools. And while the pricing is a bit confusing, there’s actually a free plan that only requires attribution.
There are other SaaS headless CMSs with free plans, such as DatoCMS and Sanity with a proposition similar to that of Contentful; Forestry, with support for a number of static generators; GraphCMS, with GraphQL support; and Prismic. These are just a few of the many options.
Sending Information: Forms without Code
Sending data through forms has forever been one of the main uses for server-side processing. There are essentially two approaches to addressing this problem on a static site, each with pros and cons.
From Builders, Embedded and Hosted Forms
Many times integrating a “powered by” external form is more than enough to collect email addresses or to receive feedback.
Google Forms have offered this possibility since 2008 entirely for free, with a simple interface that stores submissions on Google Sheets, and that can send alerts via email every time there’s a submission.
Formstack takes forms to another level by providing an integrated workflow supporting digital signatures, document generation, Salesforce integration, and more. They offer a free tryout but no free plans.
Then you have the extremely easy-to-use form builders JotForm and Wufoo, which integrate handling payments, among other things, or Typeform, which makes forms and surveys … pretty? All of them offer free plans.
External API: Form Processing as a Service (FPaaS)
Sometimes a builder won’t cut it, as you need more flexibility to present information and fields, or to fully integrate the look and feel of the form with the rest of your website. For this you will need to integrate an API.
The way these services work is surprisingly easy: you specify a URL for submission that will do the processing for you. At most you’ll have to set a few things up but most probably won’t need to do any extra coding.
There are a number of providers offering free plans, such as Form.IO, Formcarry, Formspark, and Netlify Forms. They all work in a similar way and are very easy to implement.
FormDen and FormKeep are also form builders that can otherwise be used just as back ends, though none of them offer free plans.
Programming Server-Side Logic: Function as a Service (FaaS)
Couldn’t find an API that does quite what you want? Create it! You don’t need to resort back to a hosted back-end system to process server-side logic, with all the hassle that comes with it (maintenance, bills, credentials, security patches). Instead, you can implement a micro-service in your language of choice (oftentimes JavaScript, Python, or Go), encapsulate that logic into functions, and offer them through a RESTful API.
As with pretty much everything else in this list, you won’t be paying anything for a function that’s not being actively used, so no worries for just leaving it sitting there (but beware that spikes in traffic might also trigger extra billing).
Providers
While the implementation details for AWS Lambda, Azure Functions and Google Cloud Functions may differ, they all work in pretty much the same fashion and you’ll need a degree of familiarity with AWS, Azure or GCP. AWS Lambda has the richest language support of them all (and also Amazon API Gateway to help you wrap your functions into a maintainable API with monitoring tools), while Azure — not surprisingly — has the best support for .NET Framework and .NET Core (with different versions supporting different runtimes and even TypeScript transpiled to JavaScript). But be aware that Azure systematically ranks as the slowest service by a margin.
Cloud Functions for Firebase and Netlify Functions are wrappers around Google Cloud Functions and AWS Lambda, respectively. They greatly simplify the management of functions on the cloud, as you effectively can get away without even having an account on such services. Code deployment and versioning become trivial with Netlify — which also has very good community support — as it will smoothly integrate with your repo offering stage, previewing, and rolling back at a click (or a commit). Simplicity naturally comes at the expense of losing some flexibility (see Firebase Cloud Functions: the great, the meh, and the ugly by Pier Bover).
IBM Cloud Functions (based on Apache OpenWhisk) and Cloudflare Workers are other services you might want to look at. IBM has an impressive list of supported languages, including the option to deploy Docker containers with your own runtime. However, it ranked somewhat poorly performance wise. And just as Netlify systematically manages to make things the simplest, Cloudflare again makes things the fastest (and by a difference).
Comparison
| service | languages | overhead* | coldstart* | difficulty | support |
|---|---|---|---|---|---|
| AWS Lambda | C#, Go, Java, JavaScript, PowerShell, Python, Ruby | 86 ms 🟢 | 589 ms | high | 👍 very good |
| Azure Functions | C#, F#, Java, JavaScript and TypeScript, PowerShell, Python | 760 ms 🔴 | 5,907 ms 🔴 | high | 👎 very poor |
| Cloud Functions for Firebase | JavaScript and TypeScript | 642 ms 🔴 | 168 ms | low | 👍 very good |
| Cloudflare Workers | JavaScript, COBOL | 70 ms 🟢 | 76 ms 🟢 | intermediate | intermediate |
| Google Cloud Functions | Go, Java, Node.js, Python | 642 ms 🔴 | 168 ms | high | 👍 very good |
| IBM Cloud Functions | .C#, Go, Java, JavaScript, PHP, Python, Ruby, Swift, and Docker containers | 136 ms | 2,103 ms 🔴 | high | no info |
| Netlify Functions | Go, Node.js | 86 ms 🟢 | 589 ms | very low | 👍 very good |
* As measured by λ Serverless Benchmark, the overhead is the time from request to response without the time the function took (for a concurrency of 50), and the coldstart is how long the servers takes to respond when queried are spanned every 3 hours; the lower the values, the better.
Authenticating Users: Identity as a Service
Identity as a Service (IDaaS), also called sometimes Authentication as a Service (AaaS), involves managing a full user registration, confirmation, and authentication with just APIs. The Geist of “stateless authentication” is that a user will authenticate against a third-party and come back to you with a valid “token” that you can verify, or revoke if need be.
In some cases, a provider might even offer a “drop-in” user interface (UI) that will work seamlessly across desktop and mobile, all of which could potentially save you very long hours of work.
Services
Auth0 has been in business the longest and has quickstart guides for a number of scenarios. It’s an excellent provider if you want to implement a complex solution and already have some experience implementing authentication. But as they point out, “identity is complex, deal with it”. The large scope Auth0 services (universal login, single sign on (SSO), multifactor authentication, branch password detection, and so on) can be overwhelming if you’re just starting on the topic.
Firebase Authentication (with its ready-to-use UI) and Authentication with Amplify are also very comprehensive and flexible, and somewhat presented in a more straightforward manner than Auth0. Firebase also offers anonymous authentication! Curious? Check out this clip:
Once again, Netlify seems to come up with the easiest solution to implement with Netlify Identity and its open-source zero config netlify-identity-widget to create a secure login in 10 minutes! But of course, there are some limitations (check out Four Dealbreakers in Netlify Identity, by Jean Cochrane).
You can also check Okta, FusionAuth and LoginRadius, all of which have free plans. There are no freebies for Ping Identity, OneLogin, and Ubisecure, which are more oriented to the enterprise sector. Finally, consider Cloudflare Access, as everything Cloudflare does is rock solid.
Going F·A·S·T: Static Site Generators (SSG)
I can hear some of you saying “all of this might be okay for future projects, but my sites are already dynamic, so what to do?” Here’s when static site generators enter the picture.
You can have the best of both worlds — the convenience of a familiar CMS and static pages with code and data splitting, preloading, caching, image optimization, and all sorts of performance enhancements. An SSR will bridge that gap by querying your database and generating static output out of it (for example, Markdown pages), and with some settings to set your template, you’ll be all set.
The listing here is tiny compared to the ever increasing list of SSRs. Have a look at StaticGen for more info.
Main Products
GatsbyJS is powered by React.js and webpack, meaning that it can generate progressive web apps (aka PWAs, websites that look and feel like an apps). It also supports GraphQL (see Write Apps with Better Building Blocks) and it has +1,000 plugins to get data from anywhere (WordPress, Drupal, Contentful, GraphCMS, DatoCMS, and many more). See how GatsbyJS says it compares to its main competitors, Hugo and Jekyll.
All of this flexibility comes at a cost, as setting and customizing GatsbyJS can be a time-consuming process, and if you don’t have a decent understanding of React — and therefore JavaScript — you won’t be able to make much of it. That’s where Gatsby Cloud comes in, offering support to build and maintain Gatsby sites for free or for a fee, where you could automate your fast builds, access to previews, generate daily edits, and fire deployments with ease to Netlify, Cloudflare, AWS CloudFront or Akamai.
Hugo claims to be “the world’s fastest framework for building websites”, and it sure can generate massive sites in milliseconds. With built-in templates (literally hundreds of them available) and native support for internationalization (i18n), it’s also one of the most popular SSGs. Hugo is a Go app, and while Go isn’t hard to set and learn, you’ll definitely need to be checking the documentation often if you aren’t familiar with it.
Unlike GatsbyJS, configuring and deploying Jekyll is a rather straightforward process. Furthermore, Jekyll is the only SSR supported by GitHub Pages (Tom Preston-Werner, creator of Jekyll, is also a co-founder of GitHub), and can smoothly deploy static sites for free right out of your GitHub repos! Jekyll uses Shopify’s Liquid template language, which is also easy to learn. The downsides? As a Ruby app, Jekyll can be hard to set on a Windows environment, and optimizations such as minimizing JavaScript code and image preloading aren’t included by default. In fact, Jekyll doesn’t even aim at generating a PWA but just purely static sites — which might still be fine depending on what you need.
Comparison
| Product | Language | Templating | Setting | GitHub stars |
|---|---|---|---|---|
| GatsbyJS | JavaScript | React.js | difficult | |
| Hugo | Go | Go (library) | intermediate | |
| Jekyll | Ruby | Liquid | easy |
Others
WP2Static is an SSR designed specifically for WordPress (WP). It has a small but very interesting set of plugins, like Algolia search, and Cloudflare Workers and Netlify deployments. HardyPress is actually a SaaS solution to generate static WP sites, and for a fee you’ll have an admin panel from where you can enter some credentials to access your online WP installations to manage everything: shut down live WP installs that were already imported, transparent deployment to global a CDN, HTTPS, forms, search. Other WP-related SSGs with commercial support are Shifter, Strattic, and Sitesauce.
Since I am admittedly biased towards Vue.js, I had to include VuePress, which is intended to generate single page applications (SPAs) and has a minimal setup with markdown-centered files, and it’s also powered by webpack. Gridsome and Nuxt.js are more featured Vue.js powered frameworks with SSR capabilities.
Selling and Processing Payments: Headless Shopping Carts
The architecture and benefits of headless ecommerce is not that different from that of a headless CMS: massive cost reduction (hosting, licenses, maintenance), less time to market, seamless integration, and — a big one for commerce — “omnichannel” capabilities.
Continue reading 100 Jamstack Tools, APIs & Services to Power Your Sites on SitePoint.
