Translate

Thursday, 31 October 2019

How to Build a Web App with GraphQL and React

In this tutorial, we'll learn to build a web application with React and GraphQL. We'll consume an API available from graphql-pokemon and serve it from this link, which allows you to get information about Pokémon.

GraphQL is a query language for APIs and a runtime for fulfilling those queries created by Facebook. GraphQL provides a complete and understandable description of the data in your API, gives clients the power to ask for exactly what they need and nothing more, makes it easier to evolve APIs over time, and enables powerful developer tools.

In this tutorial, we'll only learn the front end of a GraphQL application that makes use of Apollo for fetching data from a ready GraphQL API hosted on the web.

Let's get started with the prerequisites!

Prerequisites

There are a few prerequisites for this tutorial:

  • recent versions of Node.js and npm installed on your system
  • knowledge of JavaScript/ES6
  • familiarity with React

If you don't have Node and npm installed on your development machine, you can simply download the binaries for your system from the official website. You can also use NVM, a POSIX-compliant bash script to manage multiple active Node.js versions.

Installing create-react-app

Let's install the create-react-app tool that allows you to quickly initialize and work with React projects.

Open a new terminal and run the following command:

npm install -g create-react-app

Note: You may need to use sudo before your command in Linux and macOS or use a command prompt with administrator rights if you get EACCESS errors when installing the package globally on your machine. You can also simply fix your npm permissions.

At the time of writing, this installs create-react-app v3.1.1.

Creating a React Project

Now we're ready to create our React project.

Go back to your terminal and run the following command:

create-react-app react-pokemon

Next, navigate into your project's folder and start the local development server:

cd react-pokemon
npm start

Go to http://localhost:3000 in your web browser to see your app up and running.

This is a screenshot of the app at this point:

The current state of our app

Installing Apollo Client

Apollo Client is a complete data management solution that's commonly used with React, but can be used with any other library or framework.

Apollo provides intelligent caching that enables it to be a single source of truth for the local and remote data in your application.

You'll need to install the following packages in your React project to work with Apollo:

  • graphql: the JavaScript reference implementation for GraphQL
  • apollo-client: a fully-featured caching GraphQL client with integrations for React, Angular, and more
  • apollo-cache-inmemory: the recommended cache implementation for Apollo Client 2.0
  • apollo-link-http: the most common Apollo Link, a system of modular components for GraphQL networking
  • react-apollo: this package allows you to fetch data from your GraphQL server and use it in building complex and reactive UIs using the React framework
  • graphql-tag: this package provides helpful utilities for parsing GraphQL queries such as gql tag.

Open a new terminal and navigate to your project's folder, then run the following commands:

npm install graphql --save
npm install apollo-client --save
npm install apollo-cache-inmemory --save
npm install apollo-link-http --save
npm install react-apollo --save
npm install graphql-tag --save

Now that we've installed the necessary packages, we need to create an instance of ApolloClient.

Open the src/index.js file and add the following code:

import { ApolloClient } from 'apollo-client';
import { InMemoryCache } from 'apollo-cache-inmemory';
import { HttpLink } from 'apollo-link-http';

const cache = new InMemoryCache();
const link = new HttpLink({
  uri: 'https://graphql-pokemon.now.sh/'
})

const client = new ApolloClient({
  cache,
  link
})

We first create an instance of InMemoryCache, then an instance of HttpLink and we pass in our GraphQL API URI. Next, we create an instance of ApolloClient and we provide the cache and link instances.

Connect the Apollo Client to React Components

After creating the instance of ApolloClient, we need to connect it to our React component(s).

We'll use the new Apollo hooks, which allows us to easily bind GraphQL operations to our UI.

We can connect Apollo Client to our React app by simply wrapping the root App component with the ApolloProvider component — which is exported from the @apollo/react-hooks package — and passing the client instance via the client prop.

The ApolloProvider component is similar to React's Context provider. It wraps your React app and places the client in the context, which enables you to access it from anywhere in your app.

Now let's import the ApolloProvider component in our src/index.js file and wrap the App component as follows:

The post How to Build a Web App with GraphQL and React appeared first on SitePoint.


NordVPN Launches Bug Bounty Program Along With Other Security Upgrades

NordVPN has recently announced major security upgrades. The changes came following a security breach that hit the firm in the

NordVPN Launches Bug Bounty Program Along With Other Security Upgrades on Latest Hacking News.


Thousands Of Android Users Fall Prey To xHelper Malware Menace

A new Android malware has made it to the news as it has taken thousands of devices by storm. According

Thousands Of Android Users Fall Prey To xHelper Malware Menace on Latest Hacking News.


Chinese Hackers Compromise Telecom Servers to Spy on SMS Messages

A group of Chinese hackers carrying out political espionage for Beijing has been found targeting telecommunications companies with a new piece of malware designed to spy on text messages sent or received by highly targeted individuals. Dubbed "MessageTap," the backdoor malware is a 64-bit ELF data miner that has recently been discovered installed on a Linux-based Short Message Service Center

US Fast Food Restaurant Krystal Warns Users Of A Security Breach

US-based chain of restaurants Krystal has recently alerted customers about a security breach. As revealed, the security incident affected a

US Fast Food Restaurant Krystal Warns Users Of A Security Breach on Latest Hacking News.


Not All Hackers are Larcenists

When you hear the word hacker, what is the first thought that pops into your mind? Does it have negative

Not All Hackers are Larcenists on Latest Hacking News.


DeepFakes: When seeing isn’t believing

Is the world as we know it ready for the real impact of deepfakes?

The post DeepFakes: When seeing isn’t believing appeared first on WeLiveSecurity


Leading Web Domain Name Registrars Disclose Data Breach

Another day, another massive data breach—this time affecting a leading web technology company, as well as both of its subsidiaries, from where millions of customers around the world have purchased domain names for their websites. The world's top domain registrars Web.com, Network Solutions, and Register.com disclosed a security breach that may have resulted in the theft of customers' account

Security Vulnerability Discovered in Xiaomi Pet Feeders

While each passing day makes the internet-of-things more popular, it also makes it more likely to exhibit security bugs. Earlier

Security Vulnerability Discovered in Xiaomi Pet Feeders on Latest Hacking News.


Top 7 Photo Editors Like Photoshop in 2019

Looking for free photo editors like Photoshop to make photos and designs more professional? Adobe Photoshop is the dream of any designer and retoucher since it offers a professional toolset for creative process.

However, the biggest difficulty everyone faces is its quite high monthly price, which often becomes a deal-breaker and leads to many people searching for Photoshop torrents to avoid paying such a huge sum for Adobe products.

Luckily, it’s possible to find a photo editor like Photoshop that is either completely free or cheaper and is capable of doing almost everything that Photoshop can, and sometimes even more.

7 Photo Editors Like Photoshop

Even though Adobe Photoshop is often viewed as the best option among graphics editors, its capabilities are frequently superfluous. Other than that, Adobe is transferring more and more users to the “Cloud” system, which isn’t to everyone’s taste.

Finally, during the last few years, people have been complaining more and more about performance drops when using Adobe software due to the heavy load it puts on the processor. It’s often enough to open a couple of projects in Photoshop even on a powerful PC and you won’t even be able to use your browser comfortably.

Currently, Photoshop remains the leading choice among professionals, but more and more users are searching for decent free photo editors like Photoshop.

Here we have compiled list of some best photoshop alternatives.

1. Affinity Photo

Affinity Photo

Affinity Photo started to create a stir in the creative community almost from the moment it was released. It’s probably the most credible photo editor similar to Photoshop that we’ve seen to this day.

The program supports Photoshop’s signature file standards and is aimed at photographers and designers while costing significantly less.

Being completely compatible with Photoshop and other file formats, it targets specifically professional photographers and designers. While Affinity Photo is much cheaper than Photoshop (without a subscription), its creators state that their software is actually better, promising superior performance and fewer errors.

Frankly speaking, the performance boost you receive will probably highly depend on what hardware you’re using (the program was developed for using the latest quadcore technology).

Pros:

  • Works with RAW and PSD files
  • RGB, CMYK, LAB and Greyscale support
  • Layer-focused image editing

Cons:

  • Doesn’t have premade lens-specific corrections
  • Users can’t customize the workspace
  • Not very beginner-friendly

2. GIMP

GIMP

If you want to get a free photoshop alternative that is just as powerful and multifunctional, then GIMP is one of the best alternatives. It is free, open-source, which allows a huge number of volunteers to continuously improve it.

Thanks to that fact, GIMP has loads of plugins and scripts written for it and it can also work with plugins for Adobe Photoshop. Another benefit of GIMP is that it appeared all the way back in the mid-90s so you can find a huge number of free courses and guides on the web.

GIMP offers a wide selection of tools and it’s a fantastic option if you’re looking for a free photo editor similar to Photoshop. The UI is slightly different from Photoshop’s but you can modify it to your liking.

If you find a “monstrous” program with huge system requirements and a scary price tag unappealing – GIMP is the option for you.

Pros:

  • Constant maintenance and updates that solve relevant issues and add new functions
  • Smooth performance on all platforms
  • Extremely versatile and easily customizable with plugins and scripts

Cons:

  • I didn’t experience any problems but heard some people suffer from a couple of bugs
  • Doesn’t support 16bit color channels
  • Some functions are in development for way too long

3. Photo Pos Pro

Photo Pos Pro

Photo Pos Pro is another decent photo editor like Photoshop that strives to be as user-friendly as possible. It has separate modes for beginners and advanced users. In beginner-mode, you can apply filters in a single click and perform basic photo corrections.

The professional mode has a UI similar to Photoshop. Most find its interface to be more intuitive and comprehensible than GIMP.

Alas, this free photo editor like Photoshop has a very serious flaw. The maximum size of saved files is limited to 1024×2014 pixels.

If you need to work with larger files, the photo editor will offer you to purchase the paid version for $20. That’s a bit unpleasant, but still several times cheaper than Photoshop.

Pros:

  • Capability to work with layers
  • All kinds of brushes, templates, textures and gradients
  • Tools for batch, manual and automatic color correction

Cons:

  • No way to create your own brushes
  • Rather poor printing preparation functionality

4. Pixlr Editor

Pixlr Editor

Pixlr Editor is a rather unusual photo editor similar to Photoshop. It’s available in several versions, including PC, mobile and as an online editor. The web version is the sole reasonable Photoshop replacement since it’s the only one with layer support.

Sadly, the web version of this program can’t be set to full-screen since there will still be unused space on the right. However, that’s the only serious drawback of Pixlr Editor.

All tools found in Ps are available and work great. Overall, this is the perfect photo editor app like Photoshop for situations when you need to edit an image but you don’t have the right to install a downloadable editor.

Pros:

  • Available for free
  • Has its own smartphone app
  • Plenty of tools to work with

Cons:

  • Can be slightly overwhelming for beginners
  • Requires Internet connection

5. Pixelmator

Pixelmator

Pixelmator is a universal graphics editor build on the principles of simplicity and accessibility for everyone. The program is available only on iOS and MacOS, which explains such an approach.

Pixelmator positions itself as a photo editor like Photoshop that is simpler and more intuitive.

Instead of a single workspace, here we have the main window and movable panels that you can open in the View menu or by using shortcuts. The number of picture editing tools isn’t large but won’t leave you complaining either.

I also want to mention the smart selection function that was added with the latest update. My subjective experience suggests that this option works better than in Photoshop and is slightly better visible.

There’s no need to impose this editor on professionals, but it’s a perfect fit for regular users. One of the most “magical” capabilities of Pixelmator is object removal. You pick the diameter of the selection, add a couple of brush strokes, and the photo will be cleared of any excess objects.

Pros:

  • Clean user-friendly UI
  • Large choice of effects other than photo adjustments
  • Drawing tools are efficient and error-free

Cons:

  • Doesn’t offer non-destructive editing or a history panel
  • No CMYK and RAW support

6. PaintNet

PaintNet

Paintnet represents a Windows-based free photo editor like Photoshop supplied by Microsoft. However, don’t let that fact scare you: despite being a default program, it’s a surprisingly multifunctional and useful tool.

This option focuses on ease of use and is better suited for photo editing than artistic creations. Nonetheless, it includes a variety of special effects that allow you to easily create an artificial perspective, mix and move pixels on the canvas, select and copy areas, etc.

A solid selection toolset, layer support and such settings as curves and brightness/contrast mean that PaintNet is a wonderful free photo editor similar to Photoshop, especially if you don’t need the latest additions to Ps’ toolset.

Pros:

  • Allows working with image layers
  • Updates come out almost every month
  • Contains a satisfying number of effects

Cons:

  • Lack of functions for professional graphics design

7. Adobe Photoshop Express

Adobe Photoshop Express

Adobe Photoshop Express can be considered a lighter, more limited version of Photoshop. This editor can be found online or as an app for Windows, iOS and Android. This is the simplest solution described in the article.

It doesn’t have layer support, plugins or brushes and works only with JPEG, JPG and JPE images below 16MB. You can’t even crop photos.

The only things you can find in this photo editor app like Photoshop are some basic settings and a collection of beautiful filters that you can use to enhance a photo before posting it on social media.

As you can see, it isn’t suited for deep photo editing so you might as well go with a trustworthy professional photo editing service online instead for a couple of backs.

Pros:

  • Incredibly easy to use
  • Availability of basic tools
  • Stable performance

Cons:

  • Lack of most professional tools
  • No RAW support
  • Max file size of 16MB

Conclusion

If you ever start thinking about replacing Photoshop, I hope you’ll take note of some of the offered programs. If you need to perform complex image editing that requires using many different tools, then Affinity Photo, GIMP or Pixelmator are perfectly suited for such a task. If all you need is to make a couple of simple adjustments (size change, rotation, basic color correction), then you should take a closer look at PaintNet or Photo Pos Pro.

If you need a photo editor like Photoshop that you can use online, straight from your browser – Pixlr and Adobe Photoshop Express are there for you. Interested in other Adobe products, read more about a legal way to download Lightroom free.

I hope you will love these photoshop alternatives. If you know about any other good editor then please mention in comments, I will love to add it to the list.

The post Top 7 Photo Editors Like Photoshop in 2019 appeared first on The Crazy Programmer.


Two Hackers Who Extorted Money From Uber and LinkedIn Plead Guilty

Two grey hat hackers have pleaded guilty to blackmailing Uber, LinkedIn, and other U.S. corporations for money in exchange for promises to delete data of millions of customers they had stolen in late 2016. In a San Jose courthouse in California on Wednesday, Brandon Charles Glover (26) of Florida and Vasile Mereacre (23) of Toronto admitted they accessed and downloaded confidential corporate

5 Places Where Hackers Are Stealthily Stealing Your Data In 2019

Skyrocketing data breaches bring incalculable losses to organizations and can cost cybersecurity executives their jobs. Here we examine the top five places in 2019 where cybercriminals are stealing corporate and government data without ever getting noticed and then learn how to avoid falling victim to unscrupulous attackers. 1. Misconfigured Cloud Storage 48% of all corporate data is

Wednesday, 30 October 2019

Hackers Target Indian Nuclear Power Plant – Everything We Know So Far

A story has been making the rounds on the Internet since yesterday about a cyber attack on an Indian nuclear power plant. Due to some experts commentary on social media even after lack of information about the event and overreactions by many, the incident received factually incorrect coverage widely suggesting a piece of malware has compromised "mission-critical systems" at the Kudankulam

How to Build Your First Discord Bot with Node.js

How to Build Your First Discord Bot with Node.js

Nowadays, bots are being used for automating various tasks. Since the release of Amazon's Alexa devices, the hype surrounding automation bots has only started to grow. Besides Alexa, other communication tools like Discord and Telegram offer APIs to develop custom bots.

This article will solely focus on creating your first bot with the exposed Discord API. Maybe the most well-known Discord bot is the Music Bot. The music bot lets you type a song name and the bot will attach a new user to your channel who plays the requested song. It’s a commonly used bot among younger people on gaming or streaming servers.

Let’s get started with creating a custom Discord bot.

Prerequisites

  • Node.js v10 or higher installed (basic knowledge)
  • a Discord account and Discord client
  • basic knowledge of using a terminal

Step 1: Setup Test Server

First of all, we need a test server on which we can later test our Discord bot. We can create a new server by clicking the plus icon in the left bottom corner.

click create server

A pop-up will be displayed that asks you if you want to join a server or create a new one. Of course, we want to create a new server.

select create server

Next, we need to input the name for our server. To keep things simple, I've named the server discord_playground. If you want, you can change the server location depending on where you're located to get a better ping.

server name

If everything went well, you should see your newly created server.

new server

Step 2: Generating Auth Token

When we want to control our bot via code, we need to register the bot first under our Discord account.

To register the bot, go to the Discord Developers Portal and log in with your account.

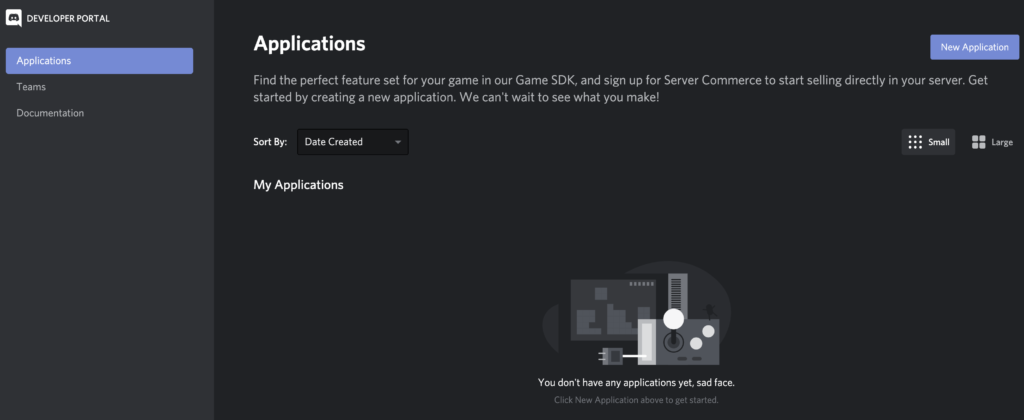
After logging in, you should be able to see the dashboard. Let's create a new application by clicking the New Application button.

developer dashboard

Next, you'll see a pop-up that asks you to input a name for your application. Let's call our bot my-greeter-bot. By clicking the Create button, Discord will create an API application.

create application

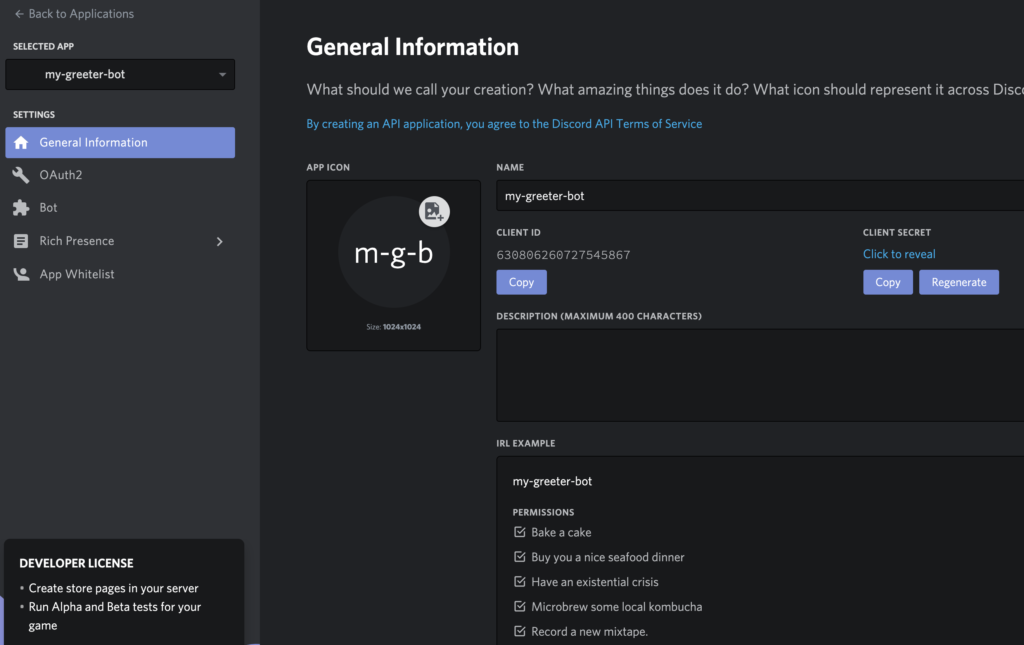
When the application has been created, you'll see the overview of the newly created my-greeter-bot application. You'll see information like a client ID and client secret. This secret will be used later as the authorization token.

overview greeter bot

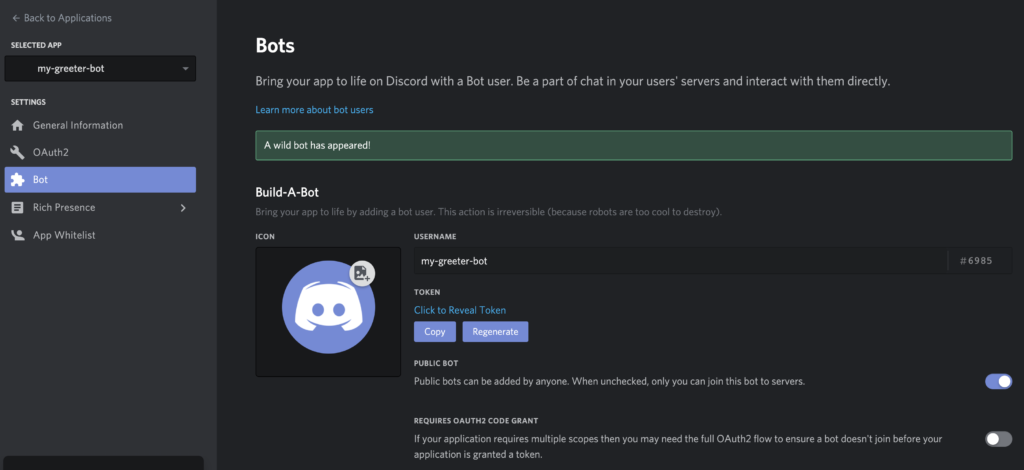
Now, click on the Bot menu option in the Settings menu. Discord will build our my-greeter-bot application and add a bot user to it.

add bot

When the bot has been built, you get an overview of your custom bot. Take a look at the Token section. Copy this authorization token and write it down somewhere, as we'll need it later to connect to our bot user.

bot tab overview

The post How to Build Your First Discord Bot with Node.js appeared first on SitePoint.


Facebook builds tool to confound facial recognition

However, the social network harbors no plans to deploy the technology in any of its services any time soon

The post Facebook builds tool to confound facial recognition appeared first on WeLiveSecurity


Tuesday, 29 October 2019

Facebook Sues Israeli NSO Spyware Firm For Hacking WhatsApp Users

Finally, for the very first time, an encrypted messaging service provider is taking legal action against a private entity that has carried out malicious attacks against its users. Facebook filed a lawsuit against Israeli mobile surveillance firm NSO Group on Tuesday, alleging that the company was actively involved in hacking users of its end-to-end encrypted WhatsApp messaging service.

Mysterious malware that re-installs itself infected over 45,000 Android Phones

Over the past few months, hundreds of Android users have been complaining online of a new piece of mysterious malware that hides on the infected devices and can reportedly reinstall itself even after users delete it, or factory reset their devices. Dubbed Xhelper, the malware has already infected more than 45,000 Android devices in just the last six months and is continuing to spread by

What Is Functional Programming?

As a programmer, you probably want to write elegant, maintainable, scalable, predictable code. The principles of functional programming, or FP, can significantly aid in these goals.

Functional programming is a paradigm, or style, that values immutability, first-class functions, referential transparency, and pure functions. If none of those words makes sense to you, don't worry! We're going to break down all this terminology in this article.

Functional programming evolved from lambda calculus, a mathematical system built around function abstraction and generalization. As a result, a lot of functional programming languages look very mathematical. Good news, though: you don't need to use a functional programming language to bring functional programming principles to your code. In this post, we'll use JavaScript, which has a lot of features that make it amenable to functional programming while not being tied to that paradigm.

The Core Principles of Functional Programming

Now that we've discussed what functional programming is, let's talk about the core principles behind FP.

The post What Is Functional Programming? appeared first on SitePoint.


The Pirate Bay was recently down for over a week due to a DDoS attack

It seems like the prolonged downtime and technical difficulties faced by The Pirate Bay over the past several weeks were due to a series of distributed denial of service (DDoS) attacks against the widely-popular torrent website by malicious actors. For those unaware, The Pirate Bay was down for more than a week with most visitors displayed a Cloudflare error mentioning that a "bad gateway" is

Italian Financial Service UniCredit Discloses Data Breach Affecting 3 Million Customers

This time, the victim is an Italian financial service that confessed to the security incident. Specifically, the firm UniCredit has

Italian Financial Service UniCredit Discloses Data Breach Affecting 3 Million Customers on Latest Hacking News.


What you may be getting wrong about cybersecurity

Attention-grabbing cyberattacks that use fiendish exploits are probably not the kind of threat that should be your main concern – here's what your organization should focus on instead

The post What you may be getting wrong about cybersecurity appeared first on WeLiveSecurity


How MSPs can become Managed Detection and Response (MDR) Providers

Managed detection and response (MDR) is one of the fastest-growing segments in the cybersecurity market. ESG research from April 2019 reveals that 27% of organizations are actively pursuing an MDR project, while another 11% plan to pursue an MDR project in the future. Cynet now enables service providers to add MDR to their portfolio and gain an important competitive advantage over

MageCart Gang Recently Targeted P&G E-Store

The notorious MageCart Gang once again made it to the news since attacking another e-commerce store. This time, it is

MageCart Gang Recently Targeted P&G E-Store on Latest Hacking News.


Handshaking Lemma in Graph Theory – Handshaking Theorem

Hello Everyone,

Today we will see Handshaking lemma associated with graph theory. Before starting lets see some terminologies. 

Degree: It is a property of vertex than graph. Degree is a number of edges associated with a node.

Pendant vertices: Vertices with degree 1 are known as pendant vertices.

Isolated vertices: Vertices with degree 0 are known as Isolated vertices. 

Now let us see the statement of the lemma first, It says:

In every finite undirected graph number of vertices with odd degree is always even. 

Note: This theorem is only correct for undirected graphs with finite length.

The Handshaking lemma can be easily understood once we know about the degree sum formula. The degree sum formula says that:

The summation of degrees of all the vertices in an undirected graph is equal to twice the number of edges present in it. 

It can be stated as:

Handshaking Theorem 1

This is evident as every edge is associated with two nodes and will add 2 to the total summation. 

Let’s take an example :

Handshaking Lemma

In the above image the number of edges is 8, so |E| = 8.

Now,

deg(A) = 3

deg(B) = 2

deg(C) = 3

deg(D) = 2

deg(E) = 4

deg(F) = 2

Which sums upto 16 which is equal to 2*|E|.

Now let’s come to our original statement.

In every finite undirected graph number of vertices with odd degree is always even. 

Now to understand this,

Lets write the above degree some formula as:

Handshaking Theorem 2

Here k denotes vertices with odd degree and t denotes vertices with degree.

The summation of degrees of all the vertices with even degree will be even now remaining are the vertices with odd degree and as we know the total sum must be even so the summation of degrees of all the vertices having odd degree must be even. This is only possible if the number of vertices is even which proves our lemma.

The above lemma is very useful for proving some very interesting properties of trees and to understand different properties of cut vertices, Full and complete binary trees.

The post Handshaking Lemma in Graph Theory – Handshaking Theorem appeared first on The Crazy Programmer.


Adobe Leaked 7.5 Million Records Of Creative Cloud Users’ Data

Once again, a prominent technology firm has made a blunder with regard to users’ privacy. This time, Adobe inadvertently exposed

Adobe Leaked 7.5 Million Records Of Creative Cloud Users’ Data on Latest Hacking News.


Russian Hackers Targeting Anti-Doping Agencies Ahead of 2020 Tokyo Olympics

As Japan gears up for the upcoming 2020 Summer Olympics in Tokyo for the next year, the country needs to brace itself for sophisticated cyberattacks, especially from state-sponsored hackers. Microsoft has issued a short notice, warning about a new wave of highly targeted cyberattacks by a group of Russian state-sponsored hackers attempting to hack over a dozen anti-doping authorities and

Monday, 28 October 2019

Two New MageCart Attack Victims: Sixth June, American Cancer Society

Today we report about further prey of the notorious MageCart attack. This time the victims turn out to be the

Two New MageCart Attack Victims: Sixth June, American Cancer Society on Latest Hacking News.


6 Tools for Debugging React Native

Debugging is an essential part of software development. It’s through debugging that we know what’s wrong and what’s right, what works and what doesn’t. Debugging provides the opportunity to assess our code and fix problems before they’re pushed to production.

debugging featured image

In the React Native world, debugging may be done in different ways and with different tools, since React Native is composed of different environments (iOS and Android), which means there’s an assortment of problems and a variety of tools needed for debugging.

Thanks to the large number of contributors to the React Native ecosystem, many debugging tools are available. In this brief guide, we’ll explore the most commonly used of them, starting with the Developer Menu.

Debugging is twice as hard as writing the code in the first place. Therefore, if you write the code as cleverly as possible, you are, by definition, not smart enough to debug it. — Brian W. Kernighan

The Developer Menu

the developer menu

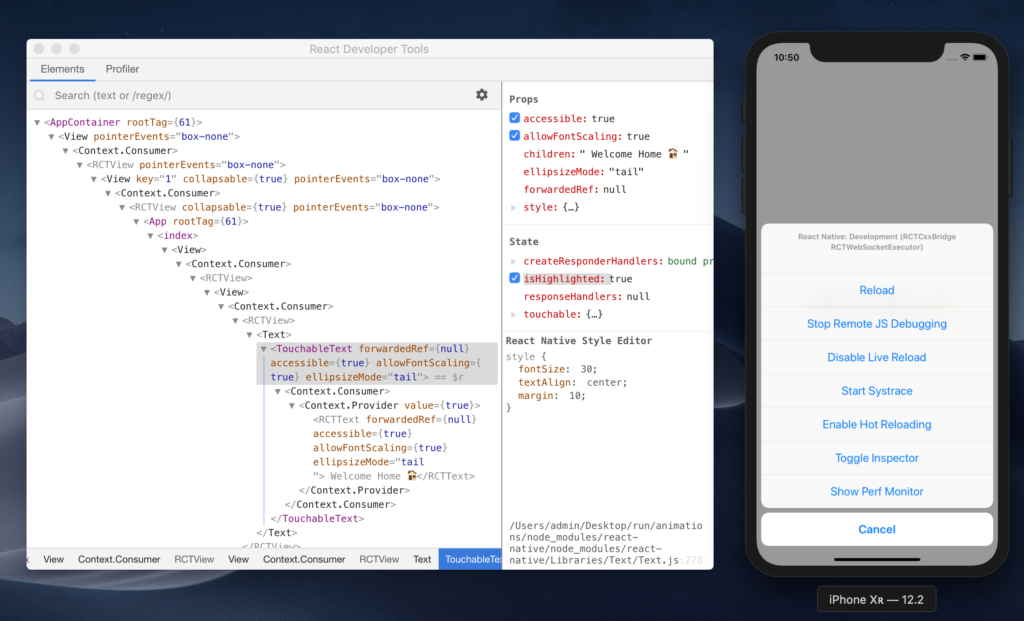
The in-app developer menu is your first gate for debugging React Native, it has many options which we can use to do different things. Let’s break down each option.

  • Reload: reloads the app
  • Debug JS Remotely: opens a channel to a JavaScript debugger
  • Enable Live Reload: makes the app reload automatically on clicking Save
  • Enable Hot Reloading: watches for changes accrued in a changed file
  • Toggle Inspector: toggles an inspector interface, which allows us to inspect any UI element on the screen and its properties, and presents and interface that has other tabs like networking, which shows us the HTTP calls, and a tab for performance.

The post 6 Tools for Debugging React Native appeared first on SitePoint.


UniCredit Bank Suffers 'Data Incident' Exposing 3 Million Italian Customer Records

UniCredit, an Italian global banking and financial services company, announced today that it suffered a security incident that leaked some personal information belonging to at least 3 million of its domestic customers. Officially founded in 1870, UniCredit is Italy's biggest banking and financial services and one of the leading European commercial banks with more than 8,500 branches across 17

Why Your Agency Should Offer Managed Cloud Hosting to Clients

This article was created in partnership with Cloudways. Thank you for supporting the partners who make SitePoint possible.

When it comes to end-to-end services, digital agencies offer an impressive range. From requirement analysis to post-deployment maintenance, these agencies do everything to make sure that their clients are able to fully leverage their projects for maximum business efficiency.

In this backdrop, many agencies (particularly those that deal with web-based projects) also offer hosting as part of their services to their customers. While small and up-and-coming digital agencies might not have hosting on their service brochure, mid-tier and top-shelf agencies see hosting as an integral service offering to their clients.

Setting up Hosting for Customers

For a web-based project, web hosting is an essential component that determines the success (and failure) of the project. Since the agency has developed the project, many clients trust the agency-managed hosting for their project.

High-performance applications (online stores and CRM in particular) demand a hosting solution that’s able to keep pace with the high request volume and a large number of concurrent connections. Clients with these projects can’t compromise on the post-deployment performance of the applications. As such, agencies prefer an in-house hosting setup that caters to the specific requirements of the projects.

Agencies Benefit From In-house Hosting

Before going into what benefits agencies get from an in-house hosting setup, it’s important to understand the major requirements of high-performance projects. Without going too much into the details, in-house hosting solutions are set up to make sure that custom-built projects continue to perform on the following parameters:

  • the number of visitors per hour/day/month
  • the number of simultaneous visitors
  • the maximum number of connections allowed
  • the number of simultaneous requests/orders
  • the size and complexity of the products catalog (number of products, product categories, attributes)
  • the content requirements and traffic on content assets such as blogs
  • the volume of search queries on the site
  • the size and connections on the database

With in-house hosting solutions, agencies (and their clients) get a whole range of benefits such as those outlined below.

Custom Hardware and Software

Hardware requirements for custom, high-performance projects generally include three components: CPU, RAM and Disk Space. Since each project has custom requirements that are often not available in off-the-shelf hosting solutions available in the market, agencies opt for setting up in-house hardware platforms for their customers.

Custom hardware setups usually cost more than the conventional, commercially available hosting hardware architecture. The cost of setting up and maintaining the hosting architecture is usually the responsibility of the dev agency, which usually bills the client for these services.

Another related (and in my opinion, more important) requirement of these projects is a custom environment that comprises an OS layer and a facilitation layer made of servers and caches. A custom environment allows agencies to build their projects without worrying about conflicts with the OS and server software required to execute the codebase. Thanks to in-house hosting, digital agencies can completely customize the OS and server layer to the project specifications.

End-to-End Management of Project Hosting

Project requirements change and clients often revise their requirements and scope. These changes also impact the hosting requirements and specifications. Since the hosting process is being managed in-house, the agency can take proactive actions to improve hosting setup specifications and ensure continued performance for the application.

Passive Income Stream

In almost all cases, agency-managed hosting solutions are built and maintained on the client’s dollars. The agency proposes hosting setup specifications and sets it up once the client pays for it. Once the setup is active, the client pays for the maintenance and upkeep of the hosting solution. This is a passive income channel that is often an important supplement to agency revenues.

Challenges In-agency Managed Hosting

Despite the benefits, managing an in-house hosting setup can prove to be a drag on the agency operations. In particular, agency-managed hosting causes the following challenges for the business processes.

Hosting Architecture Requires Continuous Attention

Since this is an in-house managed hosting solution, it’s obvious that the agency is responsible for keeping both the hardware and software layers operational. While the hardware layer (the physical server machines and the networking equipment) have a lower ratio of failure, it’s important to note that the software components of the hosting solution require detailed attention and upkeep.

Both hardware and software vendors regularly release patches that fix bugs and enhance product functionality. In many cases, these patches are mission-critical and essential for the continued performance of the project’s hosting. In in-house managed hosting, this is the responsibility of a dedicated team that performs no other function.

The Constant Need for Security

Web servers are the prime target of cybercriminals because of the wealth of information and user data on them. The problem with server security is that it's a full-time function that requires specialists on the team. The same goes for clients’ applications (CMSs such as WordPress are especially vulnerable) that could potentially open up security loopholes in the server and application security. Not many agencies can afford a dedicated infosec expert on the payroll. Thus, there's always the danger that clients’ applications can get hacked because the agency-managed hosting is unable to maintain the required security standards.

Sysadmins Prove to be an Overhead

Sysadmins are among the highest-paid professions in the ICT industry, and rightly so! They manage entire data centers and handle all aspects of hosting servers from provisioning to maintenance. The problem with sysadmins is the high recruitment and operational costs of these professionals. Thus, hiring a sysadmin to manage in-house hosting is a serious decision that's out of the budget of many dev agencies.

Deviation from the Core Business

Digital agencies are in the business of building applications and custom projects that create value for their clients. An in-house hosting solution requires competence that lies outside the normal scope of the dev agencies. In addition, managing hosting solutions require expenses that eat away into profits without generating enough revenue to justify their inclusion in business offerings.

Shared Hosting is a False Start

The good news is that many agencies are aware of the issues with in-house, agency-managed hosting and have come to realize that this is not the ideal solution for managing clients’ hosting focused expectations.

However, since the clients’ requirements continue to grow and the need for hosting solutions for custom-developed apps is on the rise, a number of agencies have turned to shared hosting as an alternative to agency managed in-house hosting solutions.

When opting for shared hosting solutions, agencies try to reduce the cost of hosting solutions while providing a comparable hosting solution to the clients.

Before going into the description of why shared hosting solutions are in fact counterproductive for dev agencies, it's important to understand how shared hosting solutions work.

Shared Hosting in a Nutshell

As the name implies, shared hosting is a solution where several websites/applications are hosted on a single physical server. This means that the physical resources (CPU, RAM, Disk space and bandwidth (in some cases) get shared among the websites hosted on the server.

While this is not a bad solution per se, it's not the right ft for high-performance applications. These applications have a minimum server resource requirements that often exceed the allocated “quota” allocated by the shared hosting server.

Many digital agencies try to integrate shared hosting solutions in their customer-focused services by eliminating sysadmins from the equation and asking the developers to manage the hosting servers for the clients.

The post Why Your Agency Should Offer Managed Cloud Hosting to Clients appeared first on SitePoint.


Researcher Finds Vulnerability in Japanese Hotels Tapia Robots

Internet-of things is seemly always vulnerable to security flaws. From individual users to the corporate sector, these IoT flaws have

Researcher Finds Vulnerability in Japanese Hotels Tapia Robots on Latest Hacking News.


17 Malicious iPhone Apps On App Store Found Targeting Users With Adware

Scammers and criminal hackers always seem to find a way to ditch various security checks implemented by the tech giants.

17 Malicious iPhone Apps On App Store Found Targeting Users With Adware on Latest Hacking News.


Samsung Patched The Galaxy S10 Fingerprint Reader Flaw

A few days earlier, Samsung’s flagship phone came into limelight owing to a glitch. The fingerprint reader of Galaxy S10

Samsung Patched The Galaxy S10 Fingerprint Reader Flaw on Latest Hacking News.


FTC Banned Retina-X Spying Apps Until Proven For Legitimate Use

The Federal Trade Commission has taken some robust steps towards ensuring user privacy. Reportedly, the FTC has banned Retina-X Studios

FTC Banned Retina-X Spying Apps Until Proven For Legitimate Use on Latest Hacking News.


Saturday, 26 October 2019

New PHP Flaw Could Let Attackers Hack Sites Running On Nginx Servers

If you're running any PHP based website on NGINX server and have PHP-FPM feature enabled for better performance, then beware of a newly disclosed vulnerability that could allow unauthorized attackers to hack your website server remotely. The vulnerability, tracked as CVE-2019-11043, affects websites with certain configurations of PHP-FPM that is reportedly not uncommon in the wild and could

Unsecured Adobe Server Exposes Data for 7.5 Million Creative Cloud Users

The U.S. multinational computer software company Adobe has suffered a serious security breach earlier this month that exposed user records' database belonging to the company's popular Creative Cloud service. With an estimated 15 million subscribers, Adobe Creative Cloud or Adobe CC is a subscription service that gives users access to the company's full suite of popular creative software for

Friday, 25 October 2019

Week in security with Tony Anscombe

This week, ESET researchers released their findings on Winnti Group's MSSQL backdoor and showed how they'd tracked down the operator of an adware campaign that victimized millions of Android users.

The post Week in security with Tony Anscombe appeared first on WeLiveSecurity


Verizon, AT&T, Sprint and T-Mobile to replace SMS with RCS Messaging in 2020

Mobile carriers in the United States will finally offer a universal cross-carrier communication standard for the next-generation RCS messaging service that is meant to replace SMS and has the potential to change the way consumers interact with brands for years to come. All major United States mobile phone carriers, including AT&T, Verizon, T-Mobile, and Sprint, have joined forces to launch a

Your smart doorbell may be collecting more data than you think, study finds

The study tested 81 IoT devices to analyze their behavior and tracking habits, and in some cases brought rather surprising findings

The post Your smart doorbell may be collecting more data than you think, study finds appeared first on WeLiveSecurity


B2B Payment Service Billtrust Went Down After Ransomware Attack

One more firm has now emerged as a victim of a ransomware attack. This time, it is the B2B online

B2B Payment Service Billtrust Went Down After Ransomware Attack on Latest Hacking News.


Thursday, 24 October 2019

How to Build a Tic Tac Toe Game with Svelte

How to Build a Tic Tac Toe Game with Svelte

Svelte is a next generation way of building user interfaces.

While frameworks like React, Vue and Angular do the bulk of their work in the browser, Svelte takes it to the next level. It does its work when you build the app and it compiles your Svelte app to efficient vanilla JavaScript. So you get the best of both worlds. You write your code in Svelte which makes it easy to read, re-use and all the other benefits you get when you use a framework, and it makes for a blazing-fast web app as it complies down to vanilla JavaScript so that you don’t have the overhead of the JavaScript framework you’re using.

Svelte allows you to write less code. It also doesn’t use the concept of the Virtual DOM popularized by React. It instead surgically updates the DOM when the state of the app changes so the app starts fast and stays fast.

Prerequisites

For this tutorial, you need a basic knowledge of HTML, CSS and JavaScript.

You must also have installed the latest version of Node.js.

We’ll also be using npx, which comes installed by default with Node.js.

Throughout this tutorial we’ll be using yarn. If you don’t have yarn already installed, install it from here.

To make sure we’re on the same page, these are the versions used in this tutorial:

  • Node 12.10.0
  • npx 6.11.3
  • yarn 1.17.3

Getting Started with Svelte

In this tutorial, we’ll be building a Tic Tac Toe game in Svelte. By the end, you’ll be able to get up and running quickly with Svelte and get started in building your own apps in Svelte.

To get started, we must scaffold our app using degit. degit is more or less the same as git clone, but much quicker. You can learn more about it here.

Go ahead and make a new project by typing the following in the terminal:

$ npx degit sveltejs/template tic-tac-toe-svelte

npx lets you use the degit command without installing it globally.

Before npx, we would have to do the two following steps to achieve the same result:

$ npm install --global degit
$ degit sveltejs/template tic-tac-toe-svelte

Thanks to npx, we don’t bloat our global namespace, and we always use the latest version of degit.

degit clones the repo https://github.com/sveltejs/template into a tic-tac-toe-svelte folder.

Go ahead into the tic-tac-toe-svelte directory and install the dependencies by typing the following in the terminal:

$ cd tic-tac-toe-svelte
$ yarn

Now run the application by typing the following in the terminal:

$ yarn dev

Now open up the browser and go to http://localhost:5000 and you should see the following:

Svelte - Hello World

If you go into the src/ folder, you’ll see two files, App.svelte and main.js. main.js is the entry point of a Svelte app.

Open up the main.js and you should see the following:

import App from './App.svelte';

const app = new App({
    target: document.body,
    props: {
        name: 'world'
    }
});

export default app;

The above file imports App.svelte and instantiates it using a target element. It puts the component on the DOM’s document.body. It also passes name props to the App component. This prop will be accessed in App.svelte.

Components in Svelte are written using .svelte files which contain HTML, CSS and JavaScript. This will look familiar if youse worked with Vue.

Now open up App.svelte and you should see the following:

<script>
    export let name;
</script>

<style>
    h1 {
        color: purple;
    }
</style>

<h1>Hello {name}!</h1>

Firstly, we have the script tag inside, in which we have a named export called name. This should be similar to the prop mentioned in main.js.

Then we have a style tag that lets us style all the elements in that particular file, which is scoped to that file only so there’s no issue of cascading.

Then, at the bottom, we have an h1 tag, inside which we have Hello {name}!. The name in curly brackets will be replaced by the actual value. This is called value interpolation. That’s why Hello world! is printed on the screen.

Basic Structure of a Svelte Component

All .svelte files will basically have the following structure:

<script>
    /* Javascript logic */
</script>

<style>
    /* CSS styles */
</style>

<!-- HTML markup -->

The HTML markup will have some additional Svelte-specific syntax, but the rest is just plain HTML, CSS and JavaScript.

Making Tic Tac Toe in Svelte

Let’s get started with building our Tic Tac Toe game.

Replace main.js with the following:

import App from './App.svelte'

const app = new App({
  target: document.body,
})

export default app

We’ve basically removed the props property from App component instantiation.

Now replace App.svelte with the following:

<script>
  const title = "Tic Tac Toe";
</script>

<svelte:head>
  <title>{title}</title>
</svelte:head>

<h1>{title}</h1>

Here, we initialize a constant variable title with a string Tic Tac Toe.

Then, in the markup below, we use a special Svelte syntax, svelte:head, to set the title property in the head tag.

This is basically similar to doing this:

<head>
    <title>Tic Tac Toe</title>
</head>

But the advantage of using the svelte:head syntax is that the title can be changed at runtime.

We then use the same title property in our h1 tag. It should now look like this:

Svelte - Tic Tac Toe

Now create two other files in the src/ directory named Board.svelte and Square.svelte.

Open Square.svelte and paste in the following:

<script>
  export let value;
</script>

<style>
  .square {
    flex: 1 0 25%;
    width: 50px;
    height: 70px;
    background-color: whitesmoke;
    border: 2px solid black;
    margin: 5px;
    padding: 5px;
    font-size: 20px;
    text-align: center;
  }

  .square:hover {
    border: 2px solid red;
  }
</style>

<button class="square">{value}</button>

Basically, we’re creating a button and styling it.

Now open up Board.svelte and paste the following:

<script>
  import Square from "./Square.svelte";
  let squares = [null, null, null, null, null, null, null, null, null];
</script>

<style>
  .board {
    display: flex;
    flex-wrap: wrap;
    width: 300px;
  }
</style>

<div class="board">
  {#each squares as square, i}
    <Square value={i} />
  {/each}
</div>

Here we’ve imported the Square component. We’ve also initialized the squares array, which will contain our X and 0’s data which is currently null.

The post How to Build a Tic Tac Toe Game with Svelte appeared first on SitePoint.


Facebook lays out plan to protect elections

How is the social network preparing to curtail the spread of misinformation as the election season heats up?

The post Facebook lays out plan to protect elections appeared first on WeLiveSecurity